MO EOP control panel - Super admin guide
General information 
Solution overview
MO EOP service is an information system developed for the state of Missouri (MO) for accessing and managing emergency operations plans (EOPs). The purpose of the EOP is to outline emergency management structure and define actions and roles necessary to provide a coordinated response during an emergency event. The plan provides general guidance for all levels of emergency management and applies best practices to mitigate loss of life or damage to property and reinforce continuity of operations.
Thus, the MO EOP solution is used to facilitate the response in emergency situations, mainly in educational institutions. It provides fast and easy access to procedures and processes created specifically to ensure safety and protection of students and staff. All EOPs account for local specifics and the types of potential hazards. Comprehensive resources are used to proactively inform about correct behavior in emergencies as well as to provide the first respondents (firemen, policemen etc.) with required details allowing to choose the best course of action.
The service works as a combination of web and mobile applications with the web control panel being the main tool for managing EOPs.
The level of access and scope of rights and permissions in the system are based on the following user roles:
-
Super admin
-
District admin
-
Facility admin
-
User
-
First respondent
Depending on the role, the user can perform operations, for example, create, update, delete plans and procedures, within the entire system, within their district, within their facility (college, school) or simply can access available documentation on demand.
This document describes MO EOP control panel functionality for a Super admin.
Supported configurations
Web interface
Operating System:
Mac OS 10.14.4,
Windows 10 Pro Version 1803, OS Build 17134.753
Browser:
Google Chrome Version 74+
Opera 60.0.3255.27+
Mobile app
Android: Android OS v.4.1 and above
IPhone: iOS v.10 and above
Registration and authorization 
Registration
In the current implementation, all Super admin accounts are created by our technical team. Please contact us to add Super admins to your system.
All other users can join MO EOP only by invitation. Super admins can send invites to users with any lower ranking role (District admins, Facility admins, Users and First respondents). For more information on user roles, refer here.
Login
To log in to MO EOP:
-
Open https://moeop.org/.
-
Enter your email and password. You can use the eye icon to view the password in case you need to check if you’ve entered it correctly.
-
Click Login.
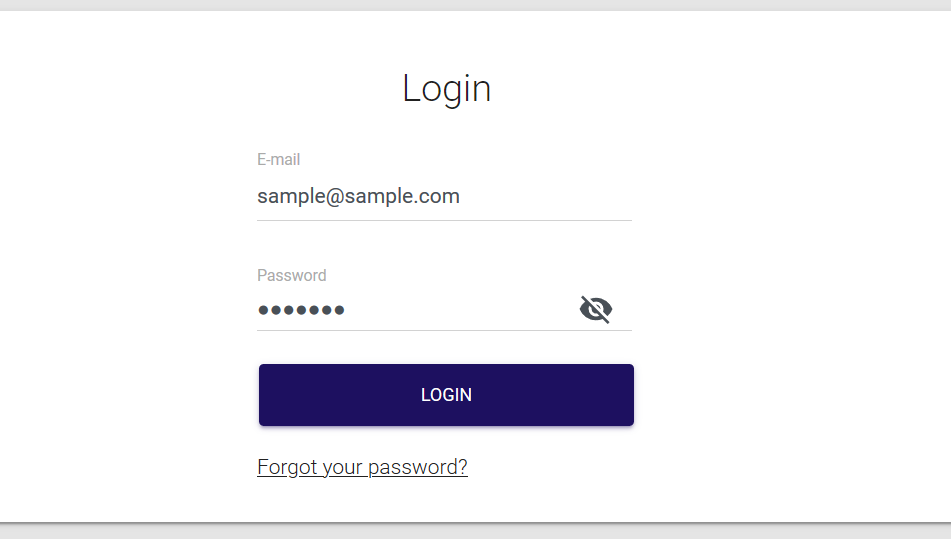
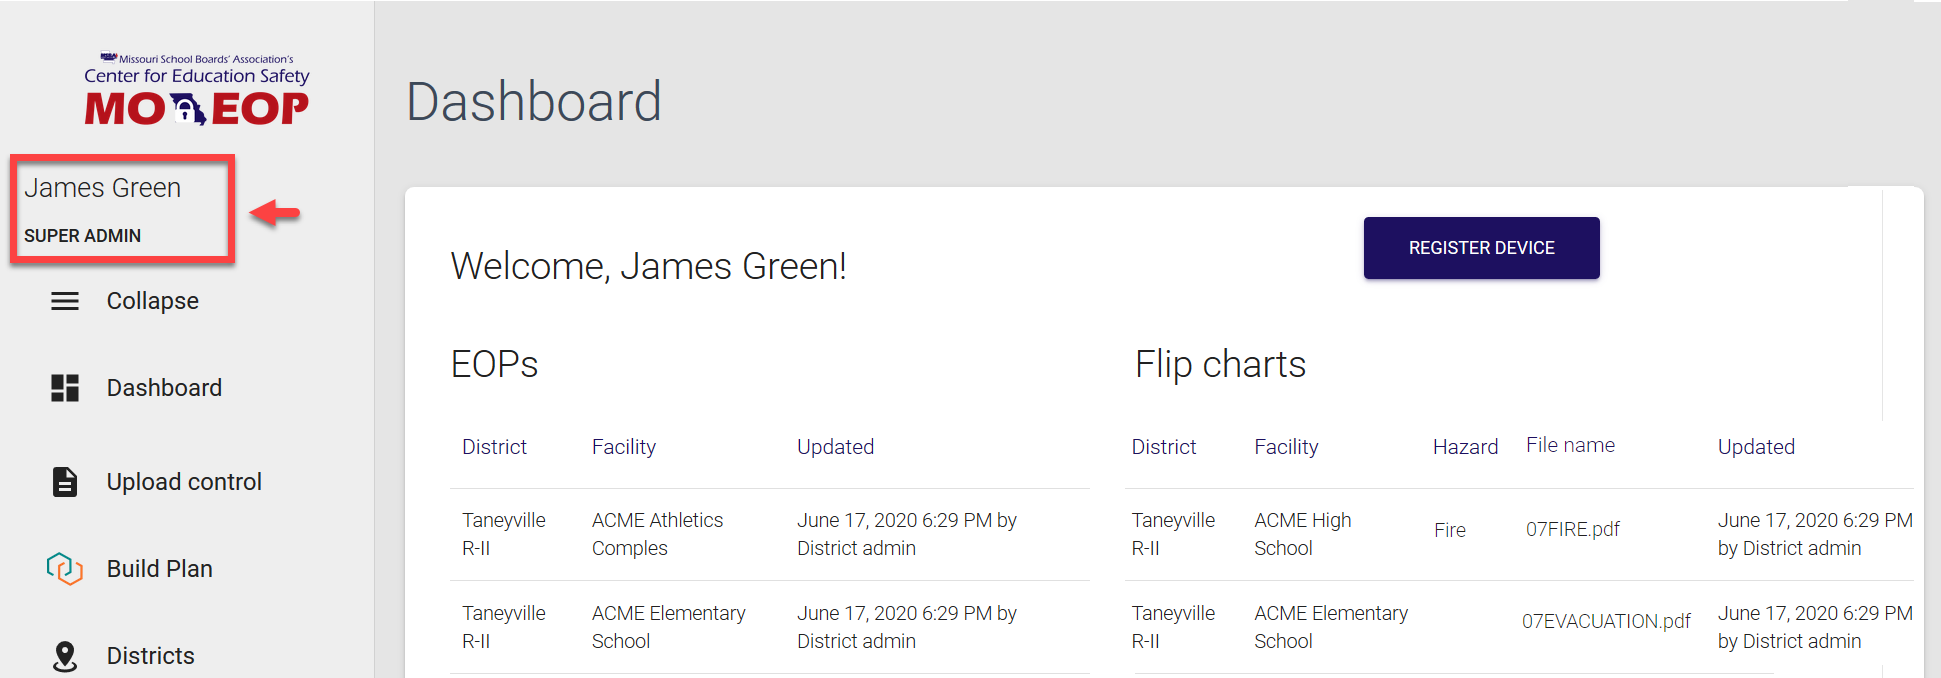
You are navigated to the MO EOP dashboard. Your name and role are displayed at the top of collapsible left-side navigation menu.
You session expires after 30 minutes of inactivity, and you’ll need to log in again to access MO EOP.
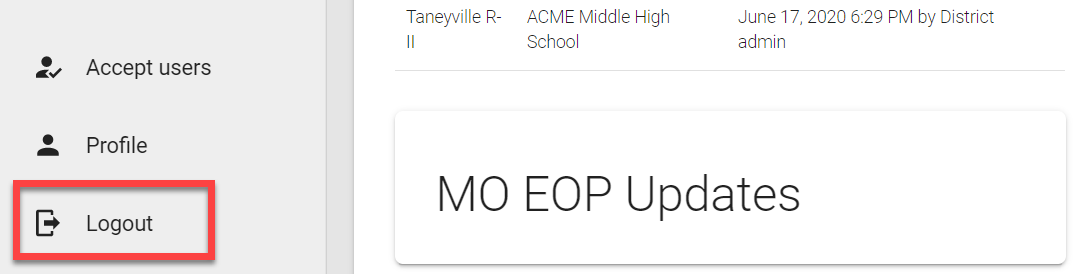
Logout
To log out of control panel, simply select the Logout option at the bottom of the left-side navigation menu.
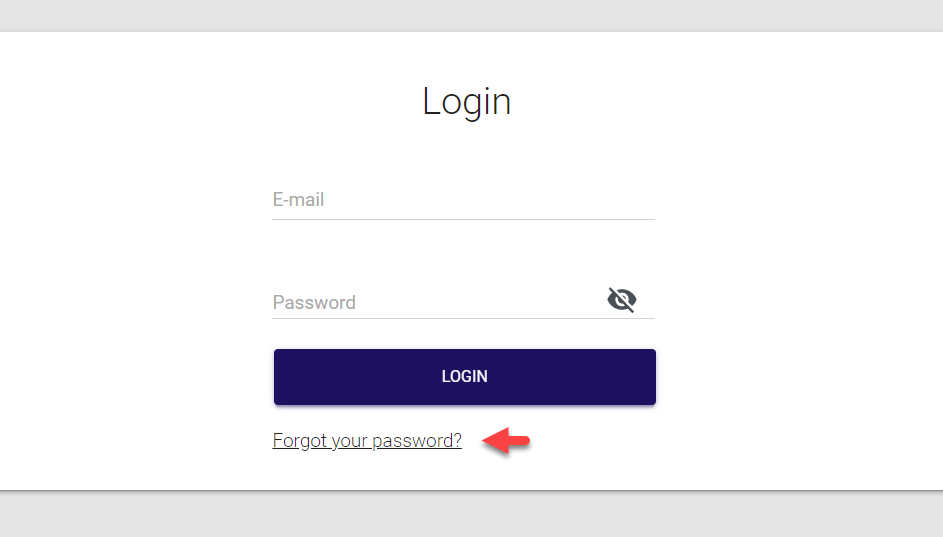
Password reset
If you forgot or lost your password, you can reset it by using the Forgot your password? option.
To reset your password:
- On the Login screen, click Forgot your password?
- Enter the email you used to register in the MO EOP system and click Recover password.

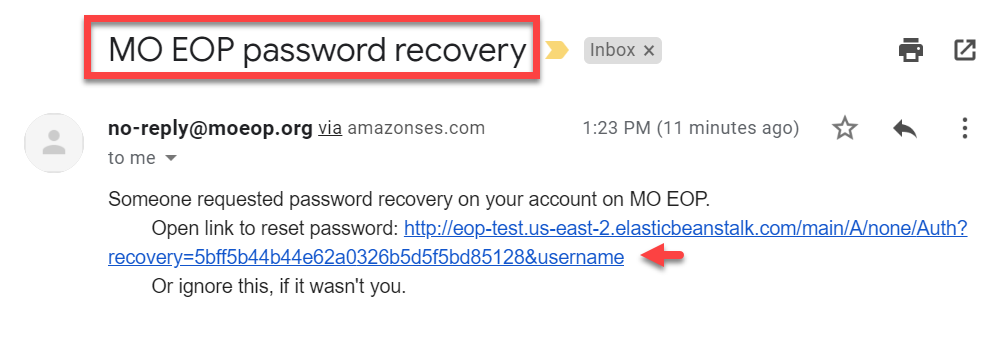
The confirmation screen is displayed. At the same time, an email is sent out to your registered account with password reset link and details.
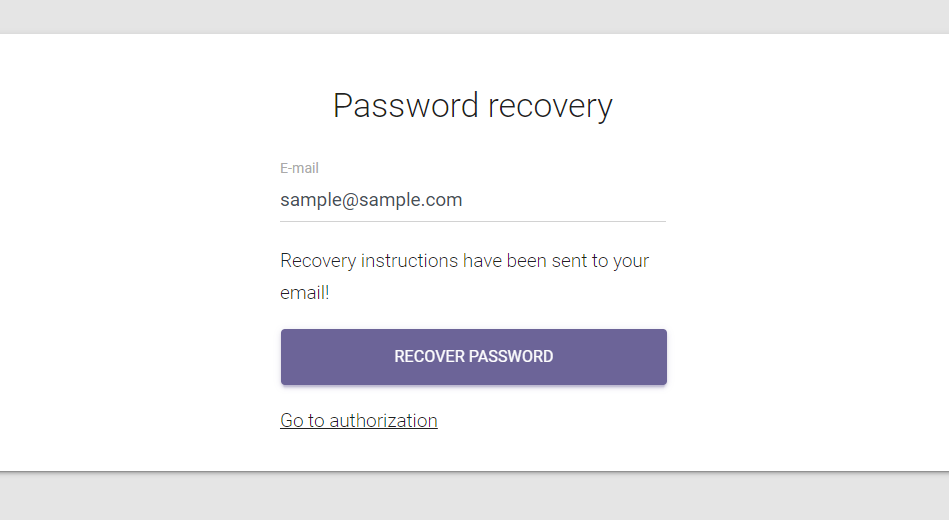
From both these screens, you have the option to return to the Login page by selecting Go to authorization, if needed.
- Go to your email account and open the MO EOP password recovery email. Use the link provided in the email to reset your password.
- On the Password reset screen, provide and confirm your updated details, and click Set new password.
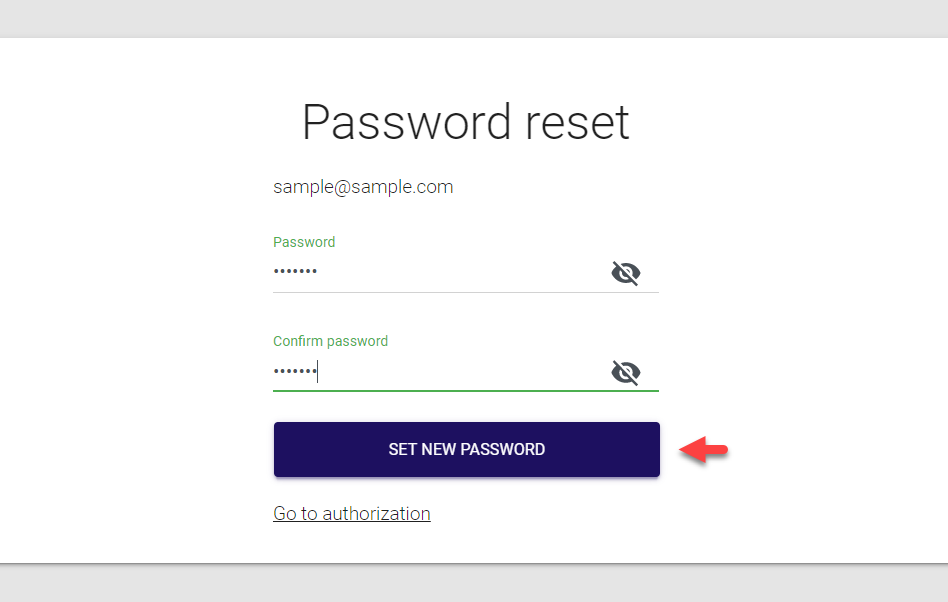
The confirmation message is displayed and your password is reset. Now you can return to the Login screen by selecting Go to authorization and sign in using your updated credentials.
MO EOP control panel overview 
The MO EOP control panel is divided into several sections according to the main functionality areas. Below is the brief description of MO EOP panel sections or tabs of the left-side navigation menu. Note that the menu can be collapsed or expanded as needed.
To collapse the menu, simply click Collapse at the top of the side navigation bar. To expand the menu, click the Collapse icon again.
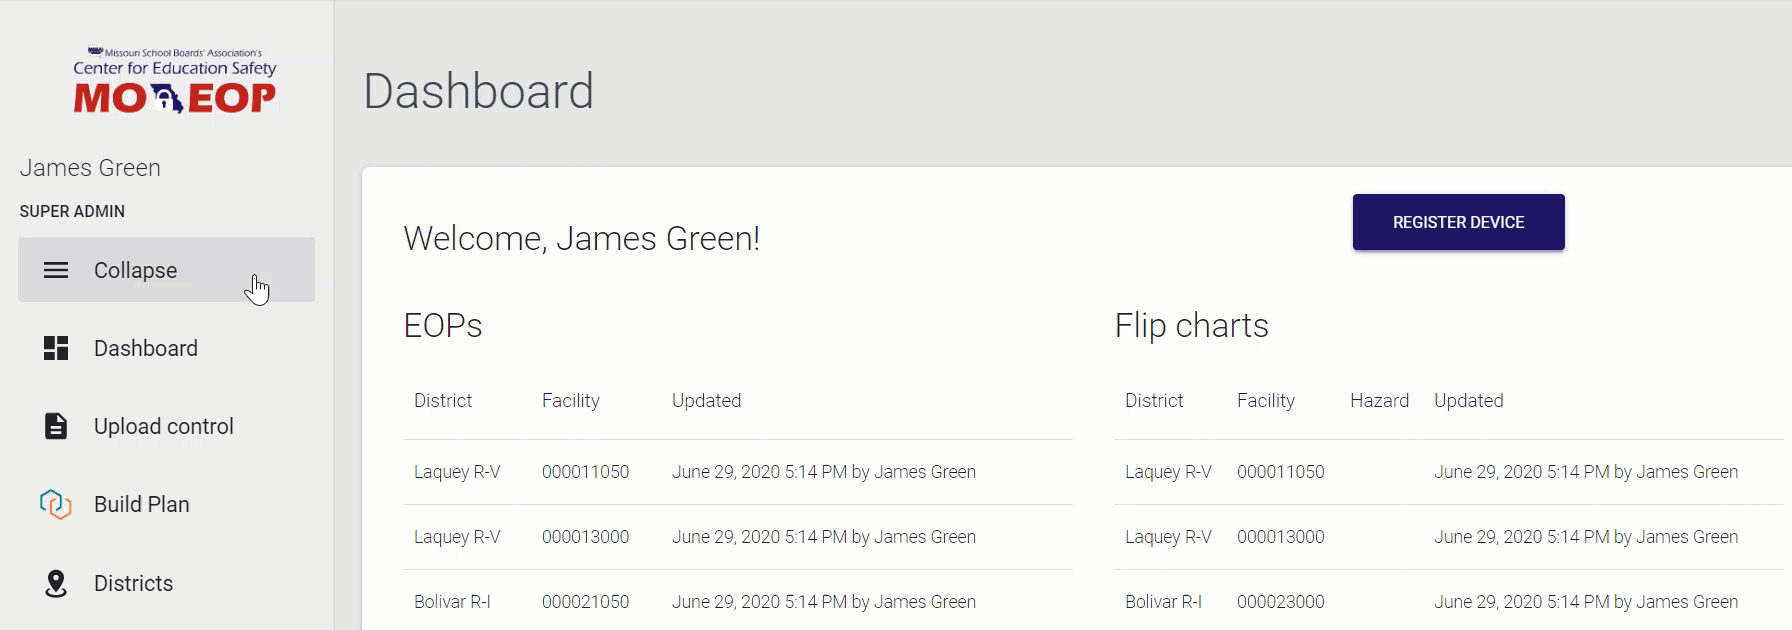
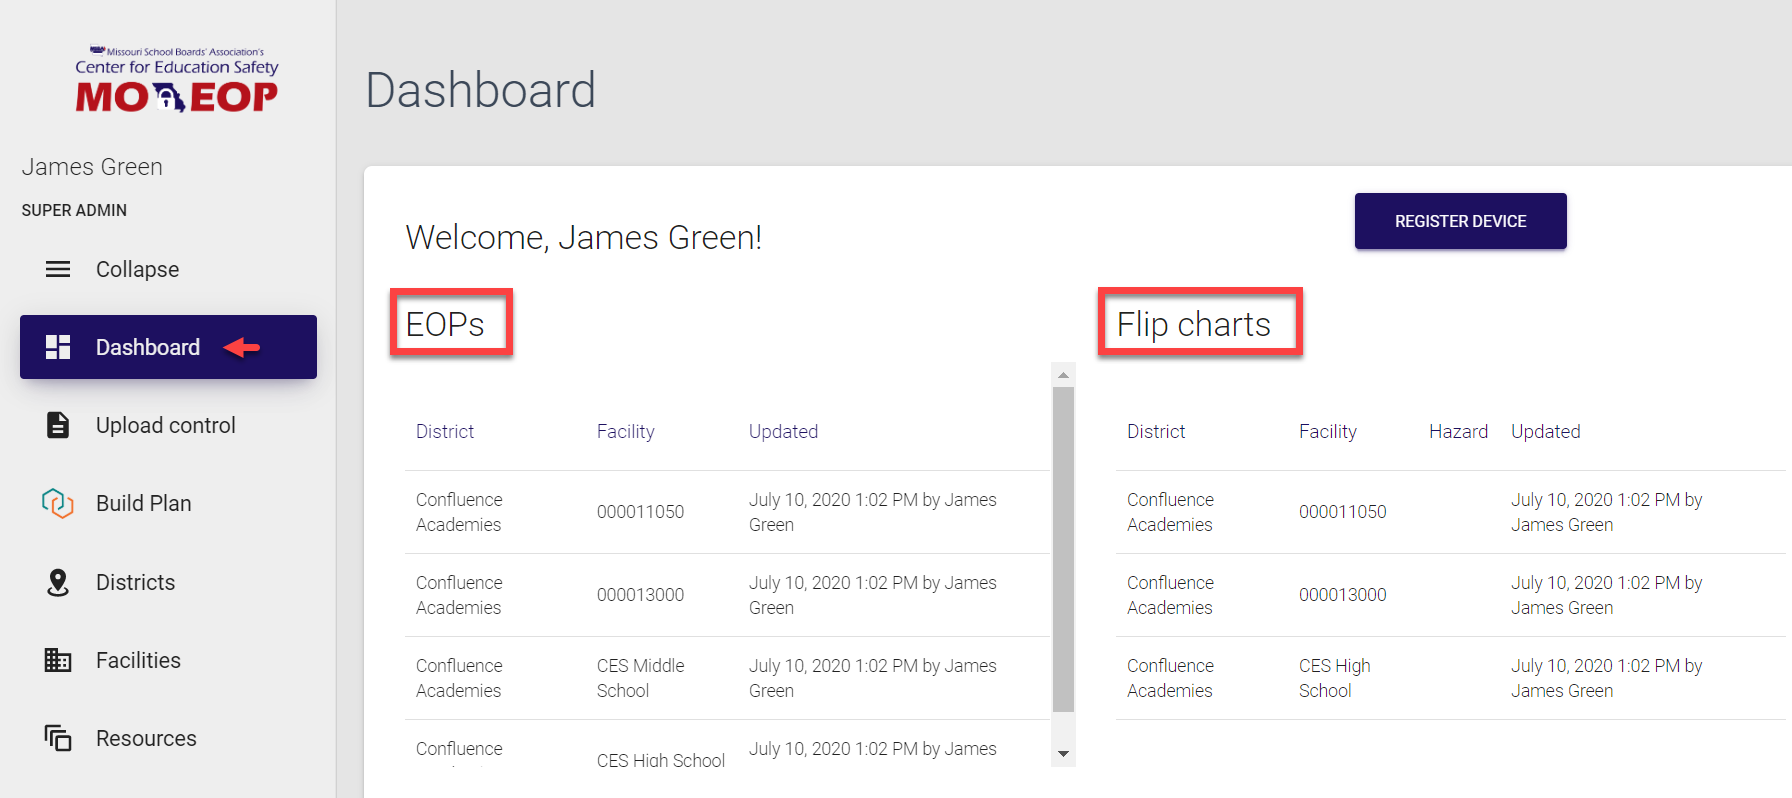
Dashboard
The MO EOP Dashboard provides a perfect at-a-glance overview of all key data points. Just on this one page, you can see everything that requires your attention or actions and helps to perform operations in a faster and easier way. The Dashboard for a Super admin includes the following sections:
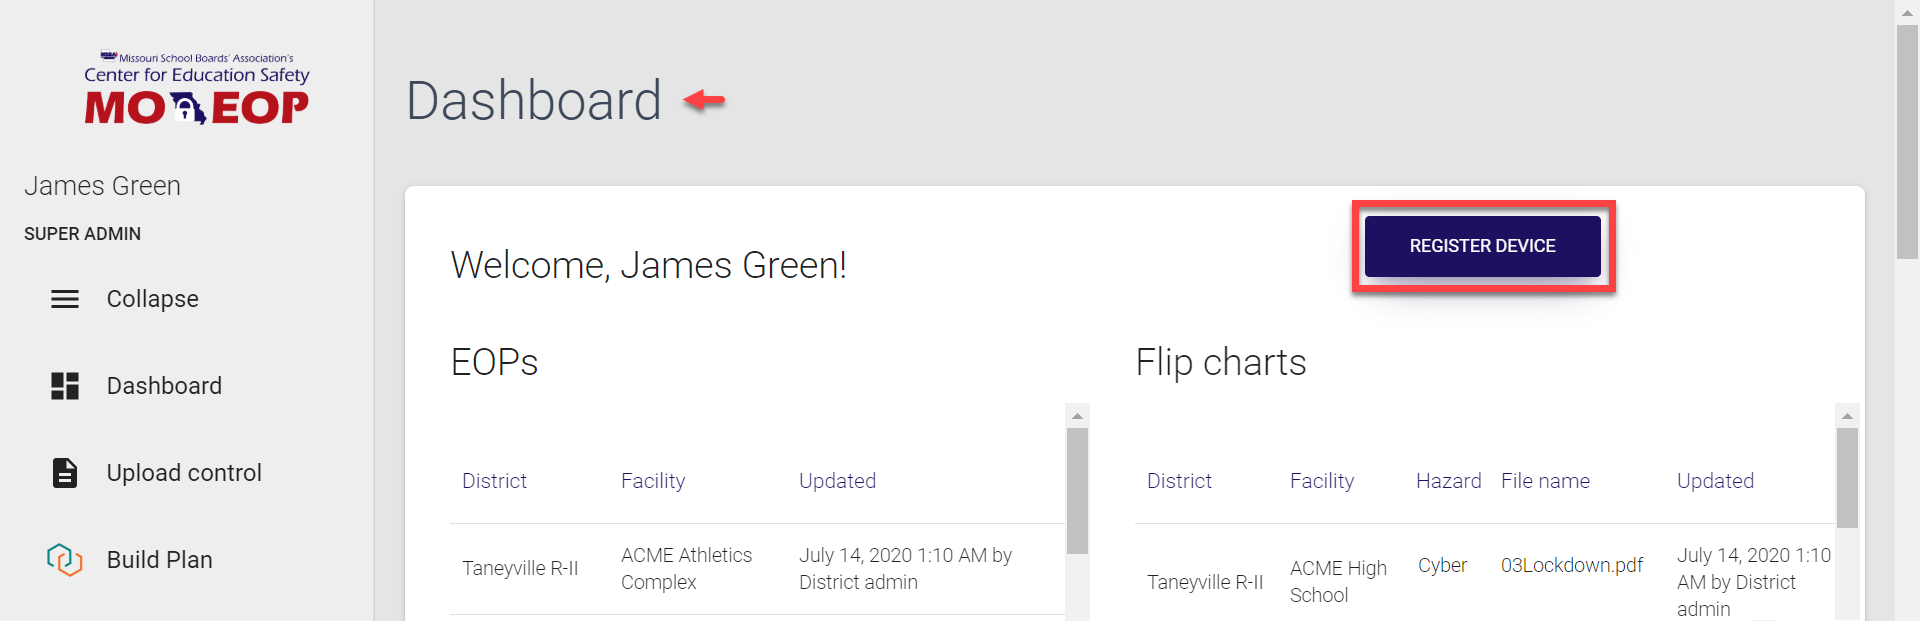
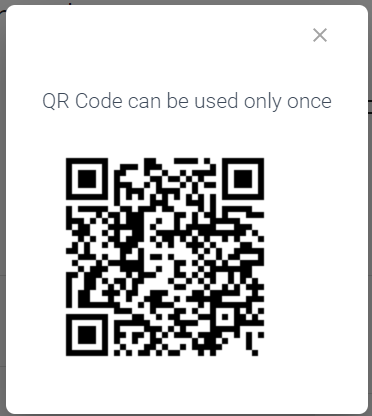
Register device
The Register device option is used for generating the QR code, which you can then scan with your mobile device to log in to MO EOP mobile app, rather than typing in your user name and password.
| Register device option on the Dashboard | Generated QR code for logging in to mobile app |
|---|---|
 |
 |
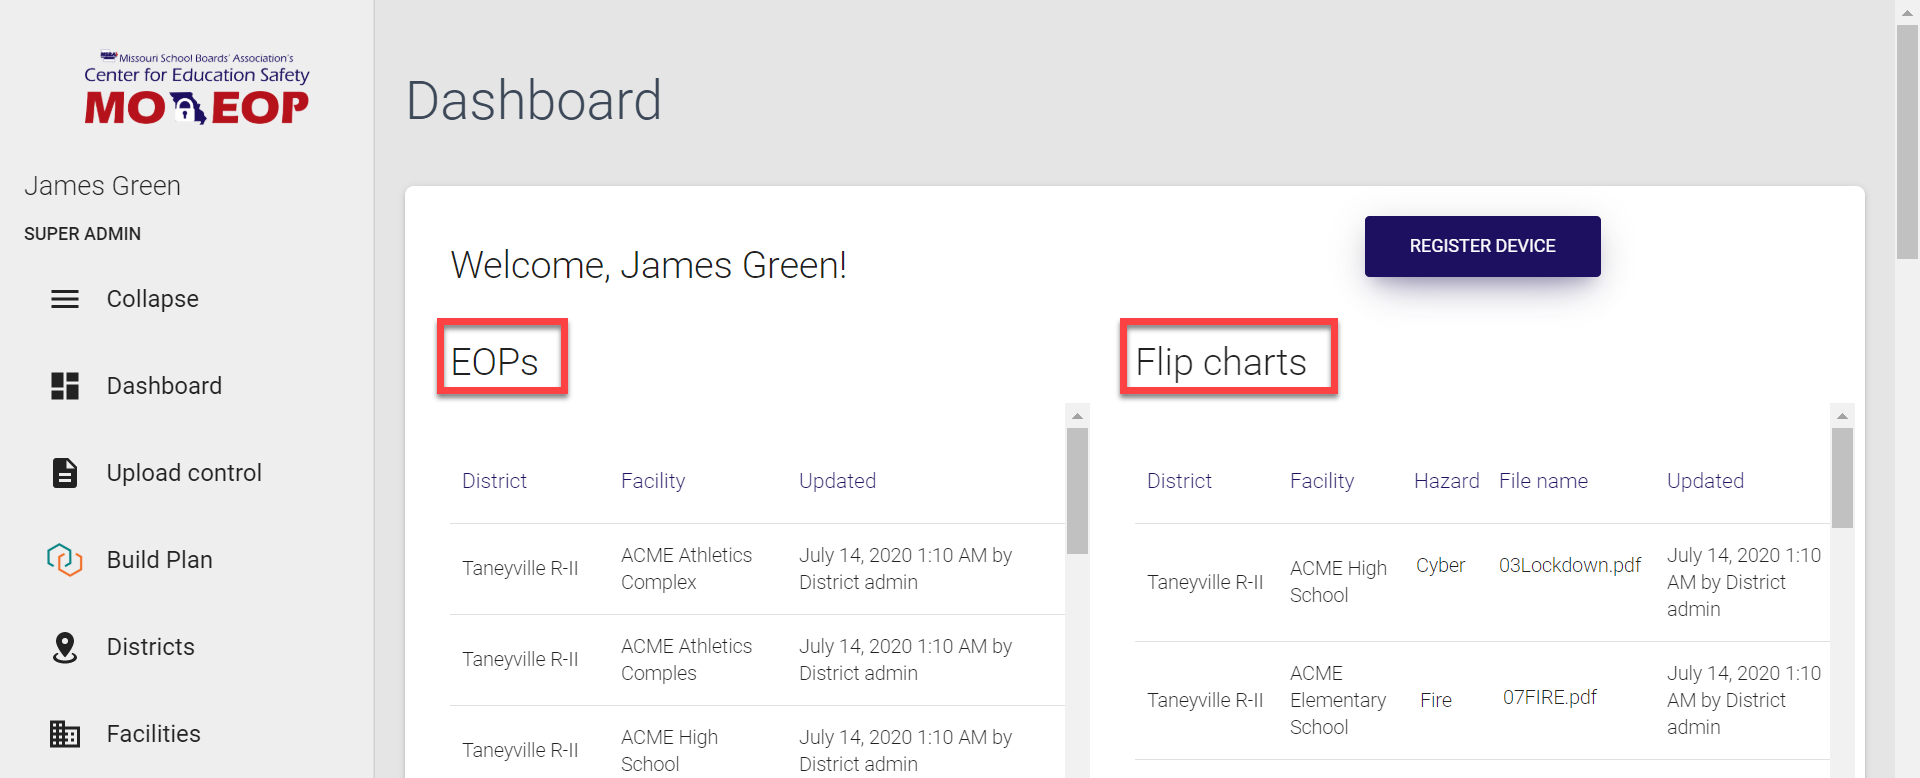
EOPs and Flip Charts
This section contains the latest EOPs and Flip charts uploaded to MO EOP panel via Upload control or added/changed manually. You can go through the list using the scroll bar and check out individual items. If you click any EOP or Flip chart entry, you will be navigated directly to the EOP / Flip chart page with the document already open for you in a pop-up window.
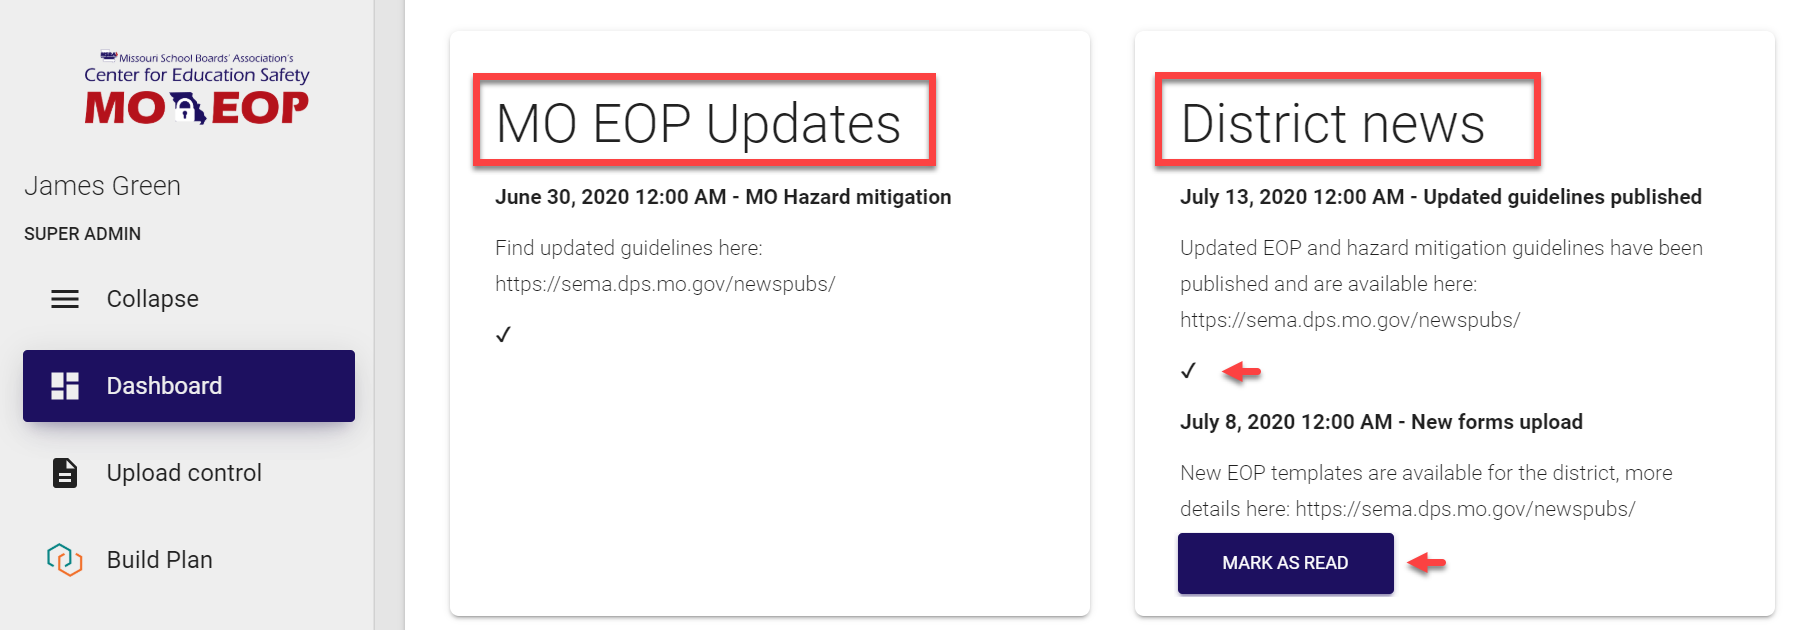
MO EOP updates and District news
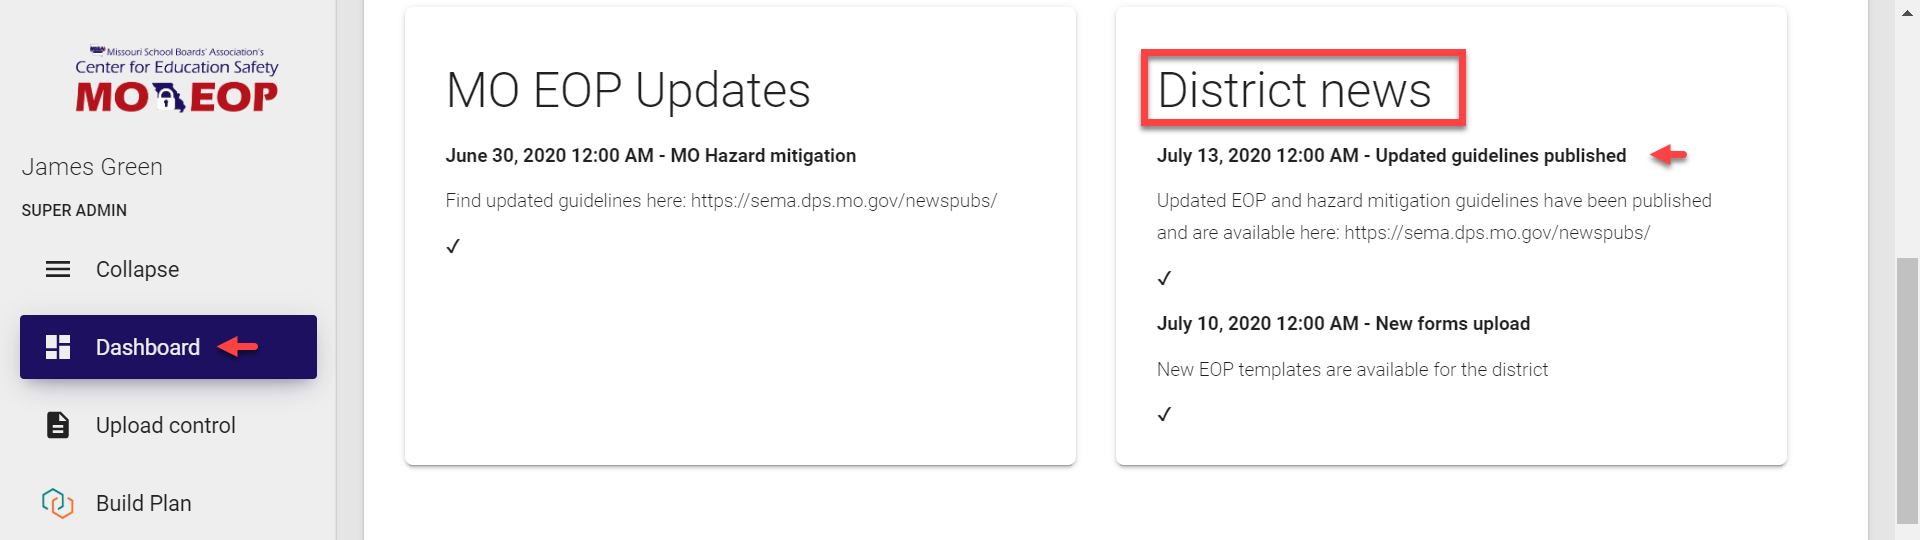
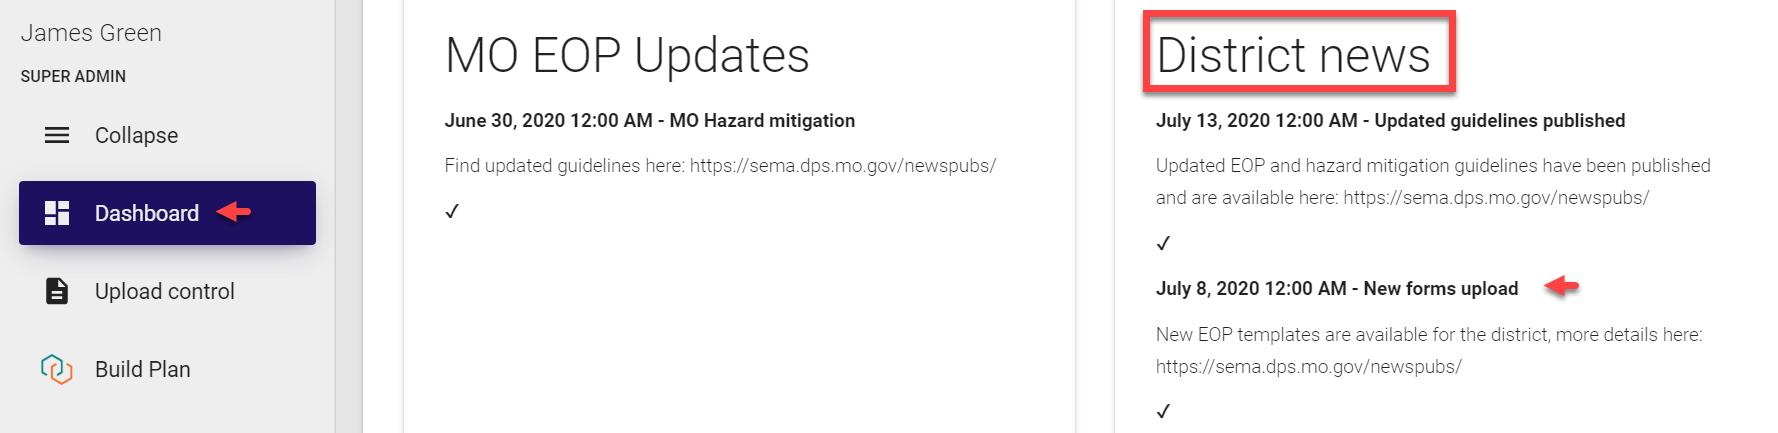
This section includes system-wide and district-wide news added by the Super admin. While MO EOP updates are displayed for all registered users, District news are shown only to Super admins and Users (registered with the User role) of corresponding districts. All new items have the Mark as read button below them, once the news piece is read and the button is clicked, it changes to the check mark.
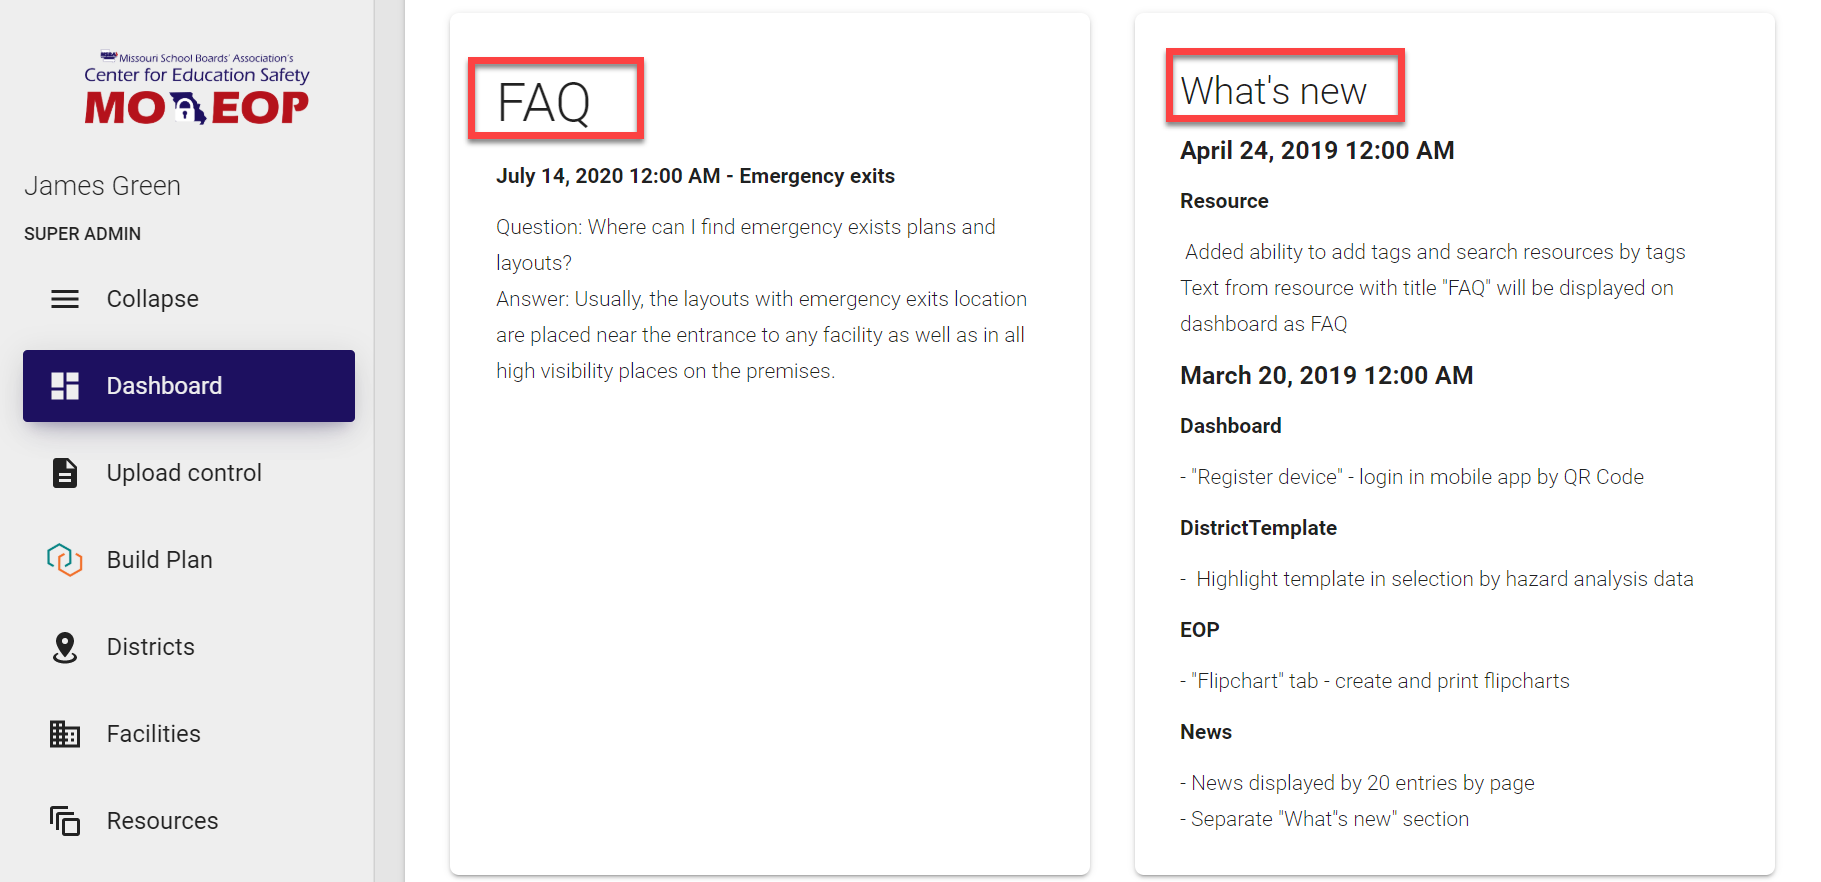
What’s new and FAQ
FAQs include important information in the “question-answer” format. FAQs can be added by Super admins in the News section. FAQs are available to all registered MO EOP users.
The What’s new section gives the overview of latest MO EOP app changes and updates. This is basically a short version of the application release notes.
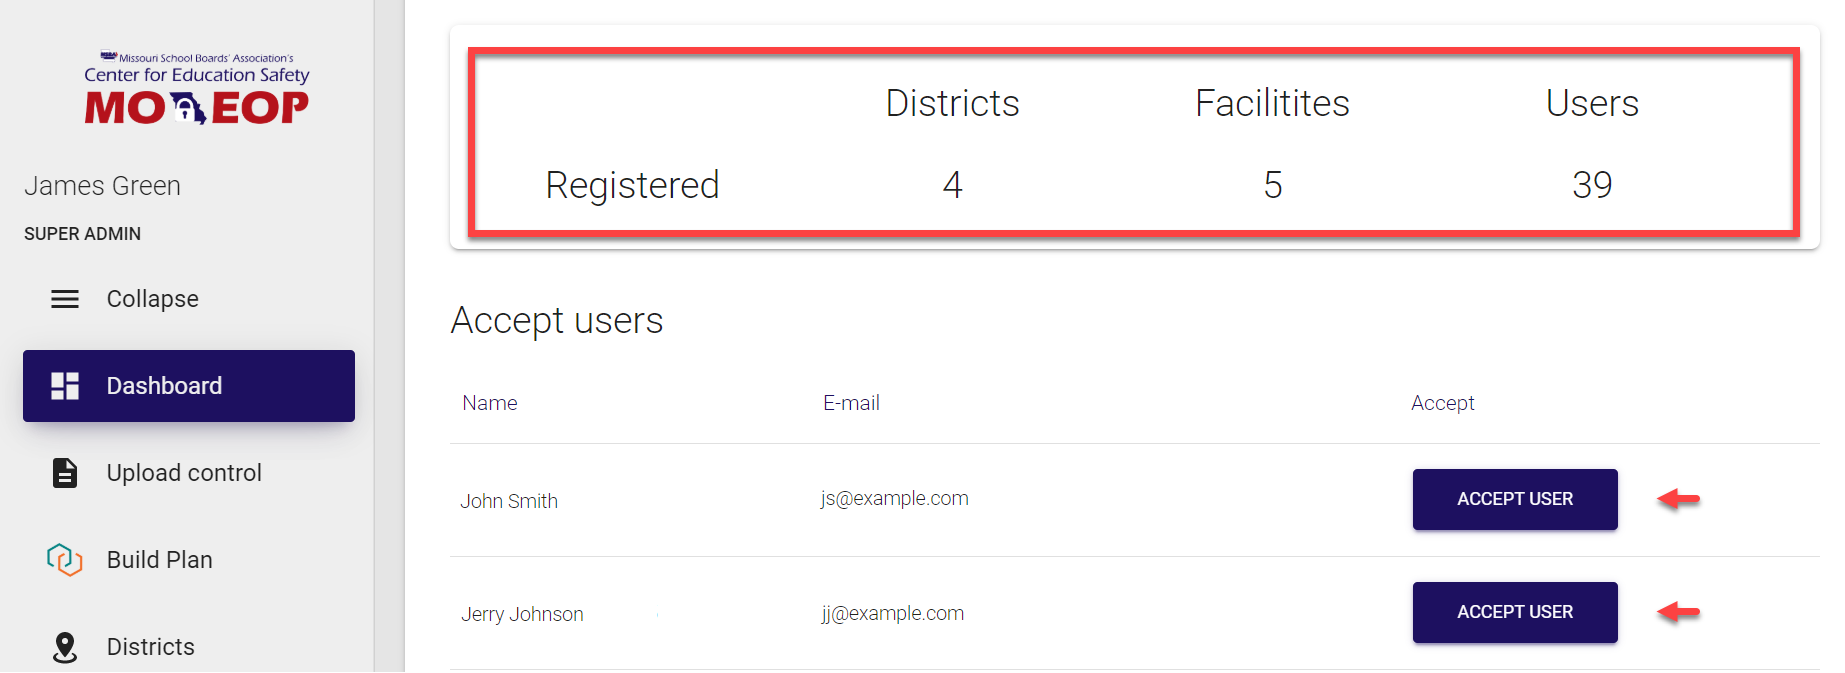
Users
Here you can find general information about the number of registered users as well as the number of districts/facilities they are distributed across. Besides, this section includes all pending user joining requests, so you can accept them right from this page by clicking Accept user.
Upload control
By default, all emergency operations plans (EOPs) as well as flip charts and resources are developed in the Trisk system. The created and approved materials can then be uploaded to MO EOP panel via the Upload control option. This is basically an interface between two systems, which allows to transfer required data and distribute it according to the area and user role. For more information, refer here.
The access to this section is provided only to Super admins.
Build plan
The Build plan section is used to provide fast and easy access to the Trisk system where EOPs, flip charts as well as any accompanying resources are developed by authorized users. You are immediately navigated from MO EOP to your Trisk account. For more information, refer here.
The access to this section is provided to:
-
Super admins
-
District admins
Districts
This sections contains the list of the US state districts in alphabetical order. The list is pre-populated and is based on our database, however, you can always add, modify or delete districts. For more information, refer here.
Whenever the data is transferred from Trisk to MO EOP, it is transferred by districts. Refer to Upload control.
The access to this section is provided only to Super admins.
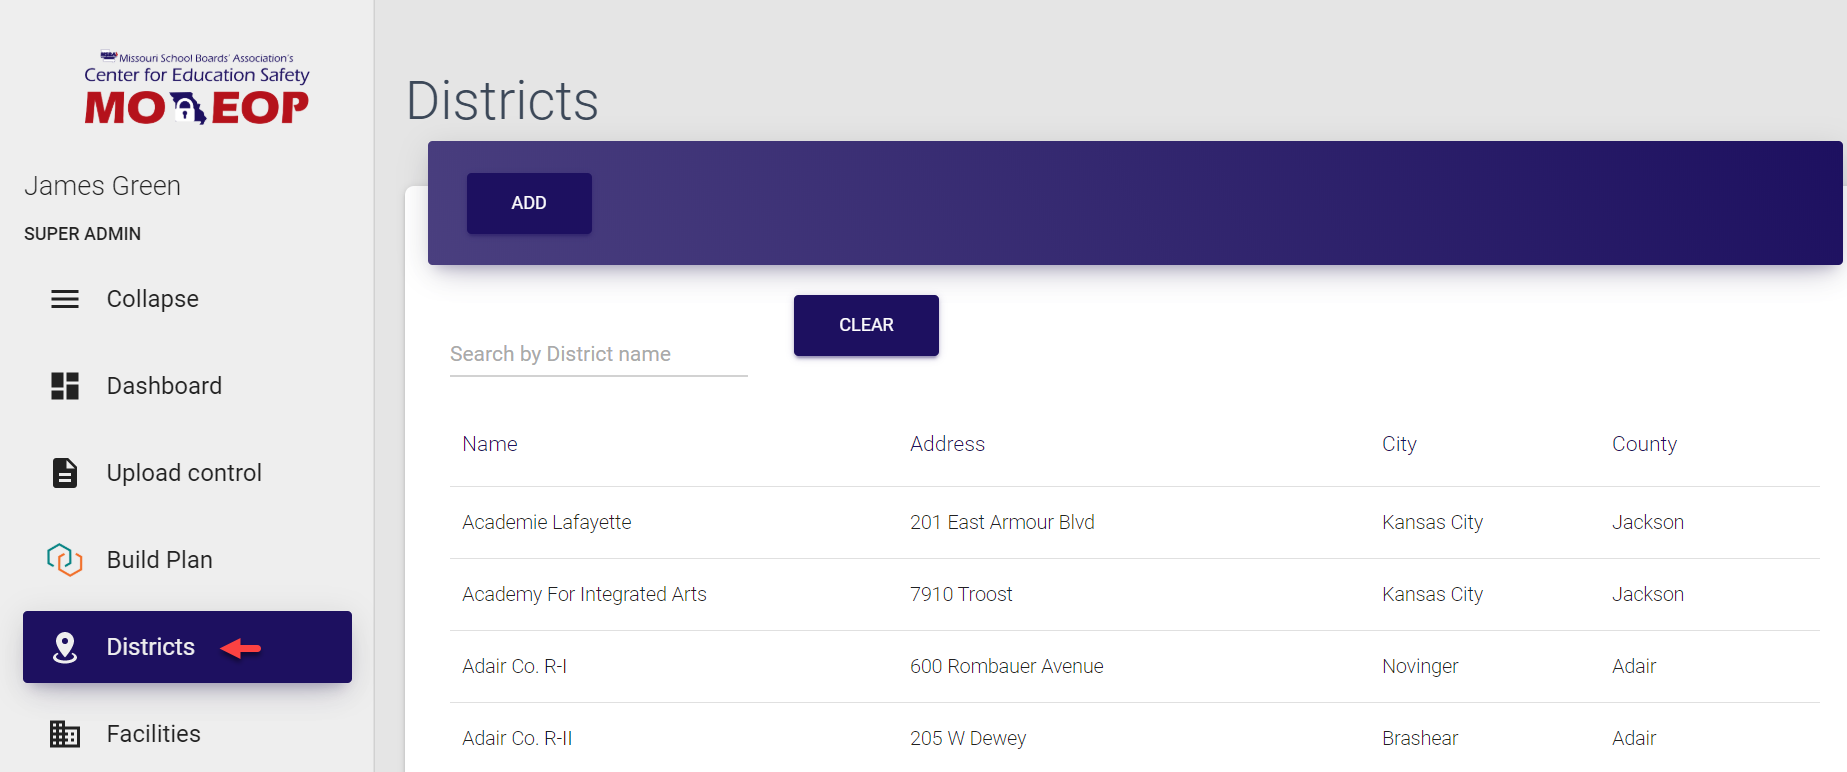
Here, you can search for entries and open any entry by clicking it.

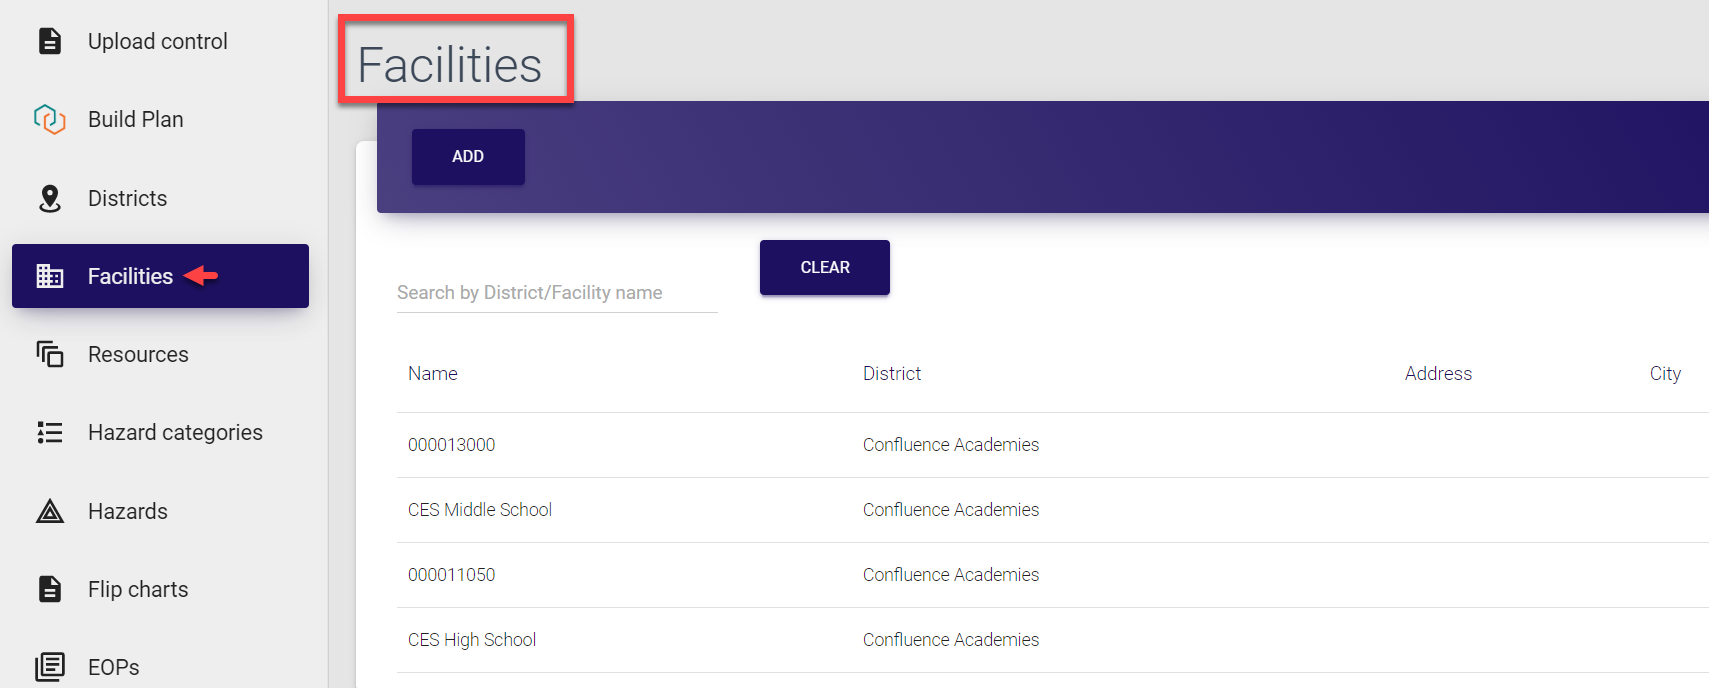
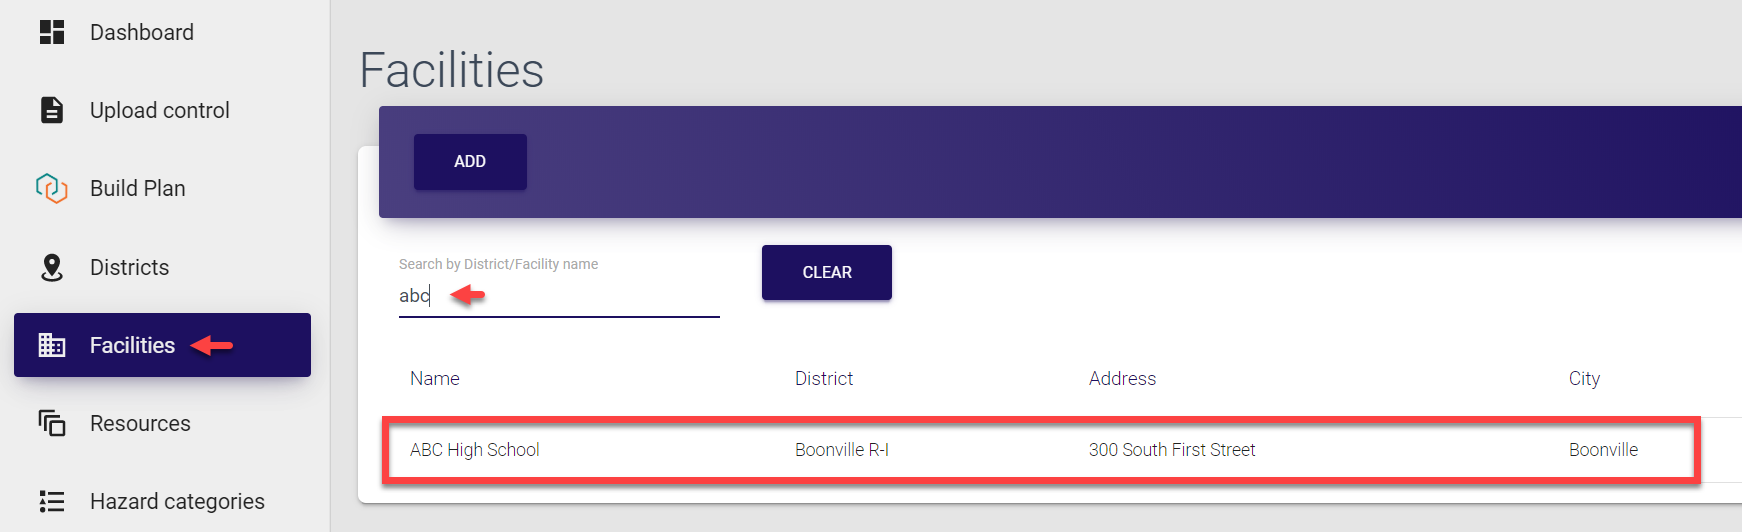
Facilities
In this section, you can see the list of facilities, which were either added during the document upload or manually. Unlike the list of districts which is fed from the database, the list of facilities is not pre-populated and is build on an as-needed basis.
The access to this section is provided to:
-
Super admins
-
District admins
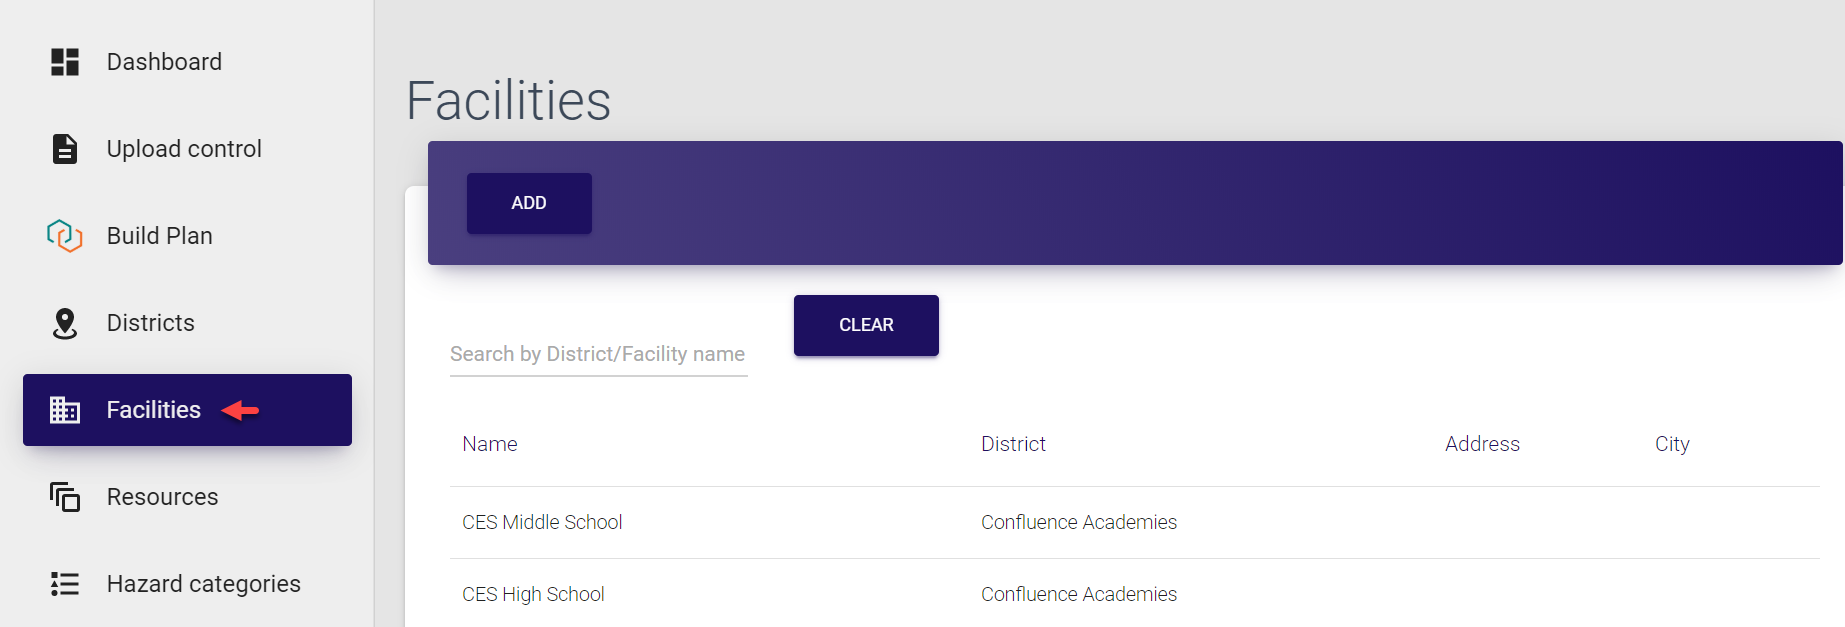
Here, you can search for entries and open any entry by clicking it. The complete list of available operations is described here.
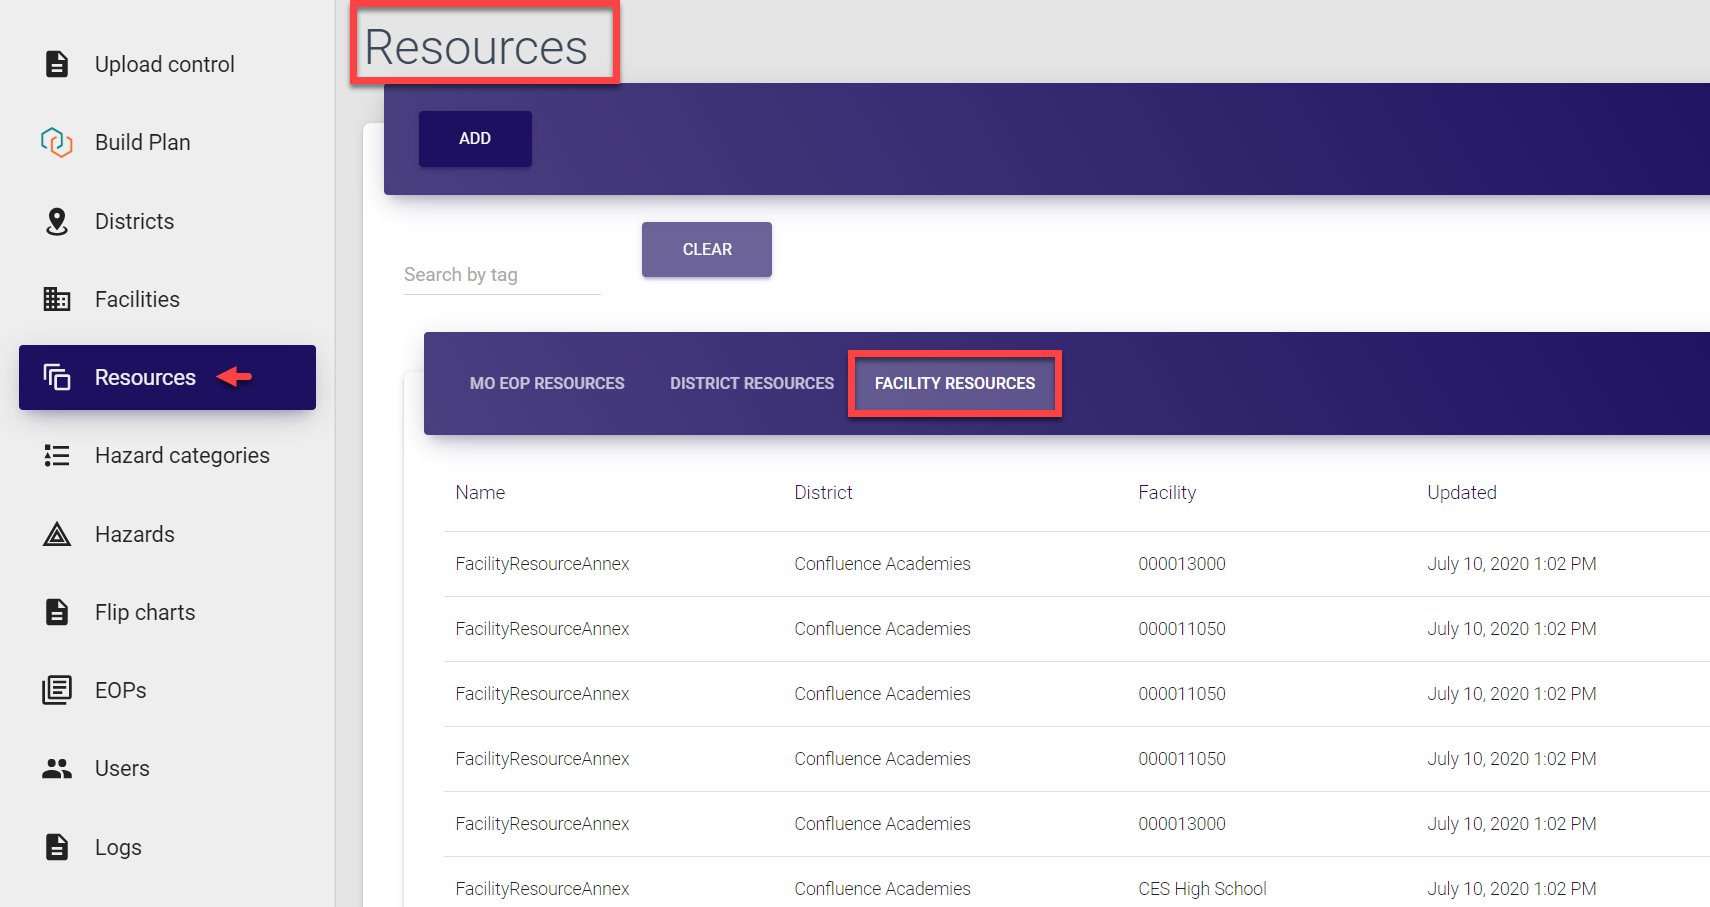
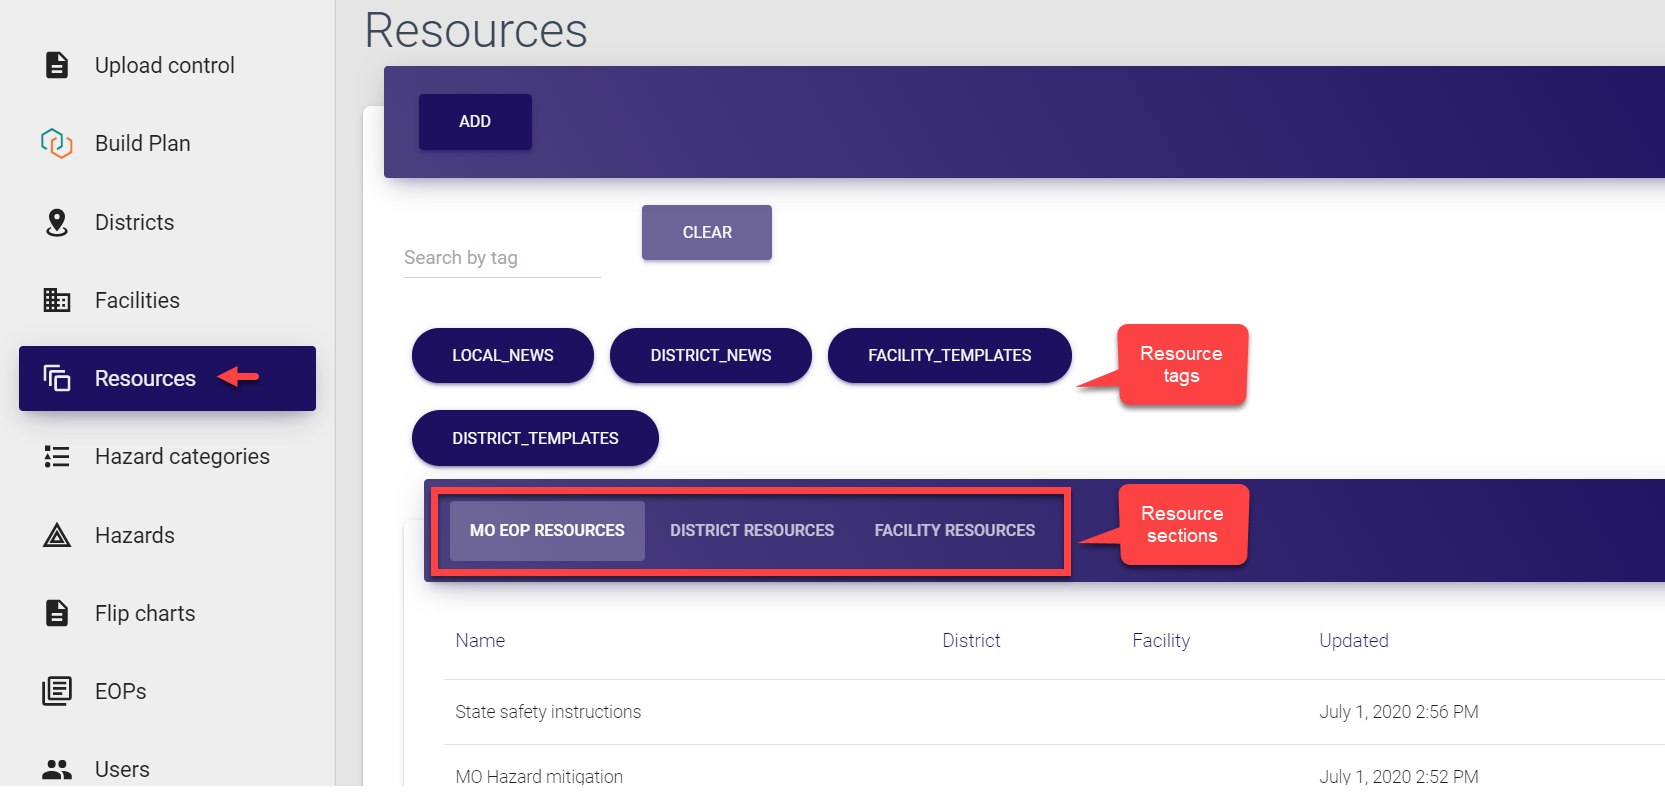
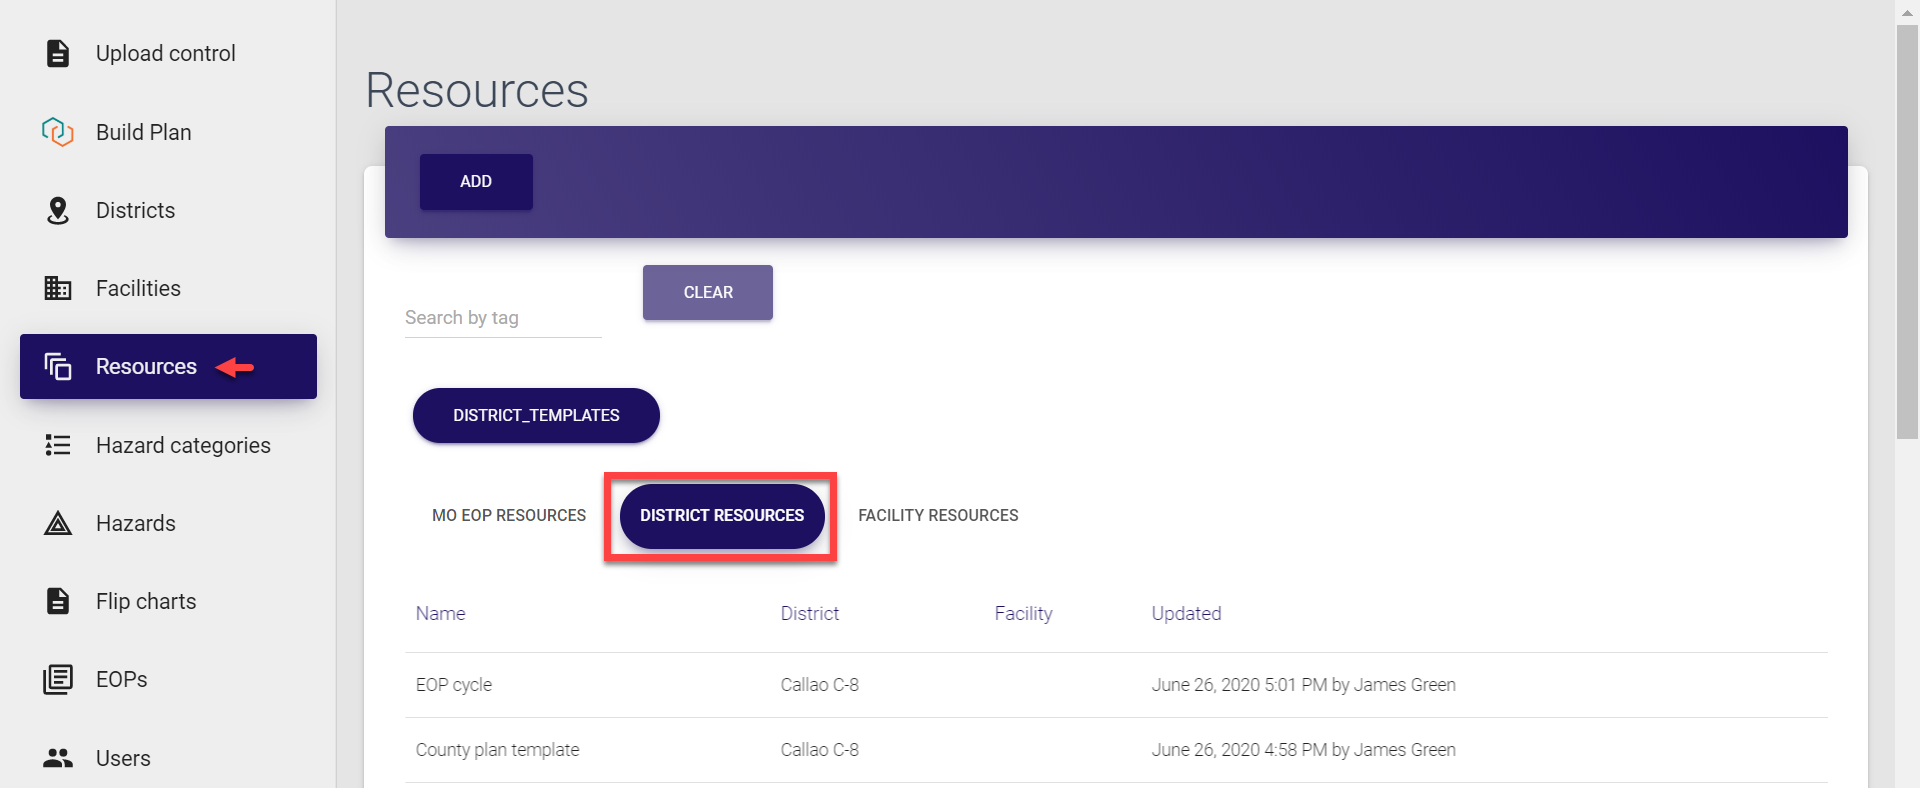
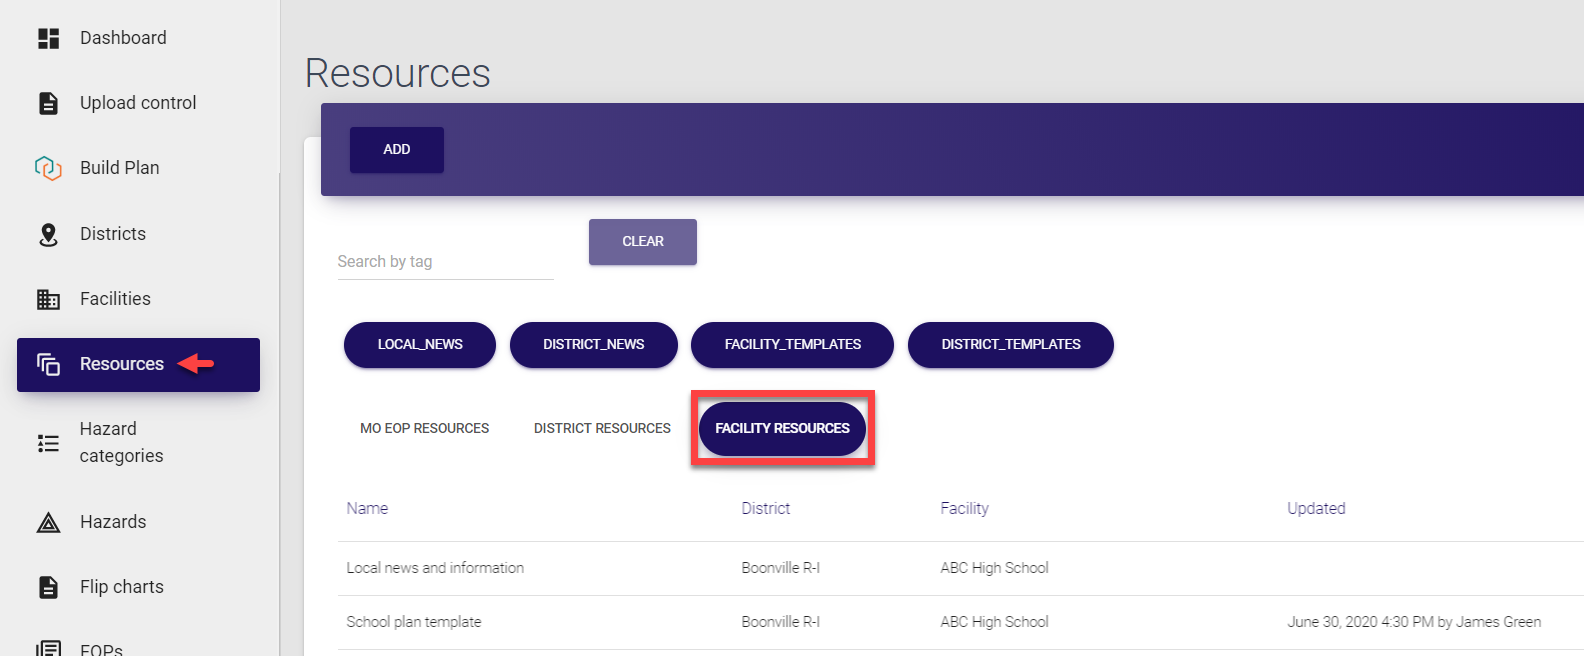
Resources
The Resources section includes all resources added to MO EOP control panel either via document upload or manually. The section is divided into three parts:
-
MO EOP resources - files and links that are applicable to the entire state, and can only be added manually.
-
District resources - files and links that are applicable to specific districts, they can be added during the document upload as well as manually.
-
Facility resources - files and links that are applicable to specific facilities, they also can be added during the document upload as well as manually.
The access to this section is provided to:
-
Super admins
-
District admins
-
Facility admins, and
-
Users
| MO EOP resources | 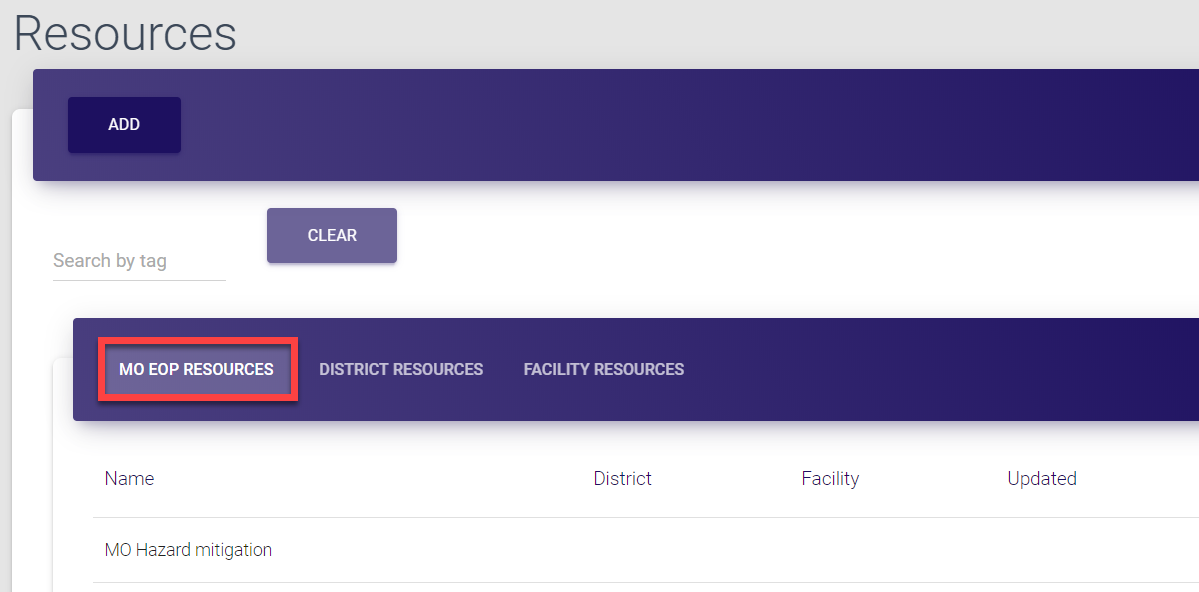 |
|---|---|
| District resources | 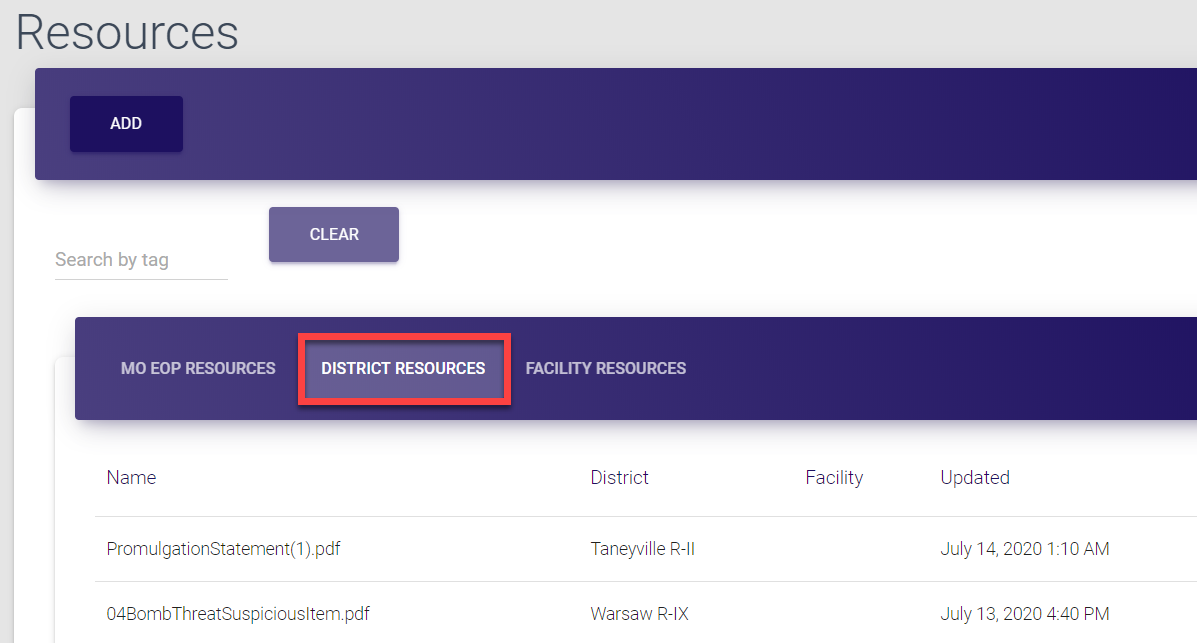 |
| Facility resources | 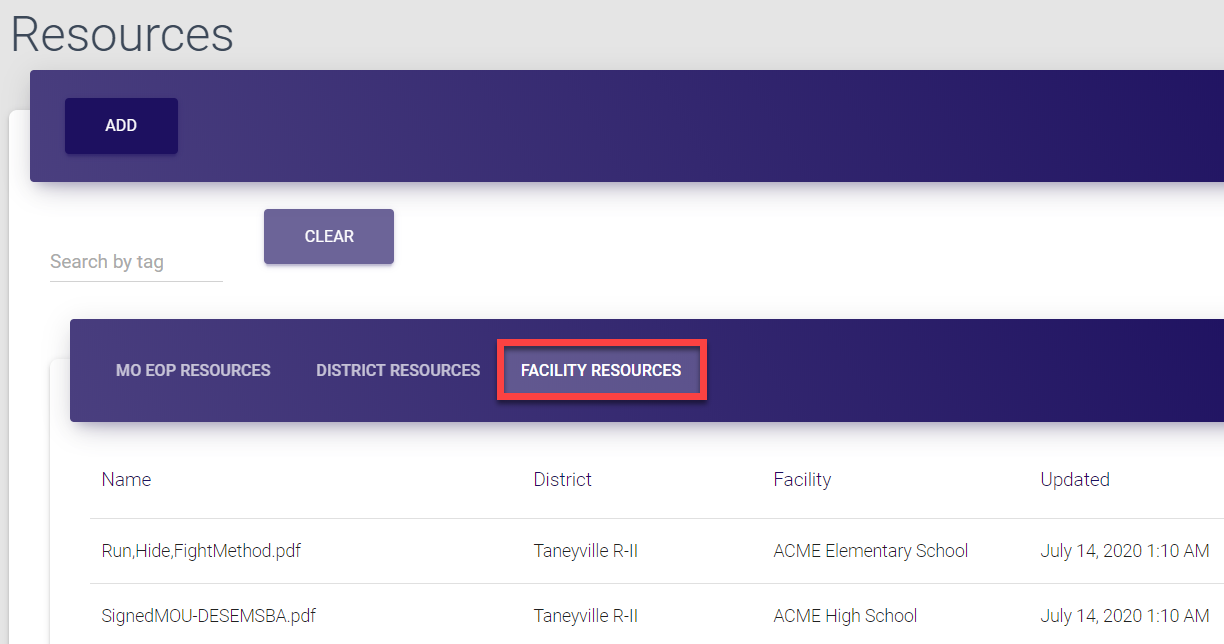 |
Here, you can search for entries and open any entry by clicking it. The complete list of available operations is described here.
Hazard categories
Both hazards and hazard categories are used to classify uploaded flip charts. Hazard category is basically a way to group relevant hazards. By default, there are four categories (Natural, Tech, Human, and Hazardous materials), however the range can always be expanded as needed.
The access to this section is provided only to Super admins.
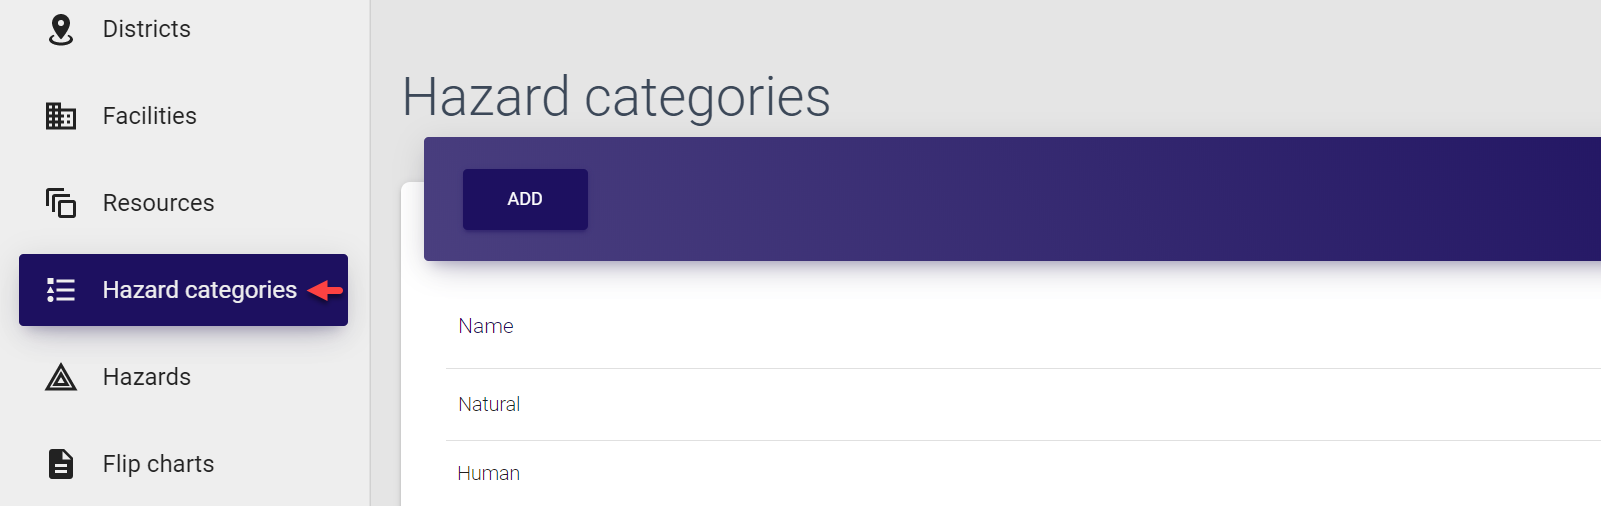
Here, you can open any entry by clicking it. The complete list of available operations is described here.
Hazards
This section contains the list of hazards, which are used to classify uploaded flip charts and are added as required.
The access to this section is provided only to Super admins.
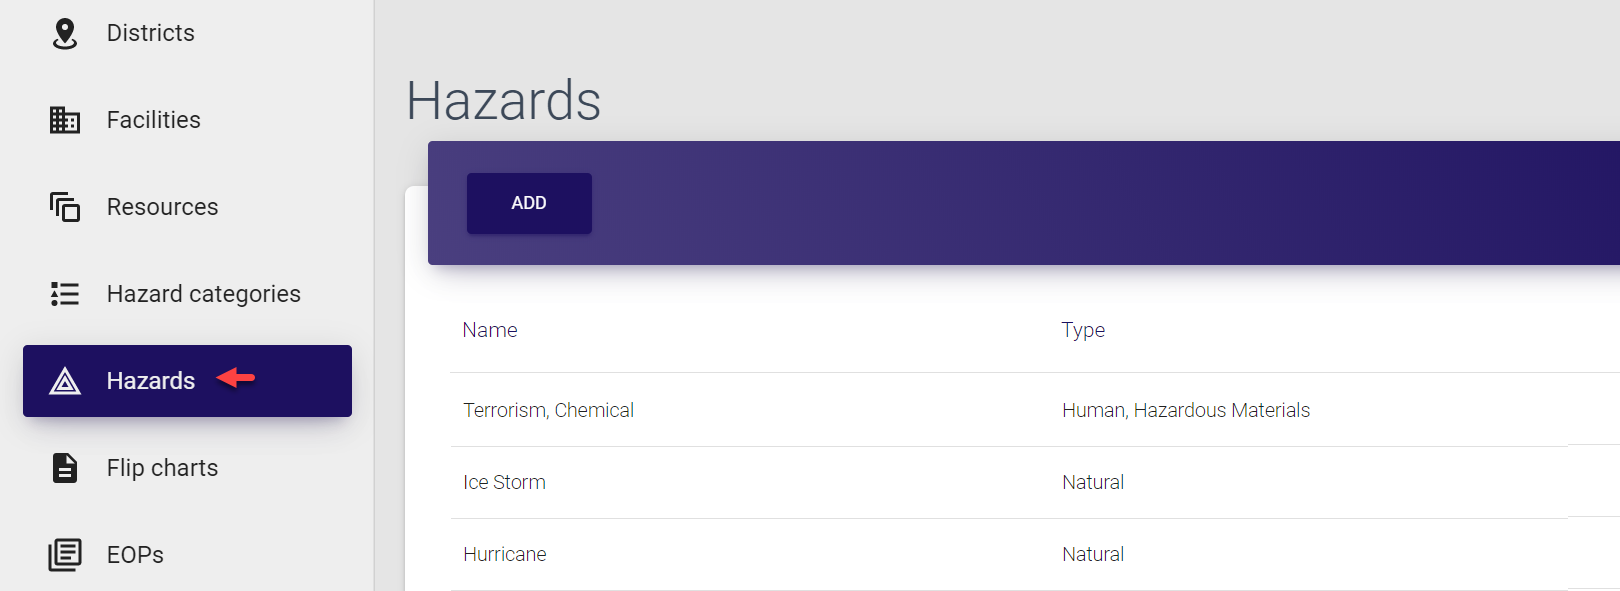
You can open any entry by clicking it. The complete list of available operations is described here. Note that the search option for hazards is not included in the current system implementation.
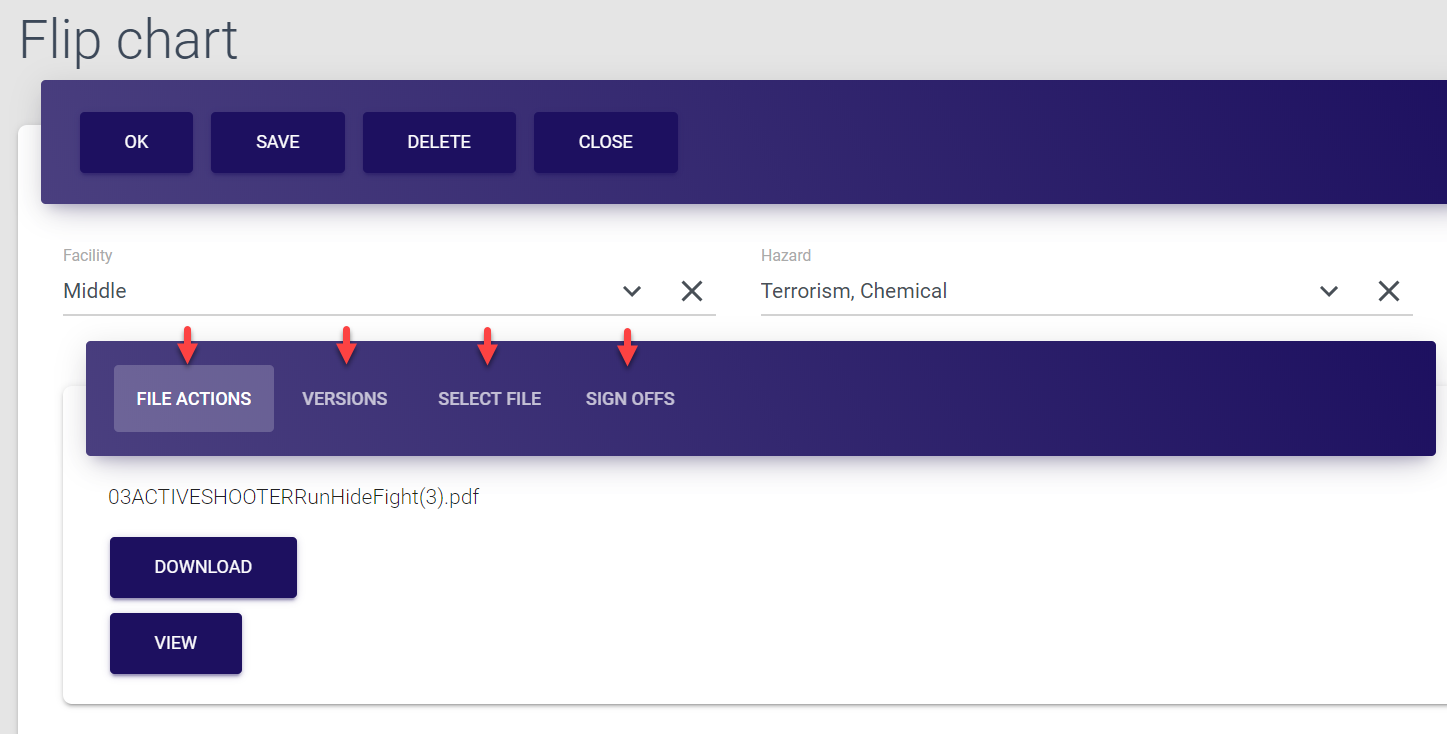
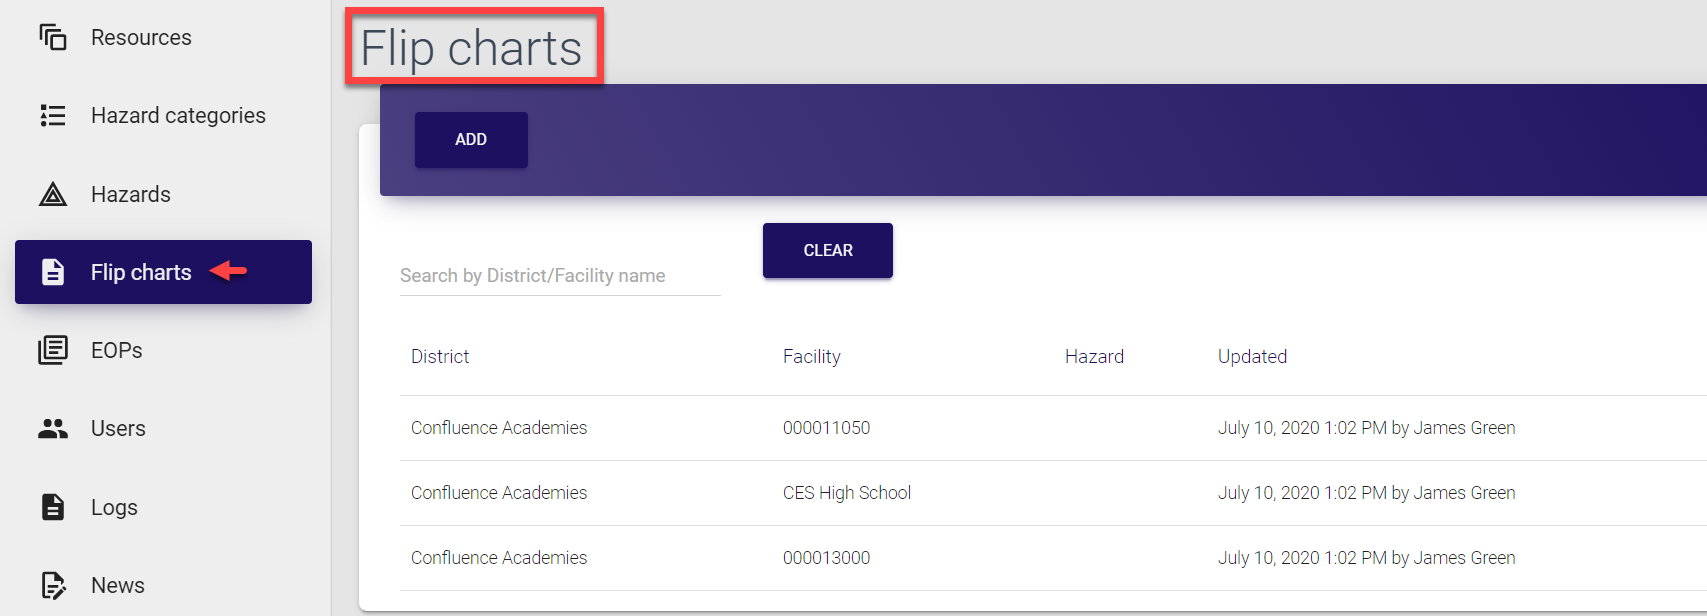
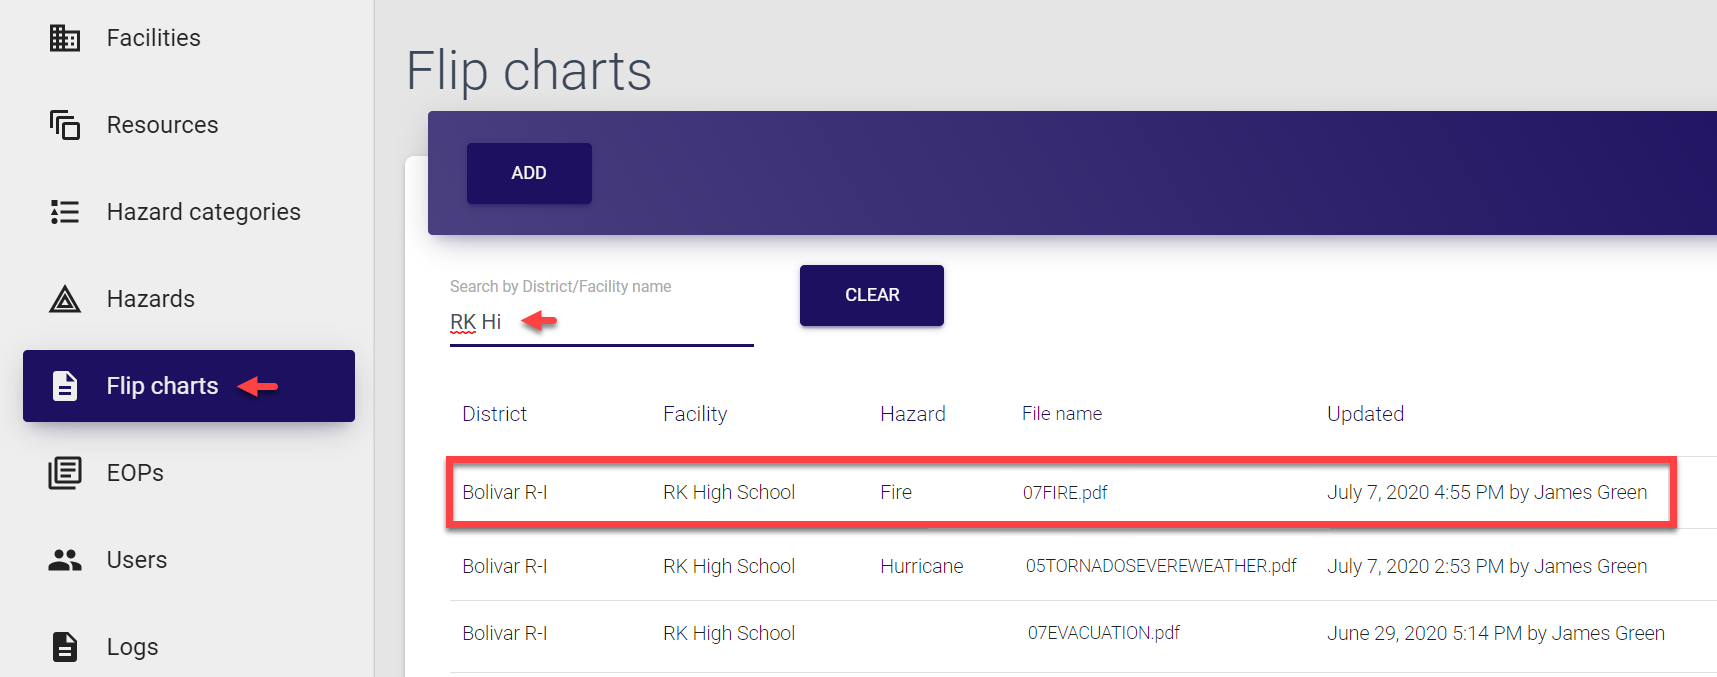
Flip charts
In this section, you can see the list of flip charts, which were either added during the document upload or manually. If added via upload, each flip chart is assigned to a specific district and facility. On the screen, you can see the following details:
Field |
Description |
|---|---|
| District | District the flip chart refers to |
| Facility | Facility within the district the flip chart refers to |
| Hazard | Type of hazard the flip chart is created for (see the Hazards section) |
| File name | Full name of the uploaded file, including extension |
| Updated | Time, date and author of the entry creation or update |
The access to this section is provided to:
-
Super admins
-
District admins
-
Facility admins
-
Users
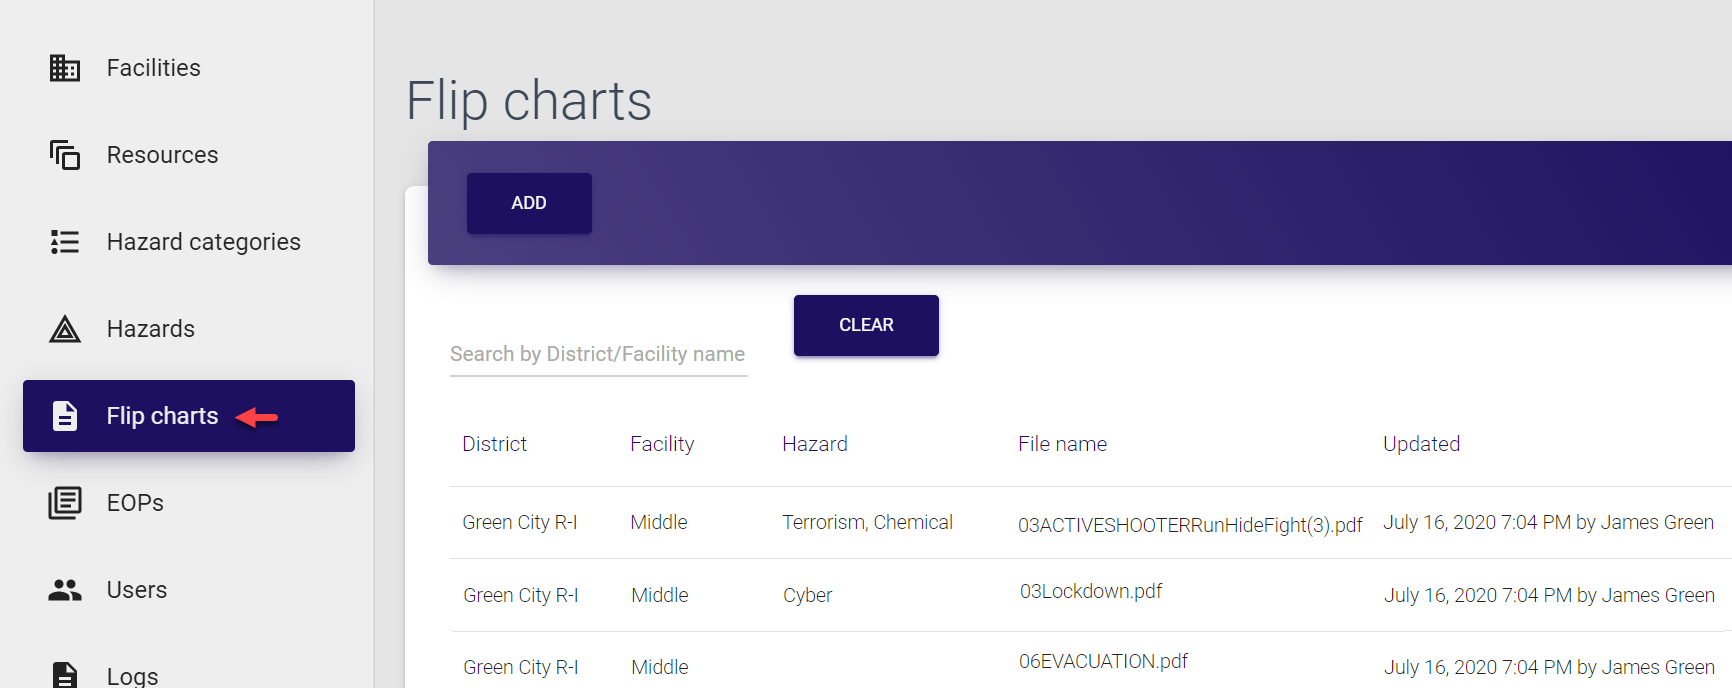
Here, you can search for entries by district or facility, and open any entry by clicking it. The complete list of available operations is described here.
Each entry has the following tabs:
Entry tab |
Description |
|---|---|
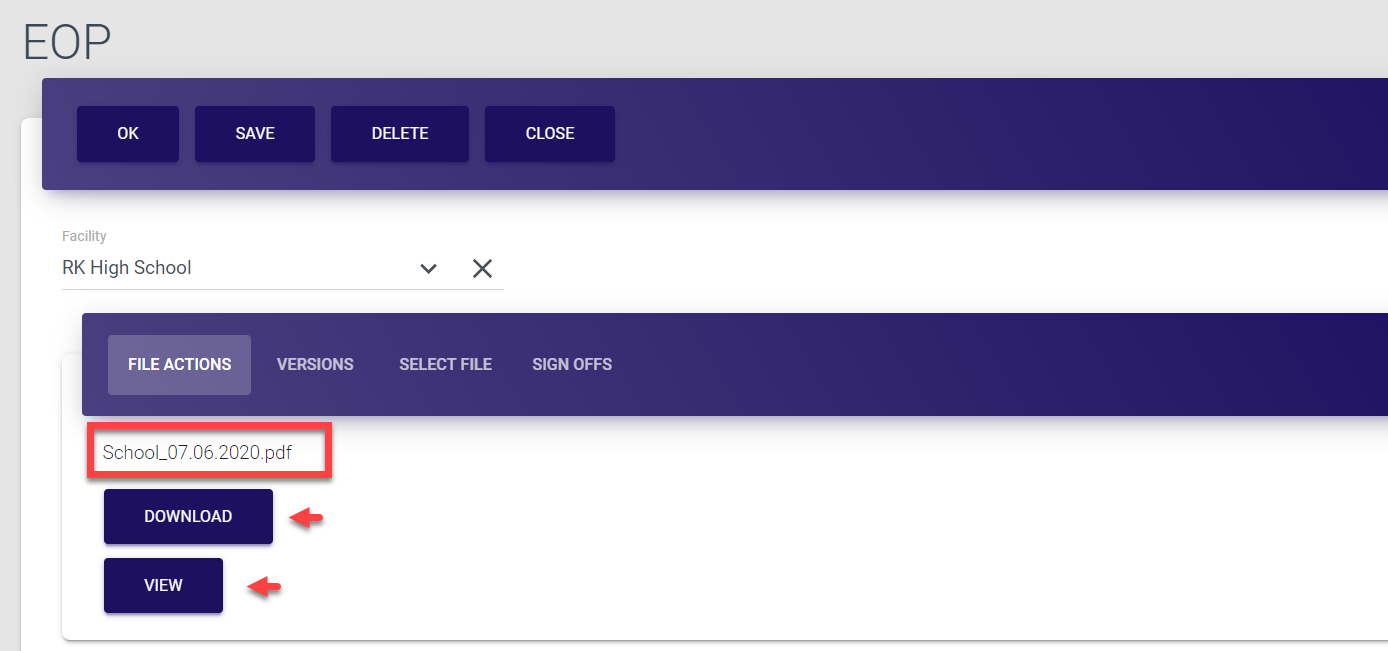
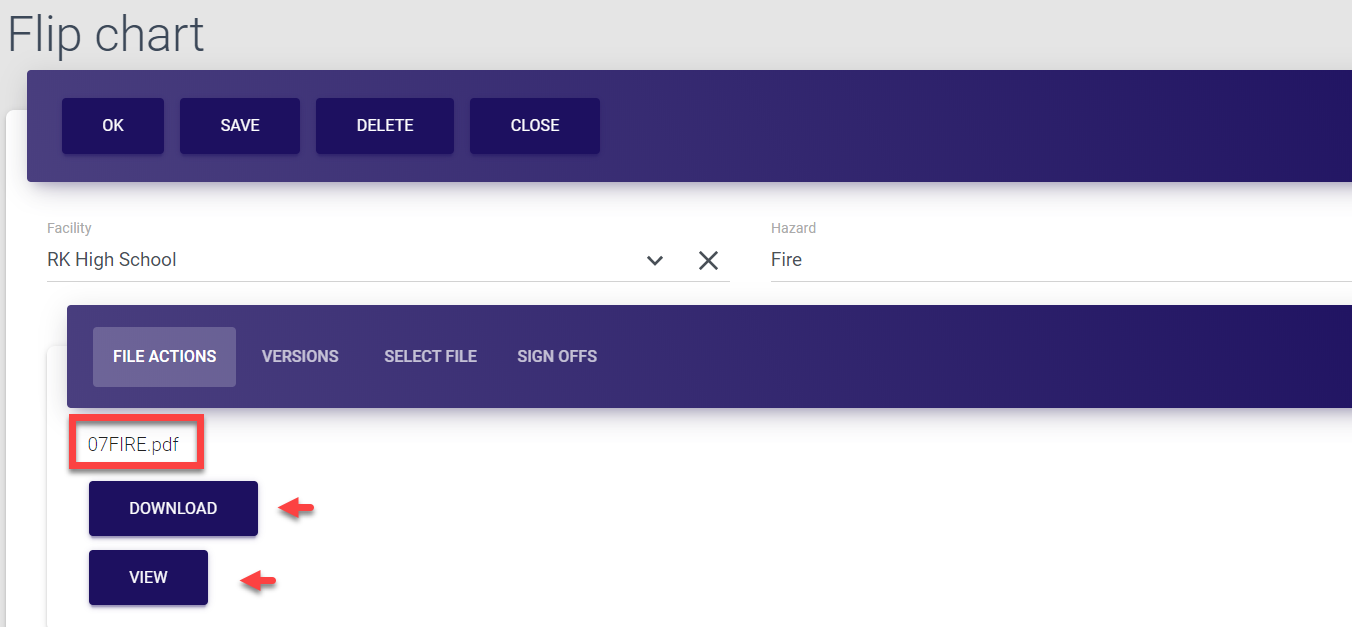
| File actions | This tab opens by default. Here you can download the file or view it in the pop-up window. |
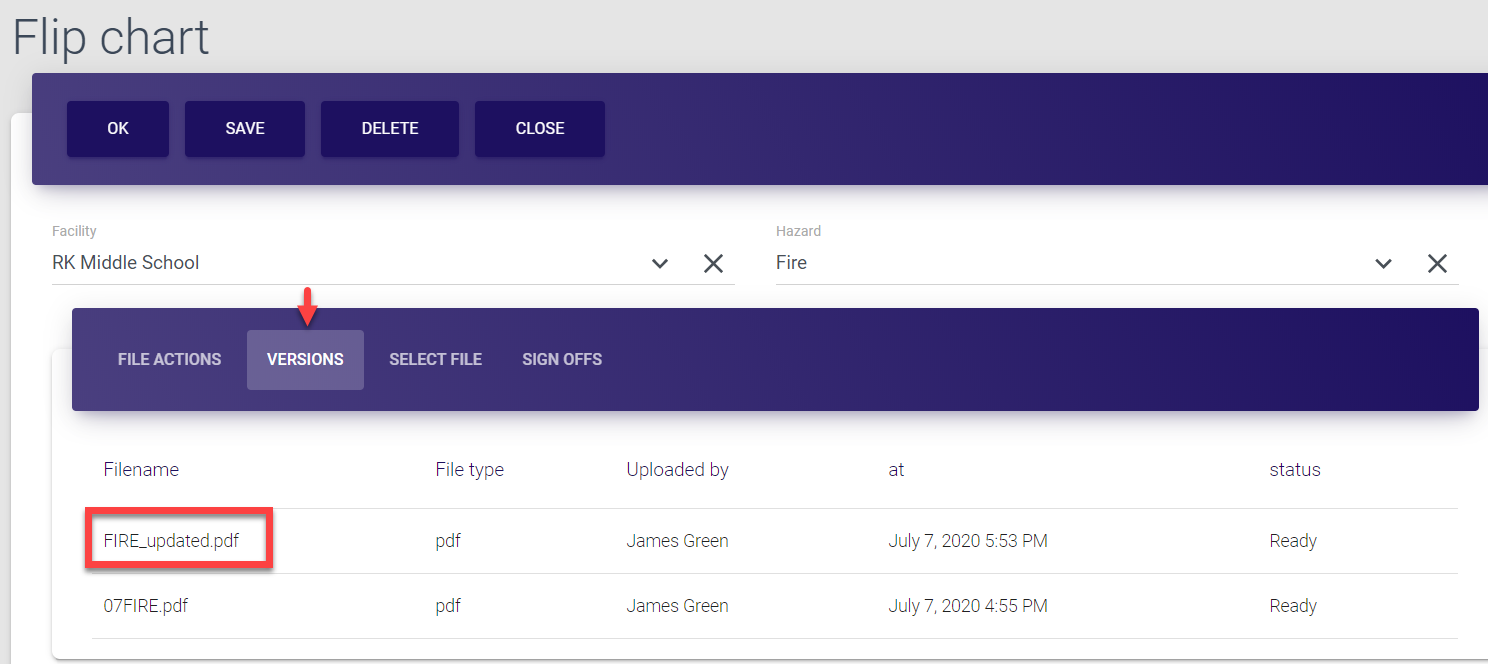
| Versions | This tab contains all versions of the document starting with the original upload. It includes such details as the name and format of the file, the time and initiator of the upload/update as well as the status (Ready - when the document is uploaded, Not ready - when the document is in the process of the upload). Here you can download and view any previous version of the flip chart by clicking required entry. |
| Select file | This tab is used to upload or update the version of the document. The uploaded file becomes the current version, while the previous file is saved under the Versions tab. |
| Sign offs | This tab includes the list of users (with User role) who opened and viewed the flip chart. Whenever the user clicks Sign off for the document in his MO EOP Dashboard or Flip charts section, they confirm that they’ve read it, and their name is included in the list under this tab. |
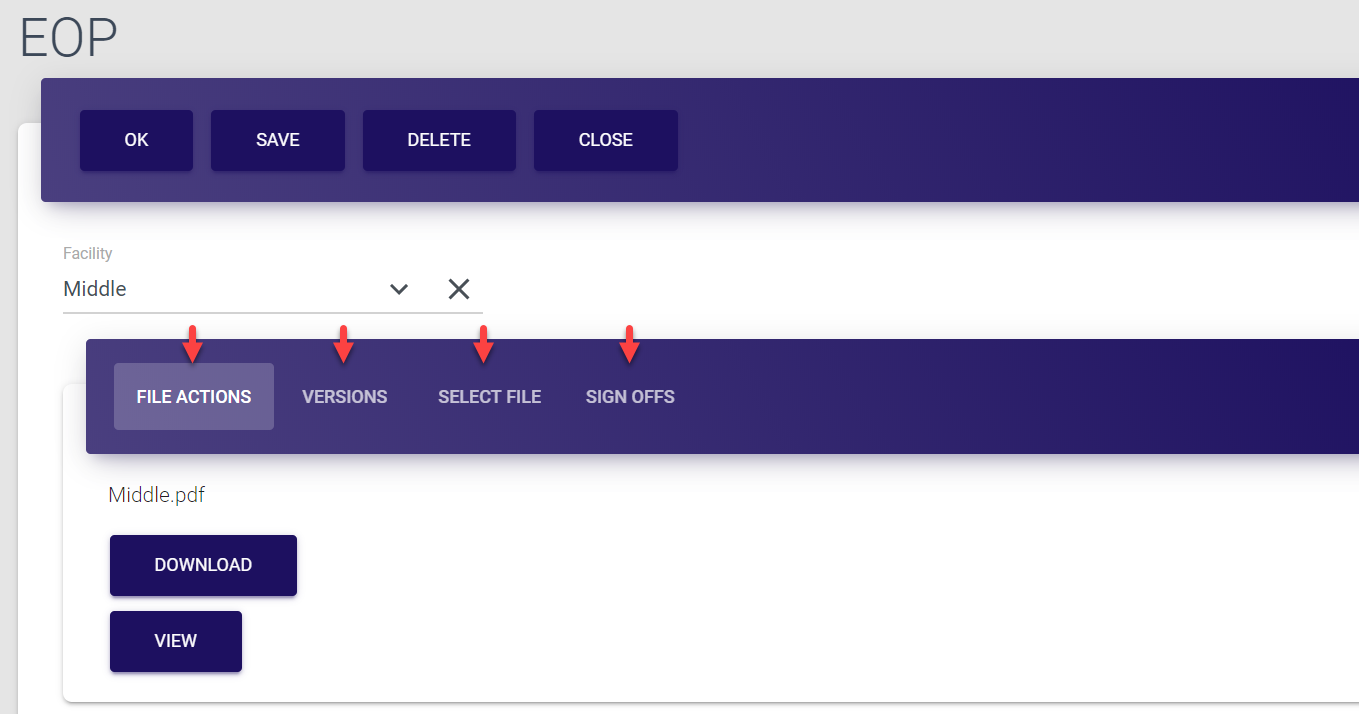
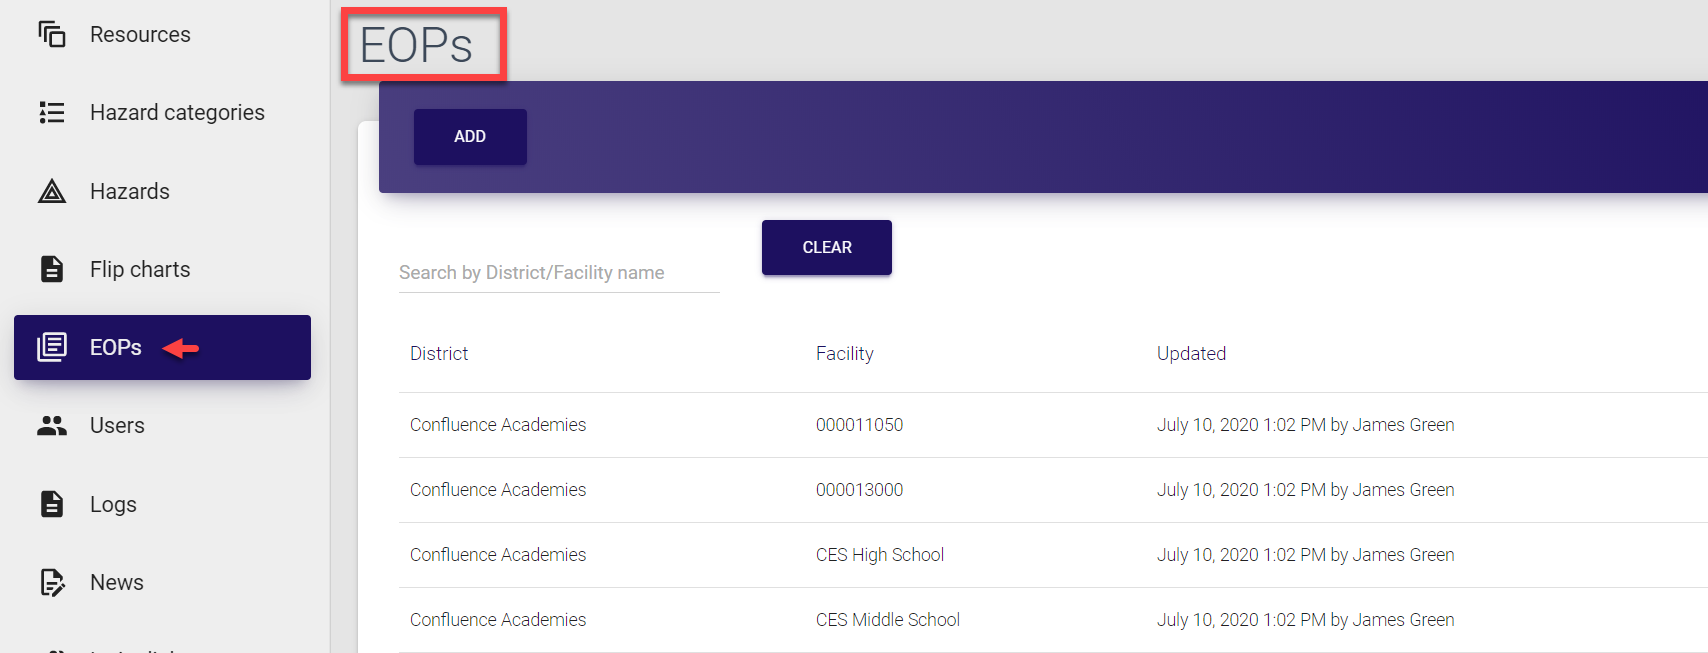
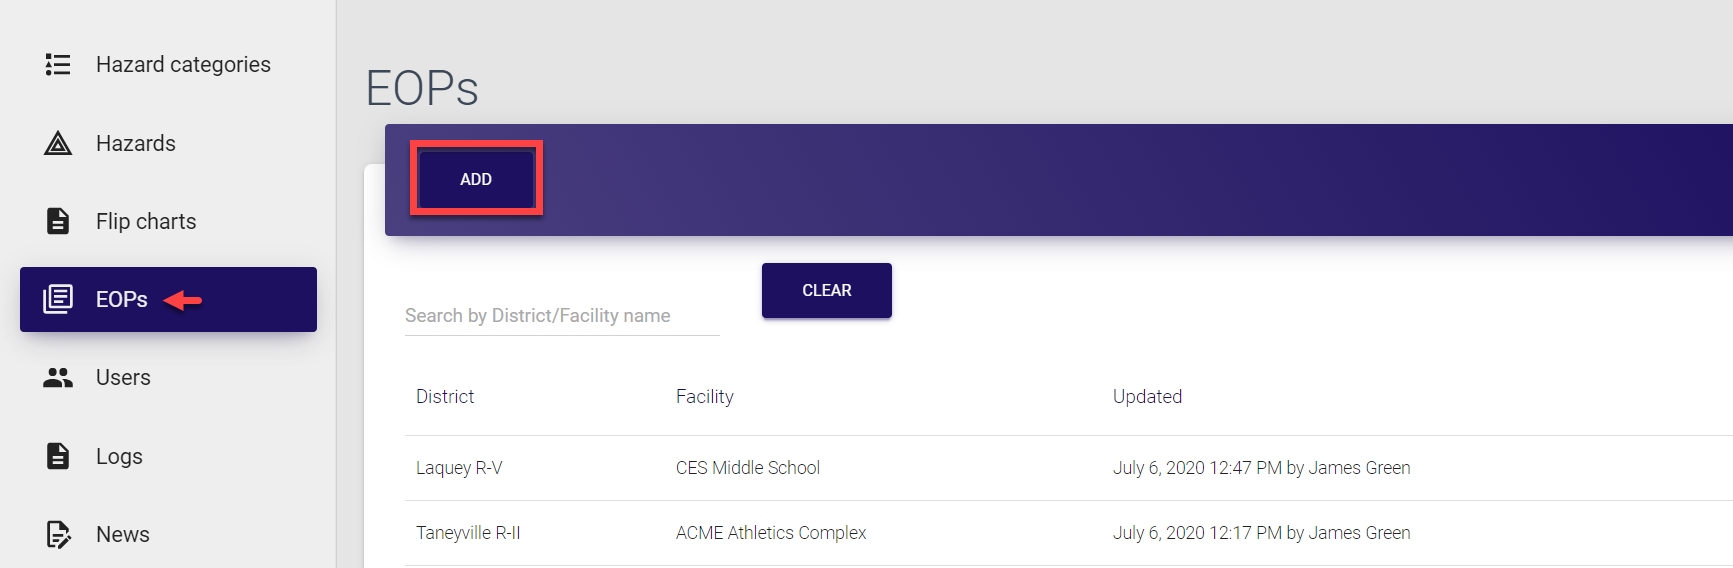
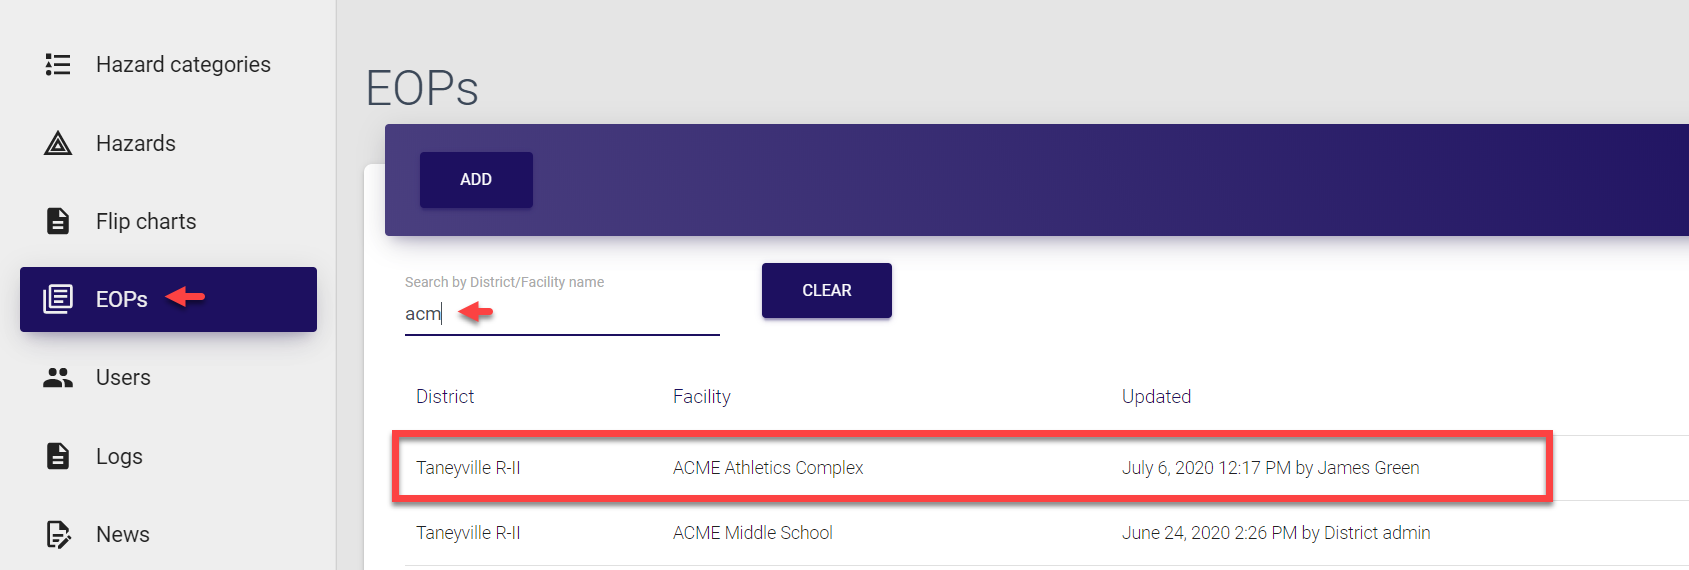
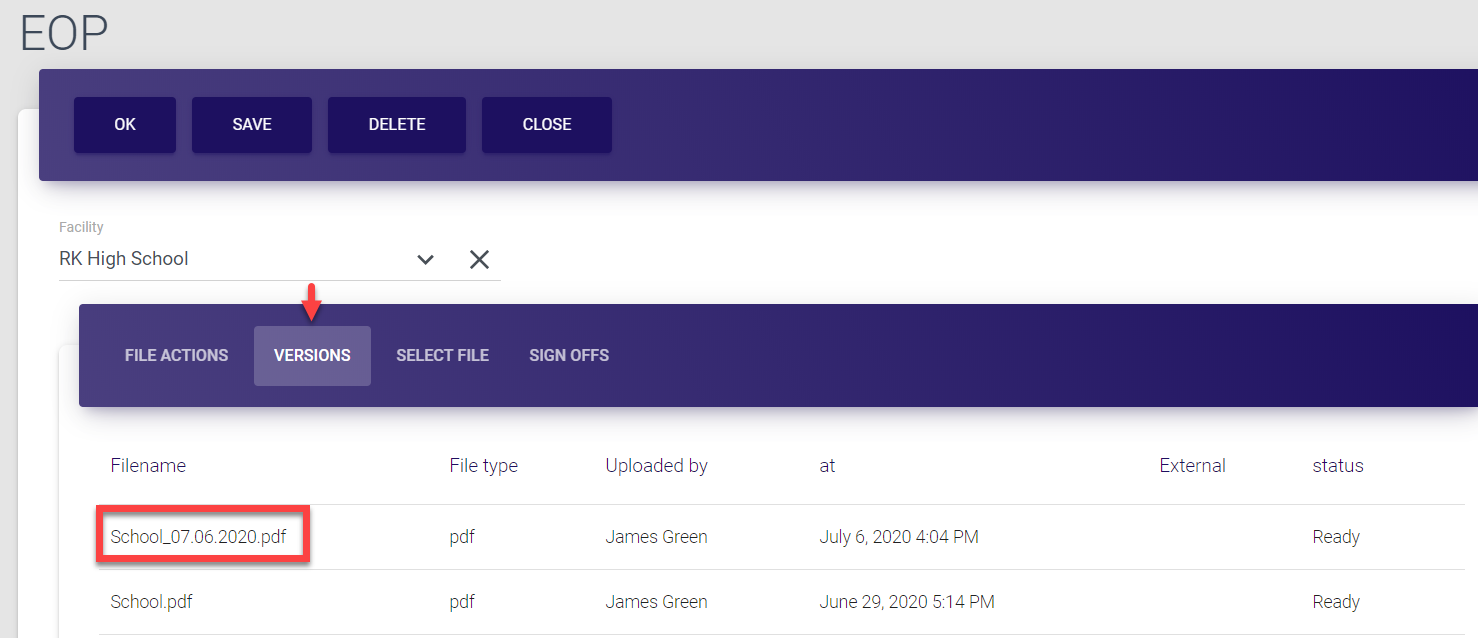
EOPs
In this section, you can see the list of EOPs, which were either added during the document upload or manually. If added via upload, each EOP is assigned to a specific district and facility. On the screen, you can see the following details:
Field |
Description |
|---|---|
| District | District the EOP refers to |
| Facility | Facility within the district the EOP refers to |
| Updated | Time, date and author of the entry creation or update |
The access to this section is provided to:
-
Super admins
-
District admins
-
Facility admins
-
Users
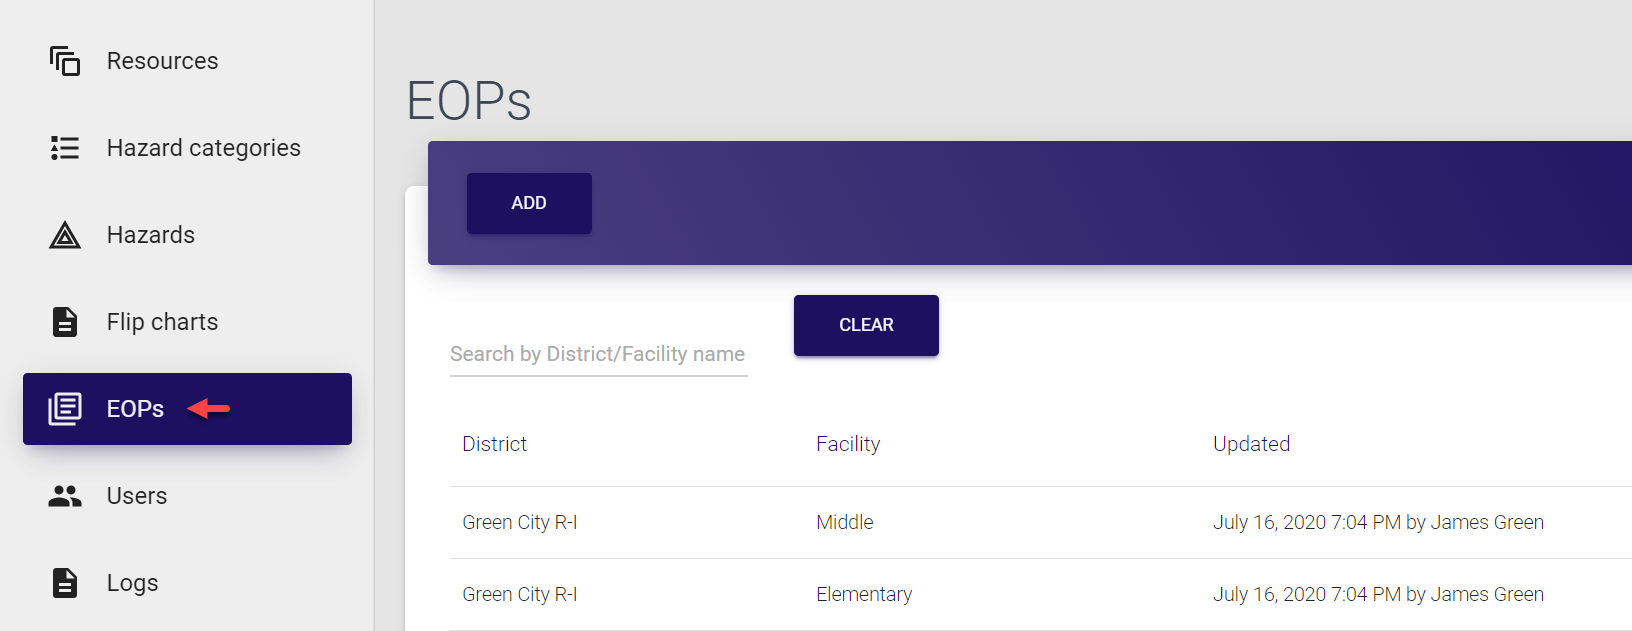
Here, you can search for entries by district or facility, and open any entry by clicking it. The complete list of available operations is described here.
Each entry has the following tabs:
Entry tab |
Description |
|---|---|
| File actions | This tab opens by default. Here you can download the file or view it in the pop-up window. |
| Versions | This tab contains all versions of the document starting with the original upload. It includes such details as the name and format of the file, the time and initiator of the upload/update as well as the status (Ready - when the document is uploaded, Not ready - when the document is in the process of the upload). Here you can download and view any previous version of the EOP by clicking required entry. |
| Select file | This tab is used to upload or update the version of the document. The uploaded file becomes the current version, while the previous file is saved under the Versions tab. |
| Sign offs | This tab includes the list of users (with User role) who opened and viewed the EOP. Whenever the user clicks Sign off for the document in his MO EOP Dashboard or EOPs section, they confirm that they’ve read it, and their name is included in the list under this tab. |
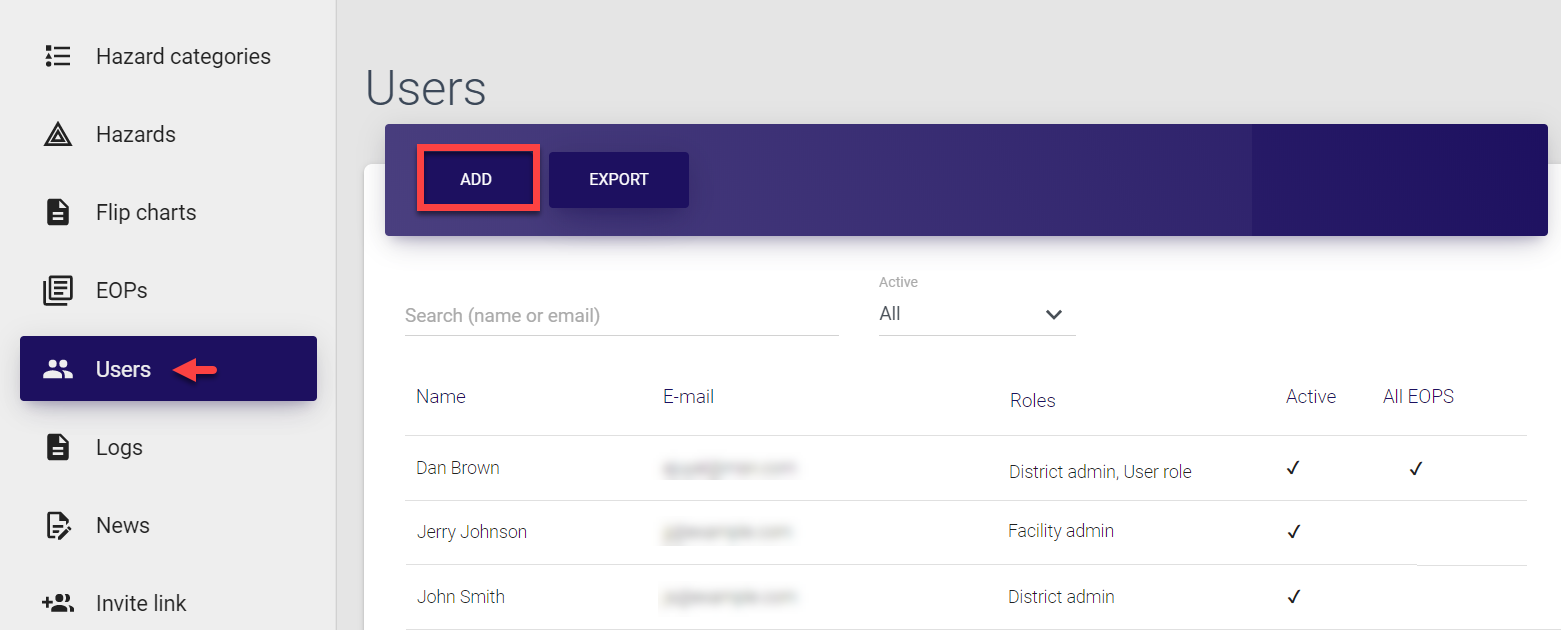
Users
This section contains the list of all registered users, both confirmed (whose joining request has been approved) and unconfirmed, including First respondents. On the screen, you can see the following details:
Field |
Description |
|---|---|
| Name | Name of the registered user. |
| Email (login) of the registered user. | |
| Role | Role of the registered user. |
| Active | Status of the user. This field has a check mark if the user is active, otherwise the field is empty. |
| All EOPs | This field has a check mark when the user read all EOPs available to them, otherwise the field is empty. |
The access to this section is provided only to Super admins.
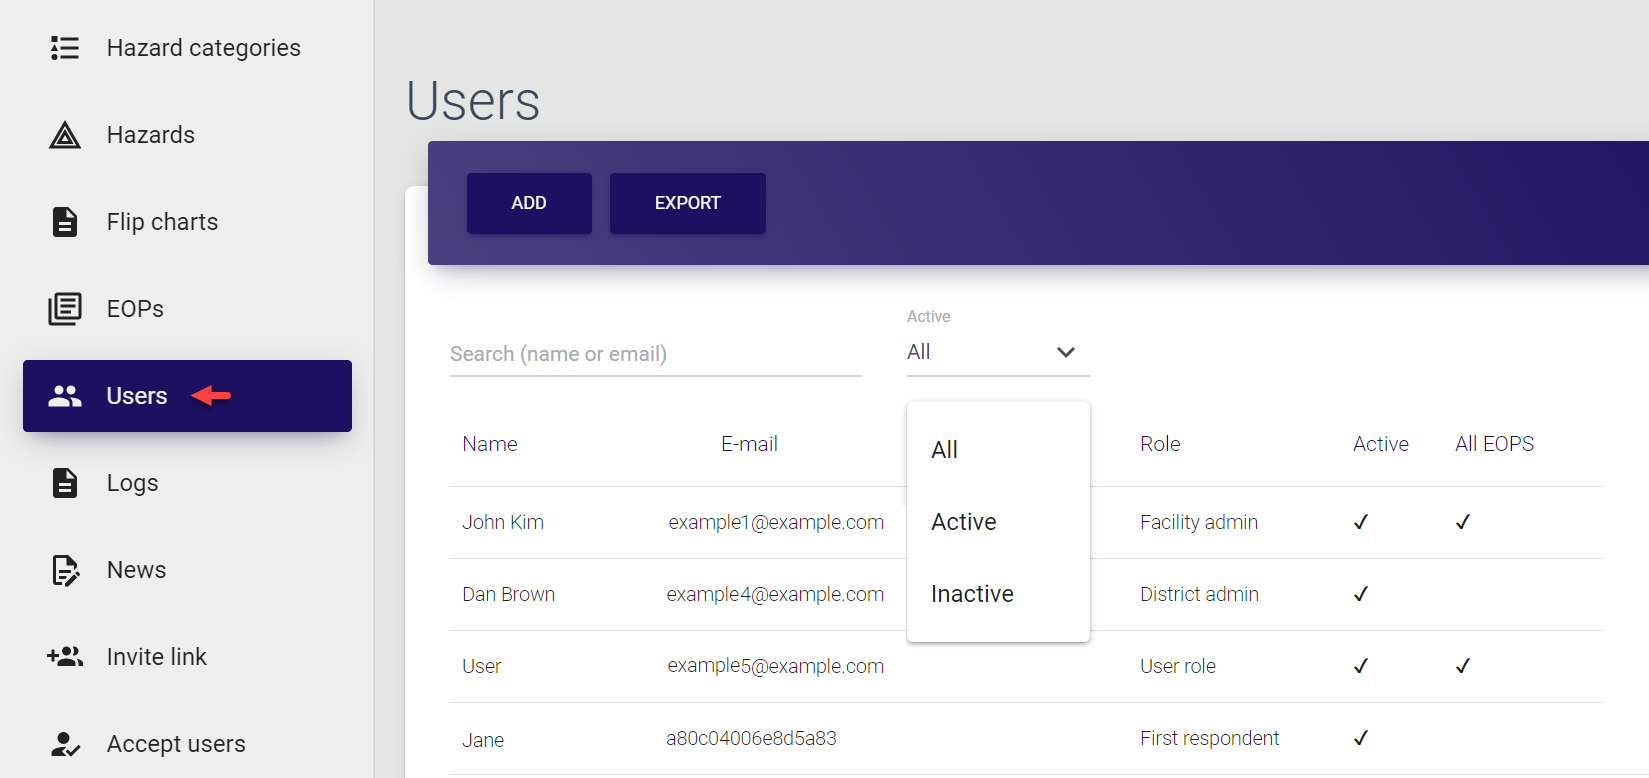
Here, you can search for entries by name or email of a registered user, or filter the list according to the user status (active, inactive, all). You can open any entry by clicking it. The complete list of available operations is described here.
Logs
This section includes the list of all logged operations. On the screen, you can see the following details:
Field |
Description |
|---|---|
| Date | Date and time of the logged event |
| Action | Description of the logged event |
| Link | Link, which takes you to the corresponding created/updated User, EOP, Flip chart, Resource, News, District, Facility, Hazard type or Hazard entry |
The access to this section is provided only to Super admins.
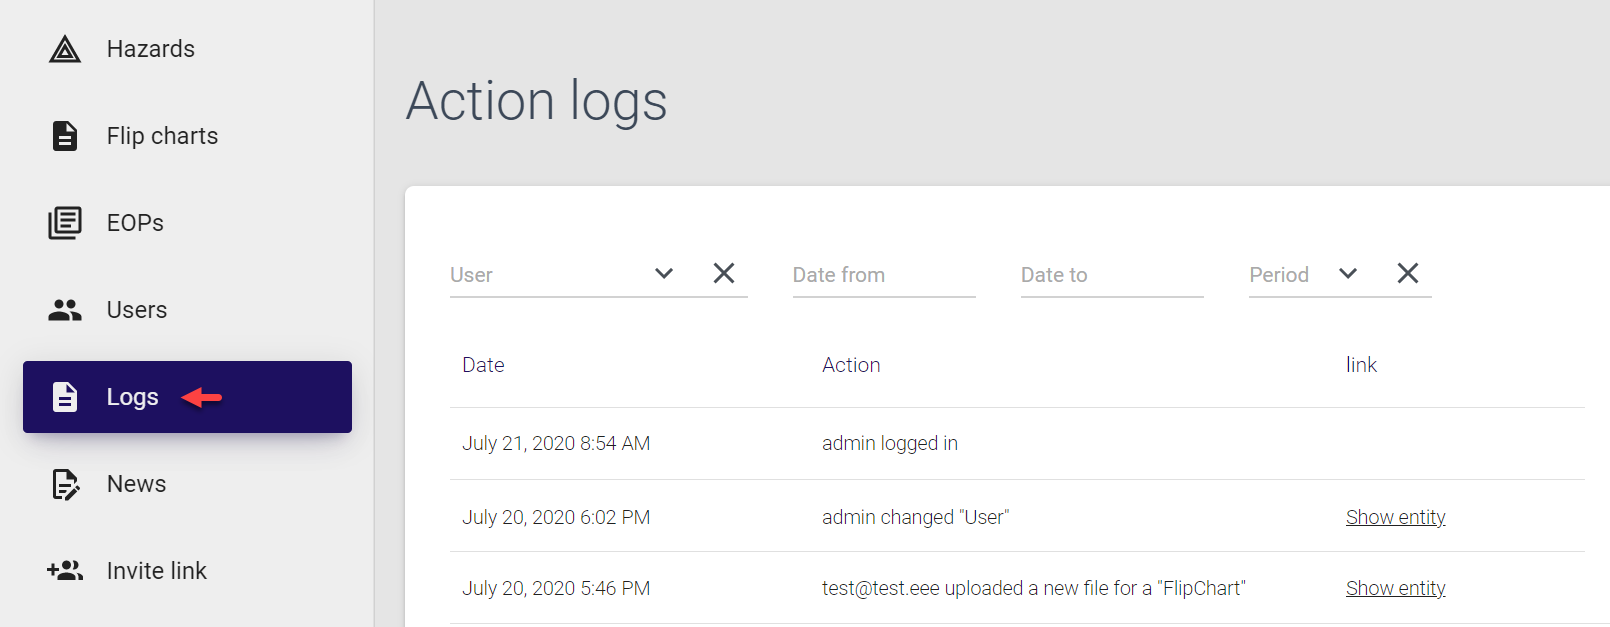
Here, you can filter entries by user name, by “from-to” date or by time period. You can open any entry by clicking it. The complete list of available operations is described here.
News
This section contains the list of all published news. On the screen, you can see the following details:
Field |
Description |
|---|---|
| Date | Date and time of the created news entry |
| Name | Title of the created news entry |
| Category | Category of the news (MO EOP updates, FAQs, or District news) |
| Author | Name of the user who created the news entry |
The access to this section is provided only to Super admins, however the published news are available on the Dashboard to users according to their role (while MO EOP updates and FAQs are shown for everyone, District news are displayed for users of the corresponding district).
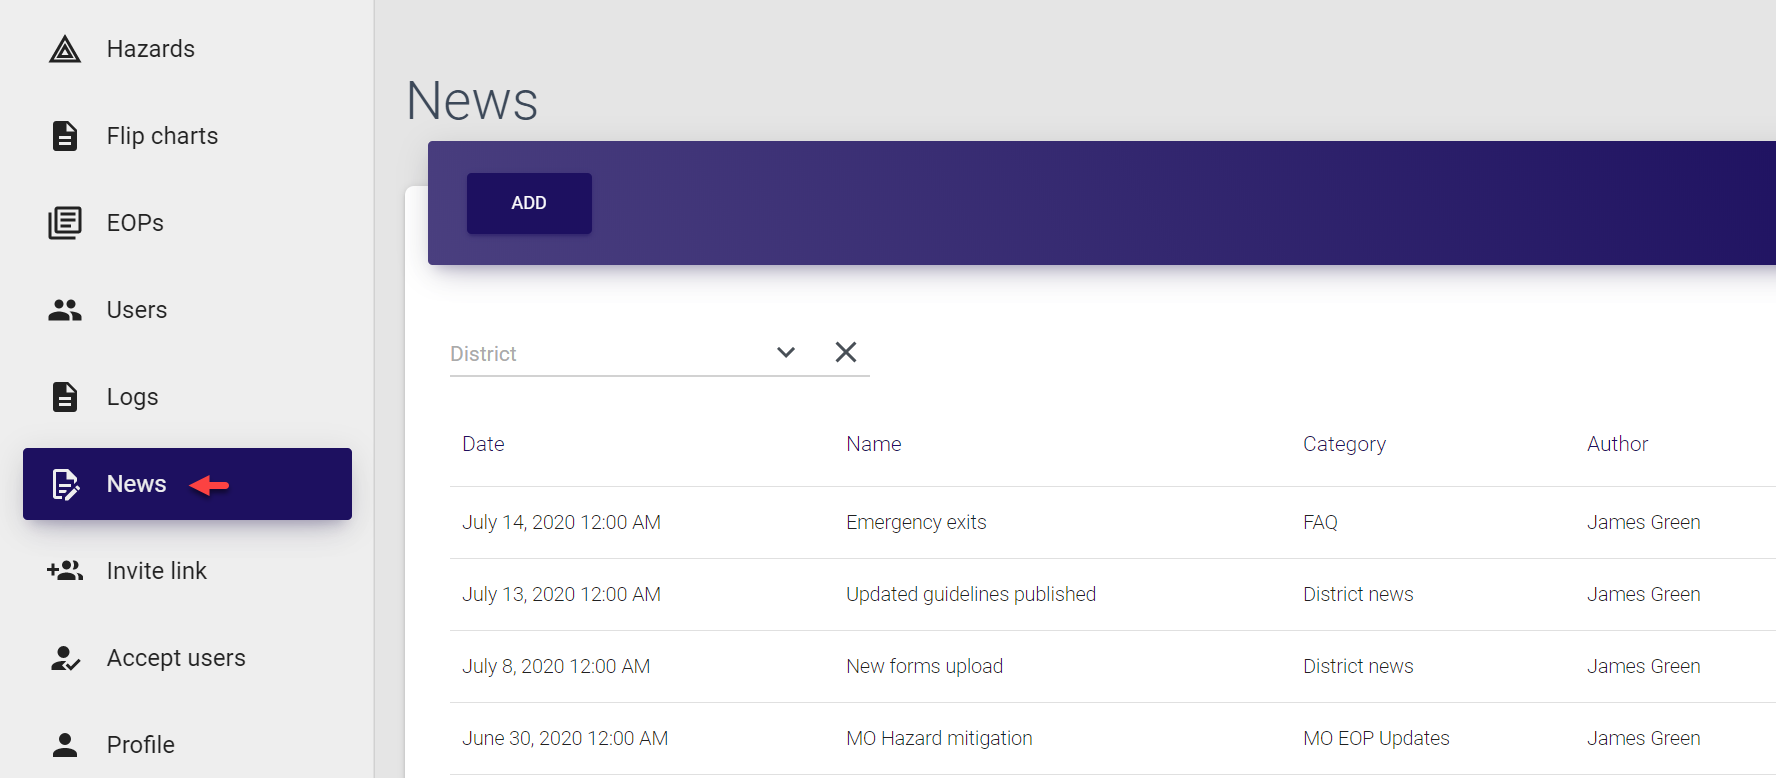
Here, you can search for entries by district, and open any entry by clicking it. The complete list of available operations is described here.
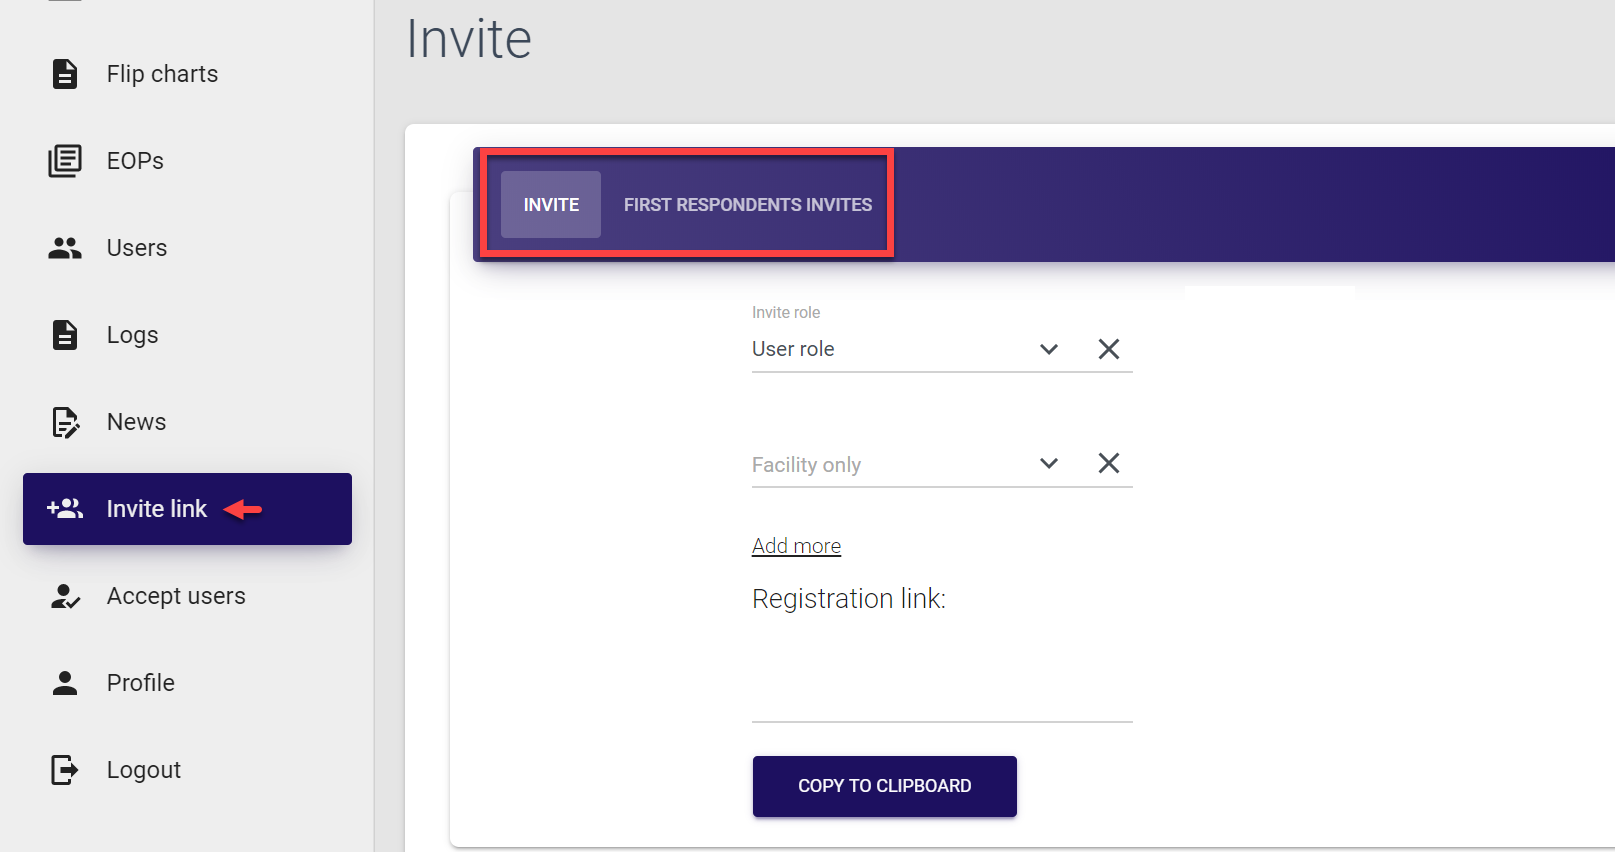
Invite link
This section allows admins to invite new users. The section is subdivided into two tabs: Invite - for all users who can access MO EOP panel (Super admins, District admins, Facility admins and Users) and First respondents invites - for users with the First respondent role.
The access to this section is provided to:
-
Super admins
-
District admins
-
Facility admins
For more information on inviting new users, refer here.
Accept users
Each invited user must be approved by MO EOP admin for their account to become activated. This section contains the list of all users who sent their joining requests after filling their registration form. On the screen, you can see the following details:
Field |
Description |
|---|---|
| Name | Name of the user to be approved. |
| Email (login) of the user to be approved. | |
| Accept | Status of the user to be approved. If user’s joining request is pending approval, the Accept user button is displayed against their name. If user’s request has already been approved, the check mark is displayed in this field. |
The access to this section is provided to:
-
Super admins (requests of all invited users within MO EOP system)
-
District admins (requests of all invited users within the corresponding district)
-
Facility admins (requests of all invited users within the corresponding facility)
Here, you can filter the entries by the user role. Note that entries in this section are not clickable.
For more information on accepting new user requests, refer here.

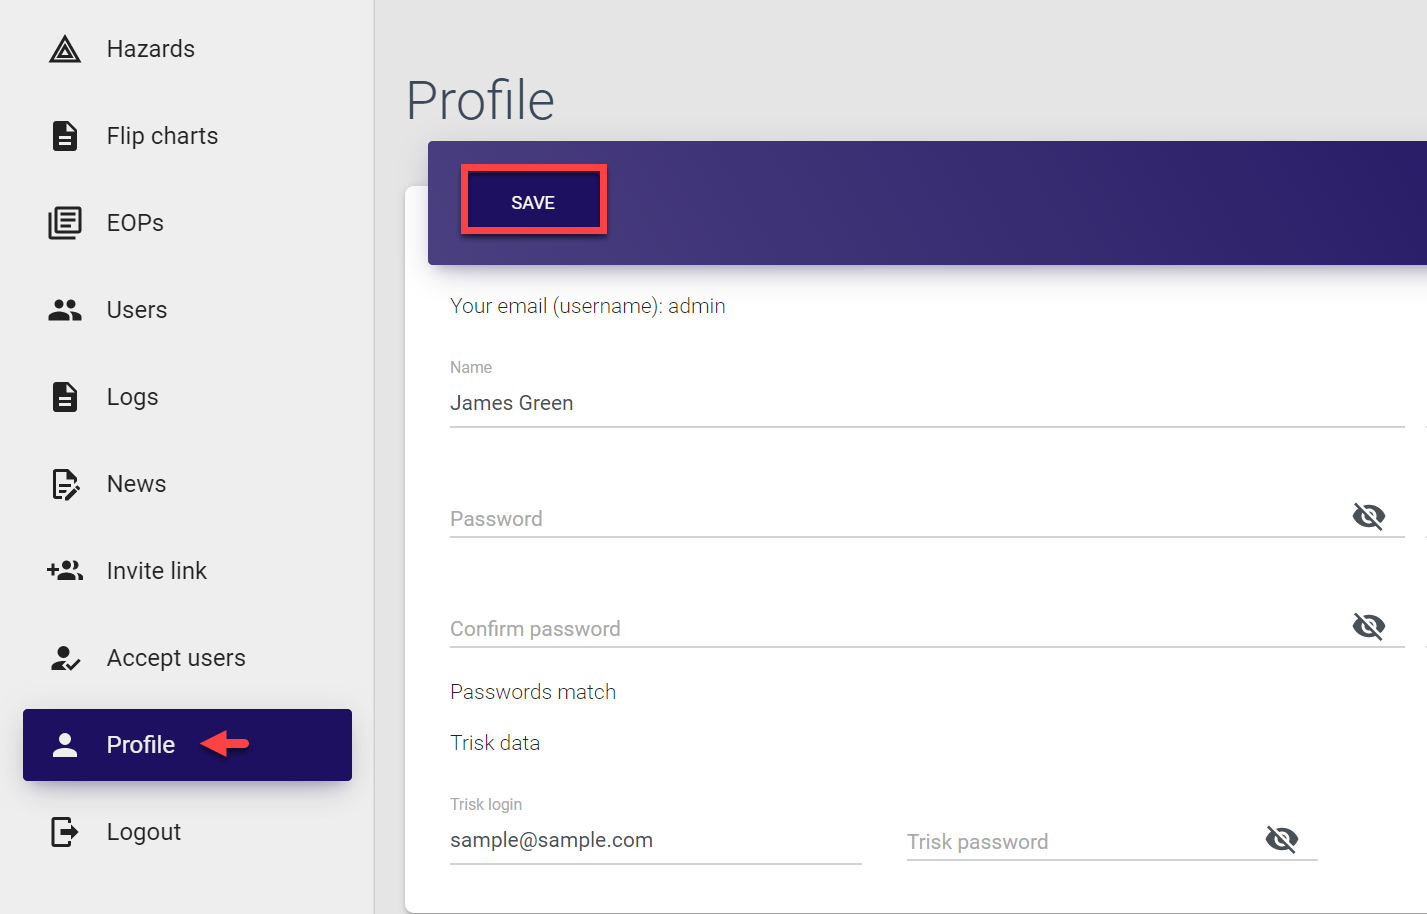
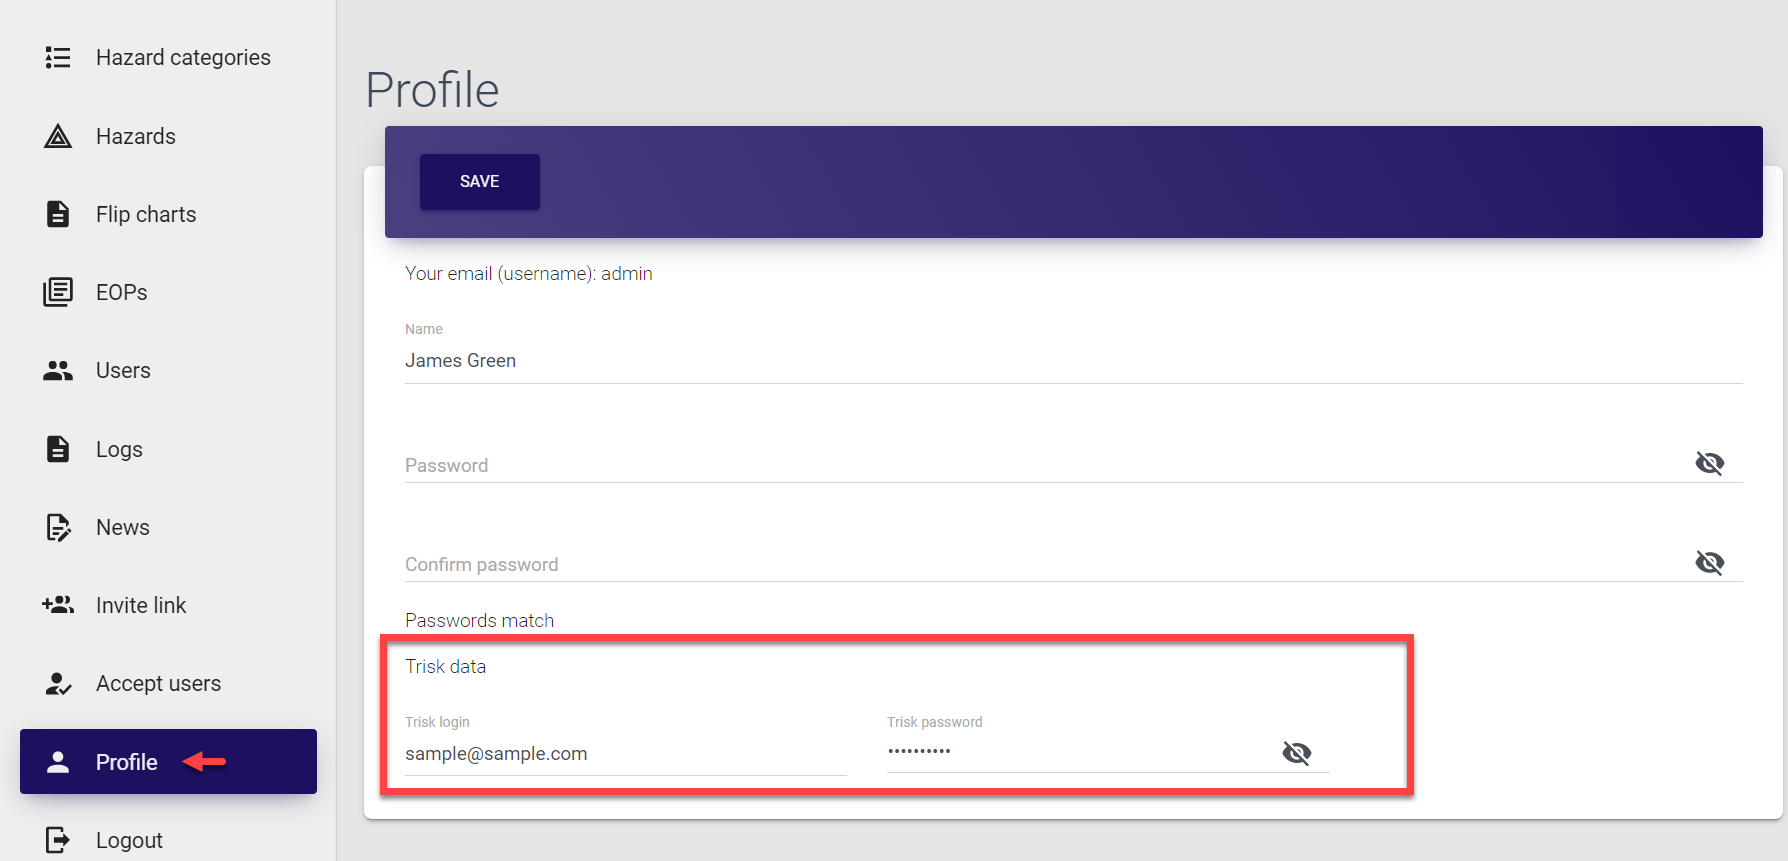
Profile
The Profile section contains all information about the logged-in user. Here you can:
-
Update your name,
-
Update your password,
-
Provide or update your Trisk details.
To save the changes, simply click Save in the top bar.
Logout
You can find the Logout option at the end of the left-side navigation menu list. Once you click the button, you end your session, log out and are directed to the Login page.

Building and uploading plans 
As a Super admin, you can access Trisk and create EOPs yourself or upload plans already available in Trisk to MO EOP system.
Building plans
EOPs, flip charts as well as any accompanying resources by default are created in Trisk. To build a plan, an admin can access Trisk directly from MO EOP control panel.
Pre-requisites
-
Login credentials provided by Trisk;
-
Super admin or District admin role in MO EOP;
-
Trisk login credentials provided in the Profile section of MO EOP control panel.
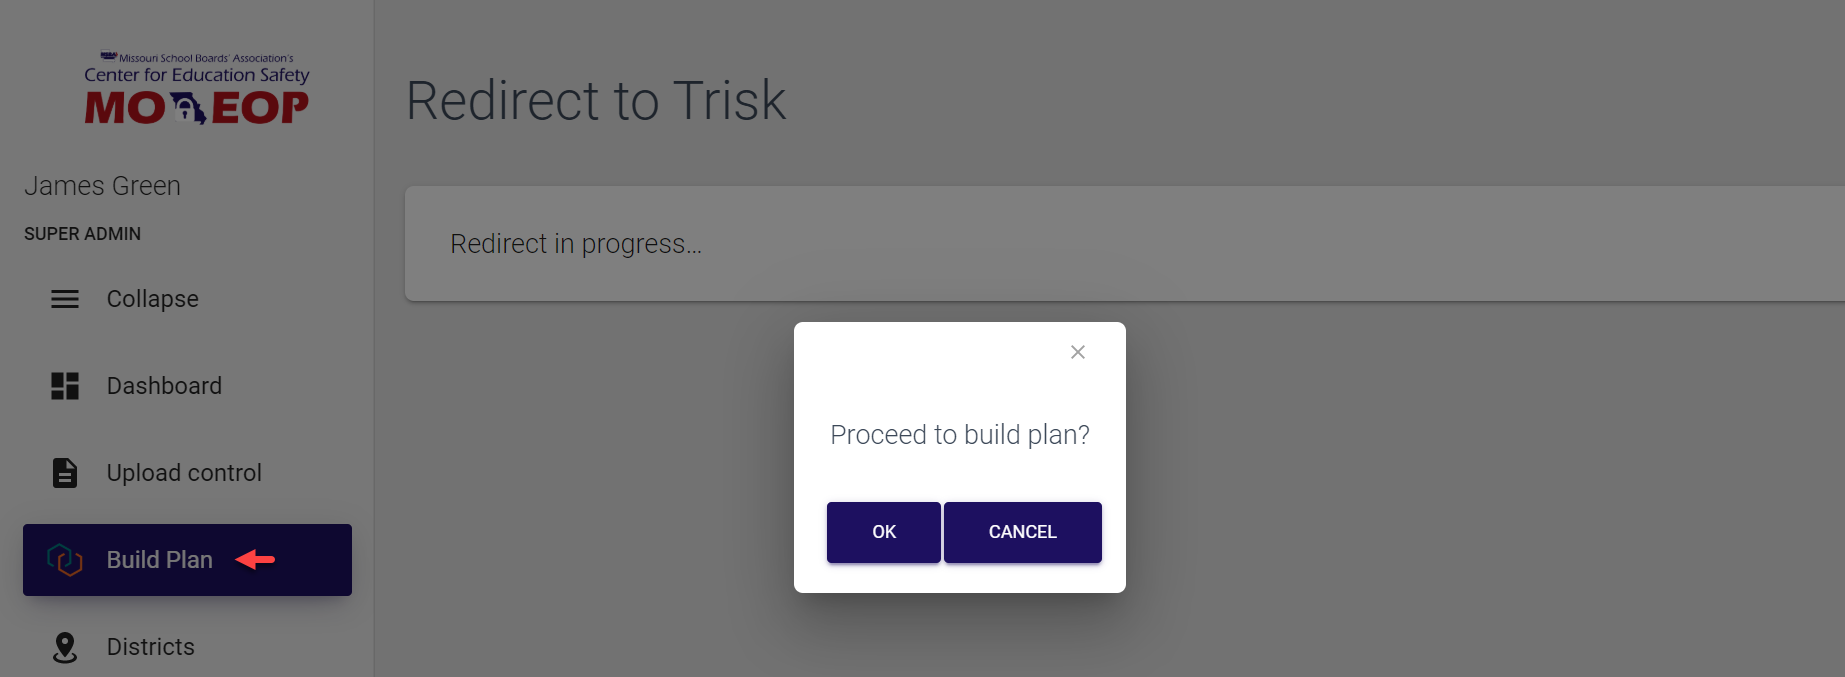
To access Trisk and to build a plan, simply select the Build plan section from the left-side navigation menu and confirm your choice by clicking Ok in the pop-up confirmation screen.
Selecting Cancel cancels the action and directs your back to the Dashboard view.
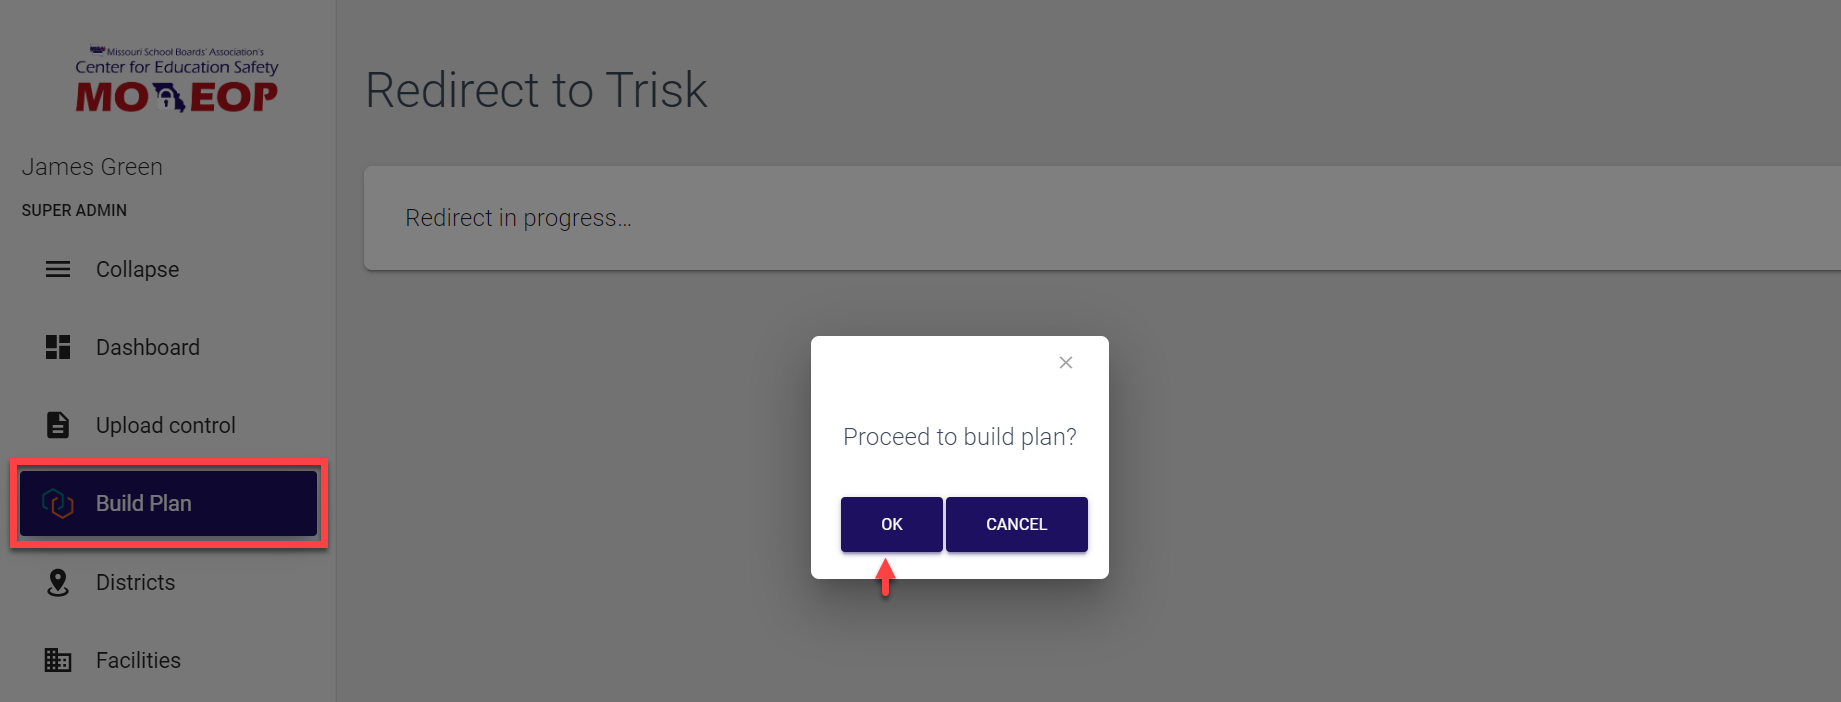
After successful confirmation, you are navigated directly to the Trisk panel where you can create EOPs, flip charts etc. as needed.
Uploading plans
As mentioned above, by default, all emergency operations plans (EOPs) as well as flip charts and resources are developed in the Trisk system. The created and approved materials can then be uploaded to MO EOP panel via the Upload control option. This is basically an interface between two systems, which allows to transfer required data and distribute it according to the area and user role.
Pre-requisites
-
Login credentials provided by Trisk;
-
Super admin role in MO EOP;
-
Trisk login credentials provided in the Profile section of MO EOP control panel.
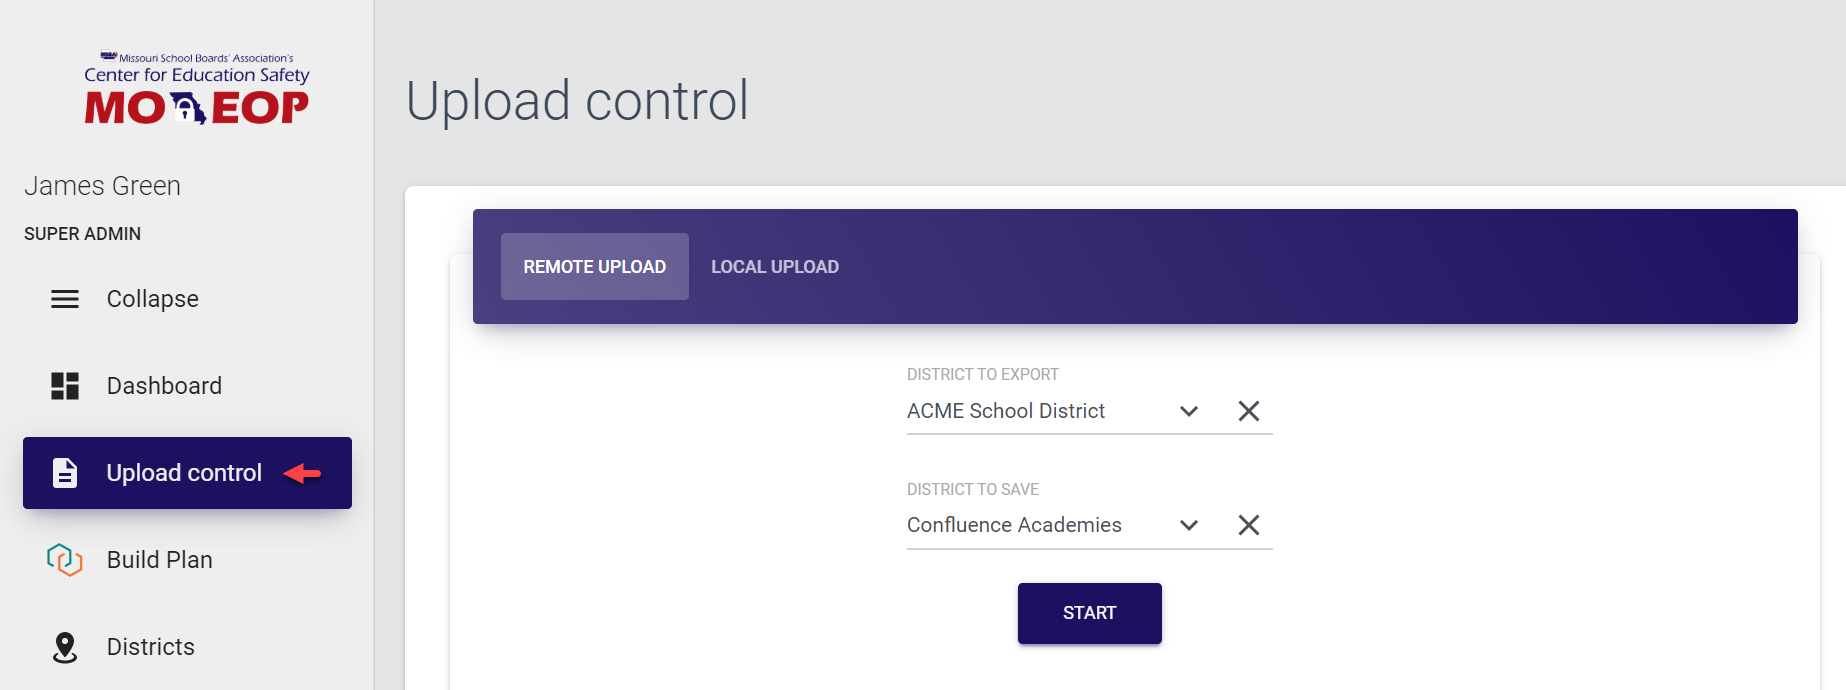
To upload data:
-
Select Upload control from the left-side navigation menu. The Remote upload tab opens by default.
The Local upload option is currently under development.
-
Select District to export. This option allows you to upload documentation created in Trisk for specific district to MO EOP panel. You can choose the district from the drop-down list or find required area by typing initial letters of the district name right in the editable field.
The list contains all districts that have their documentation configured in Trisk.
-
Select District to save. This is the place where you want to save the data in MO EOP. Same as with exported district, you can choose it from the drop-down list or find required area by typing initial letters of the district name right in the editable field.
-
Then, click Start to initiate data transfer.
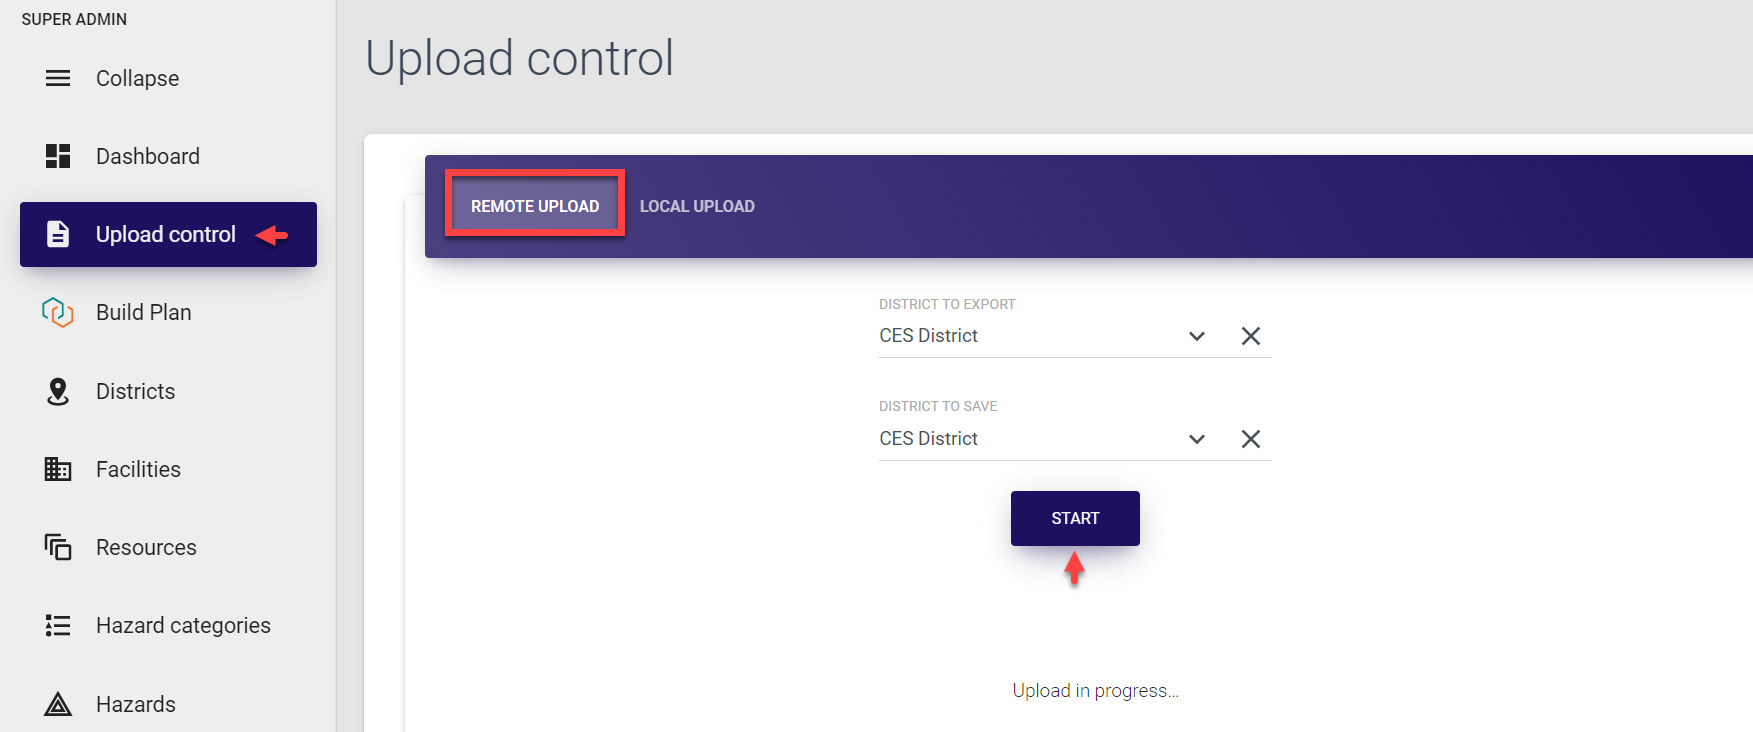
The Remote upload option transfers all the data created for a district in Trisk. This might include EOPs, flip charts and resources, which are distributed among corresponding facilities of that district. If such facilities are not yet included in the MO EOP panel, they are created automatically.
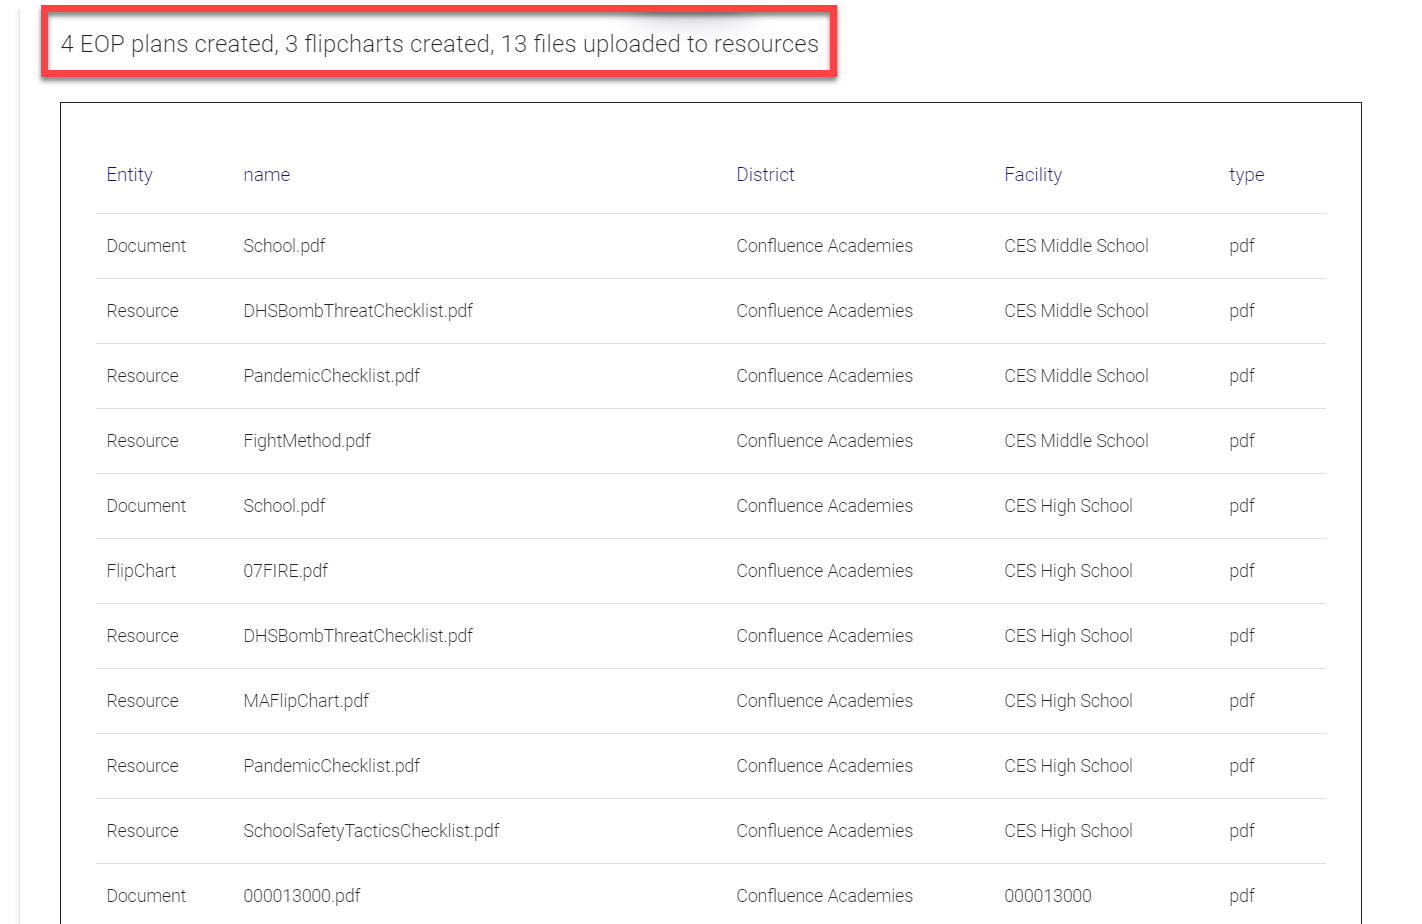
In this case, the following documents have been uploaded and the following MO EOP sections updated:
- 4 EOPs are saved and reflected in the EOPs section
- 3 flip charts are saved and reflected in the Flip charts section
- 13 resources are added and reflected in the Resources section under the Facility resources tab as all documents have been assigned the corresponding facility
Apart from that, the MO EOP facilities database has been expanded to include four new facilities, which have been included in exported district.
All newly uploaded EOPs and flip charts are also shown on the MO EOP Dashboard.
Managing EOPs 
As a Super admin, you have access to the complete range of functionality related to EOPs. By default, the list of EOPs and flip charts is auto-updated every time an admin uploads documents from Trisk. However, it is also possible to add EOPs manually as well as to update the uploaded files or to delete those that are no longer in use.
EOPs are usually created and uploaded for facilities. Each facility can have only one active version of EOP.
Adding EOPs
Even though the list is pre-populated, you can always add any new EOP. The permission to add EOPs is granted to Super admins (within entire system), District admins (for corresponding districts) and Facility admins (for corresponding facilities).
To add an EOP:
-
Select EOPs from the left-side navigation menu.
-
Click Add in the top bar of the page to open the EOP form.
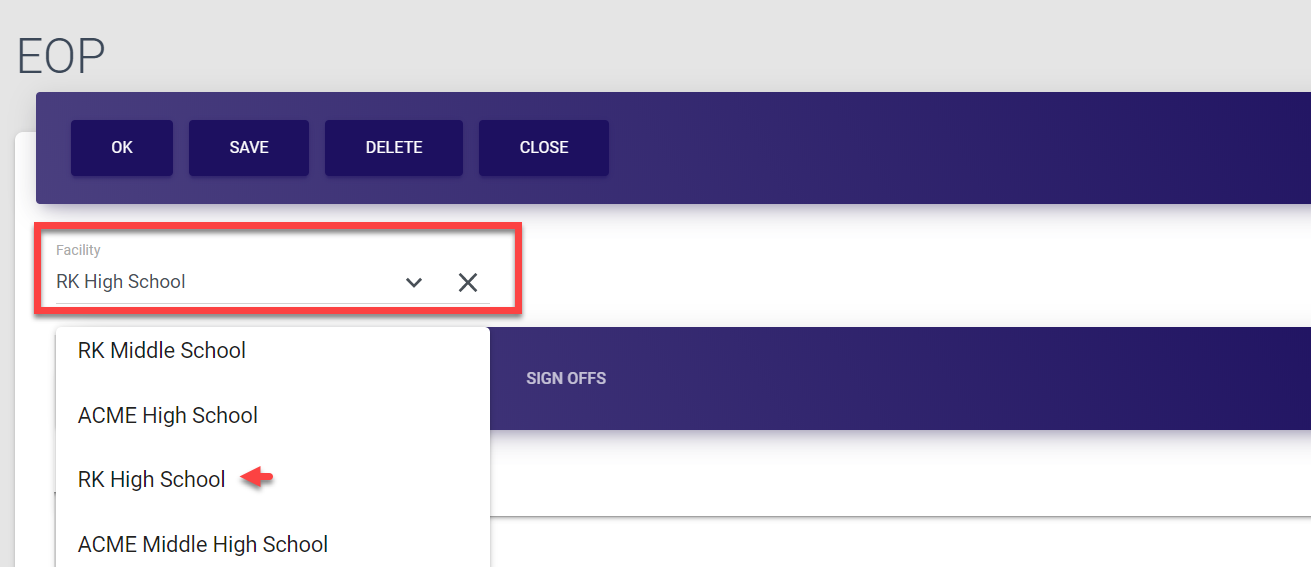
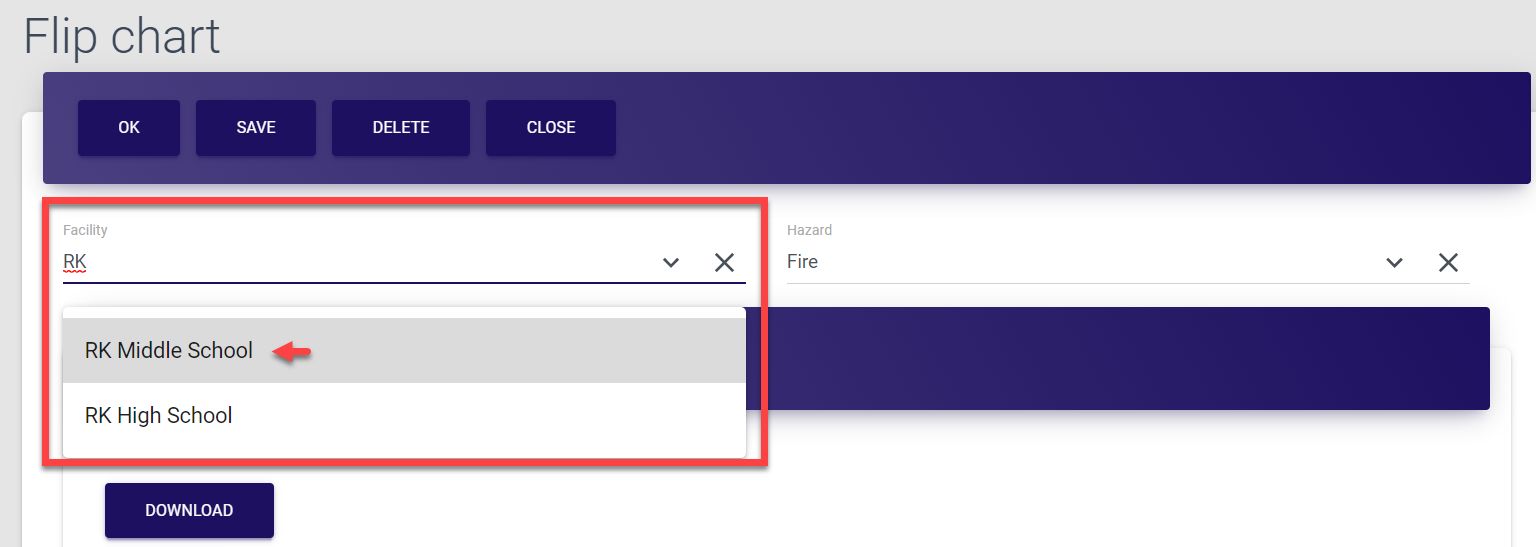
- In the EOP form, select the facility the EOP refers to. You can either select it from the drop-down list or search by typing few first letters of the facility name in the search field.
- Now, upload the document. For that, open the Select file tab of the form, click Choose file, select the file from your PC and click Upload.
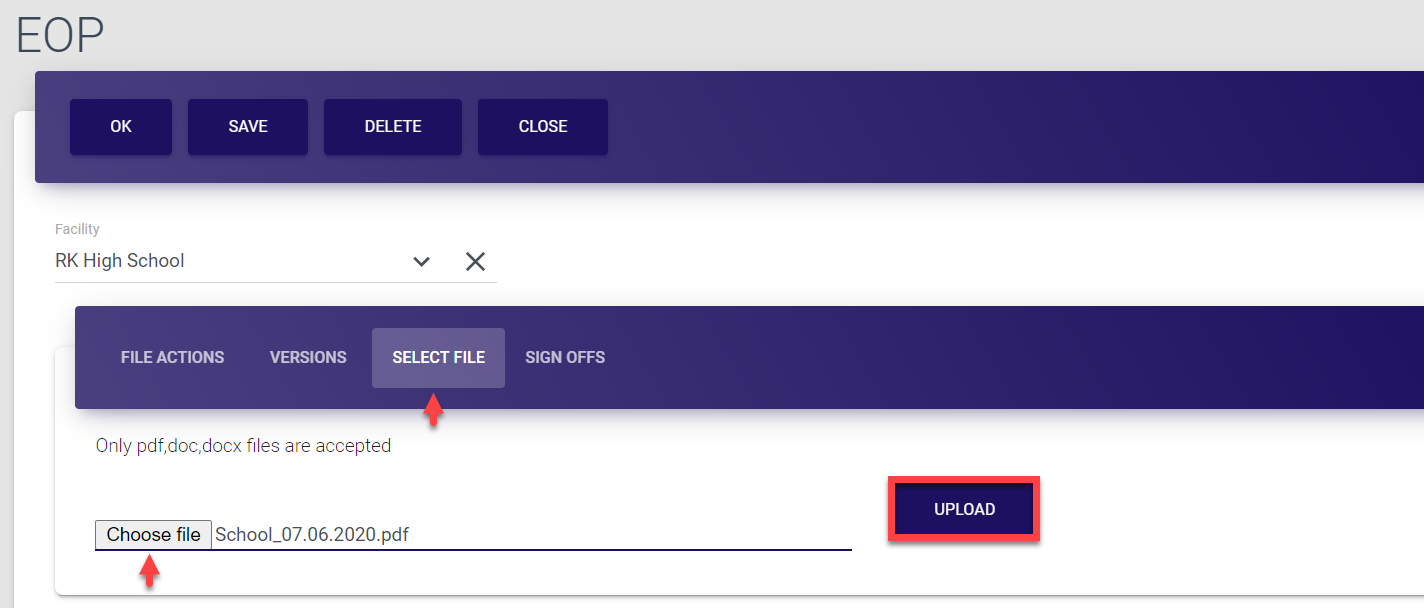
Successful upload is confirmed by the Saved! pop-up.

The file is now visible under the File actions tab, from where it can be downloaded and previewed. It is also distributed between corresponding users who can then go through the document and give their sign-off (confirmation that they’ve read it).
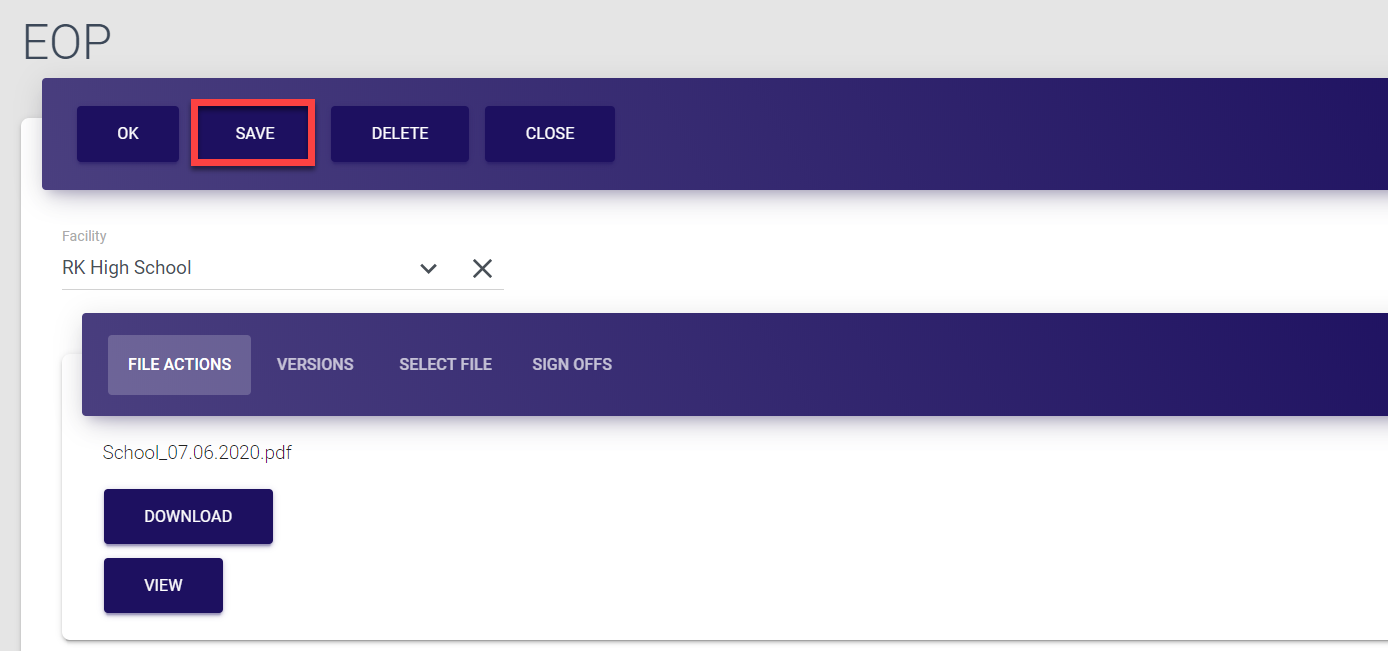
-
Finally, in the top bar menu of the EOP screen, select Save.
Selecting Ok also saves the data and directs you back to the EOPs list.Selecting Close directs you back to the EOPs list without saving the data.
Selecting Delete removes the entire EOP entry and after the deletion confirmation directs you back to the EOPs list.
Note that if you are adding EOP for a facility which already has an EOP uploaded, your document is saved in the same entry as the latest version of the EOP.

Updating EOPs
Any EOP details can be updated in MO EOP control panel whenever required. The permission to update EOPs is granted to Super admins (within entire system), District admins (for corresponding districts) and Facility admins (for corresponding facilities).
To update EOP details:
-
Select EOPs from the left-side navigation menu.
-
Find the required entry. You can search for a document by typing at least three first letters of the district or facility it refers to in the search field at the top of the list.
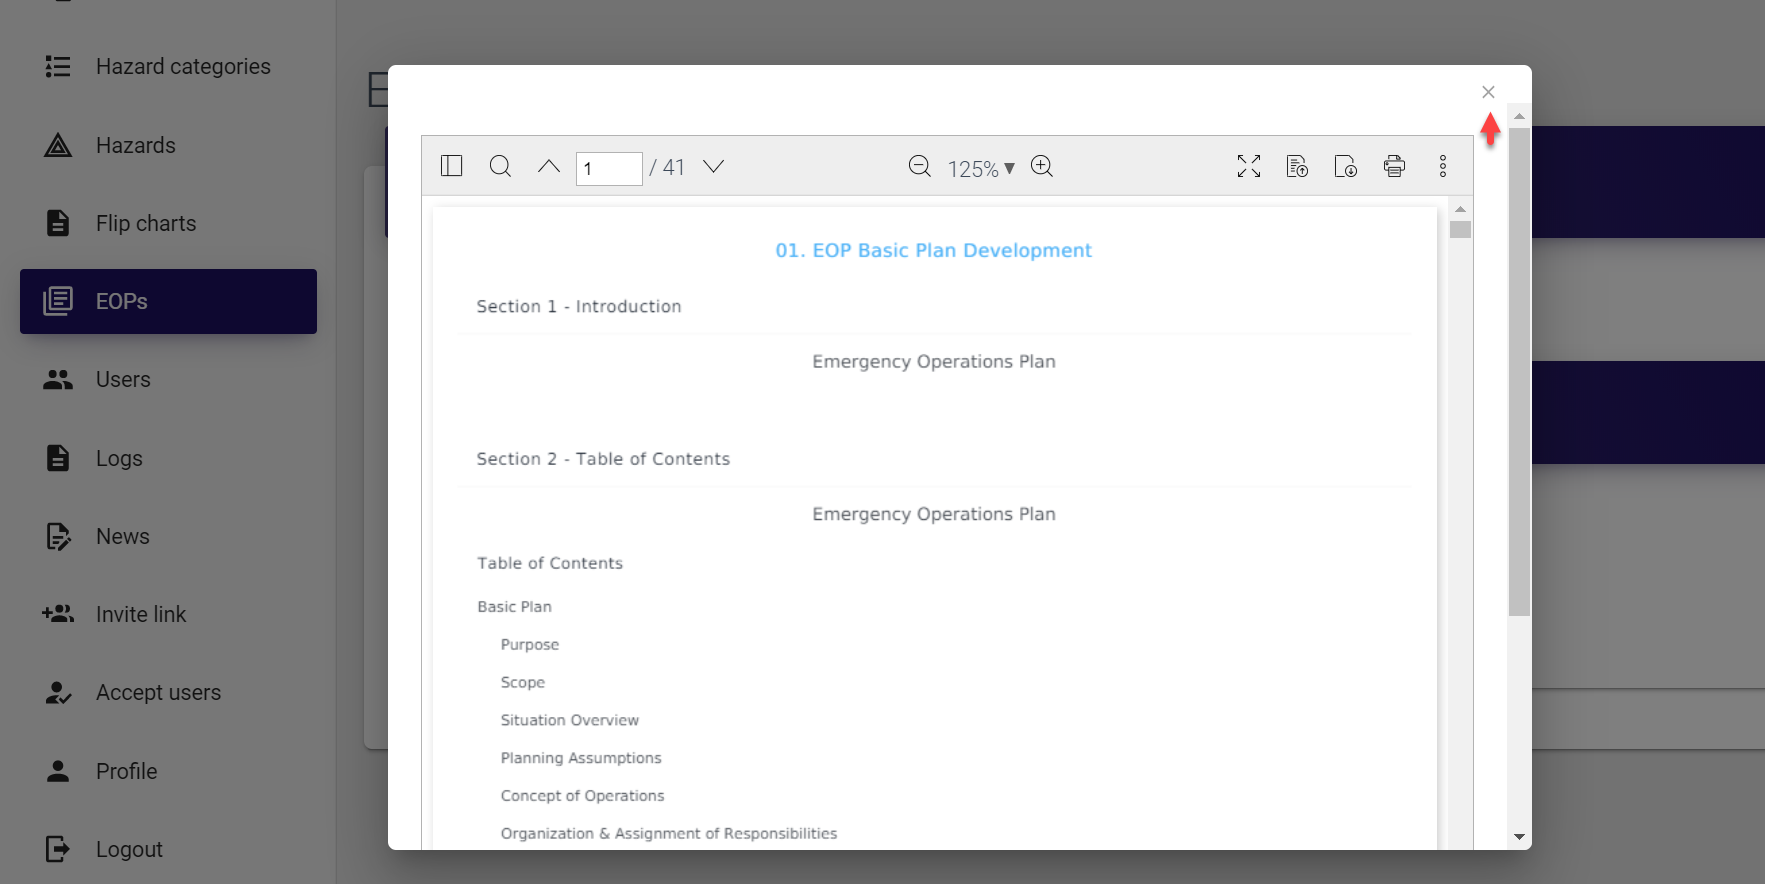
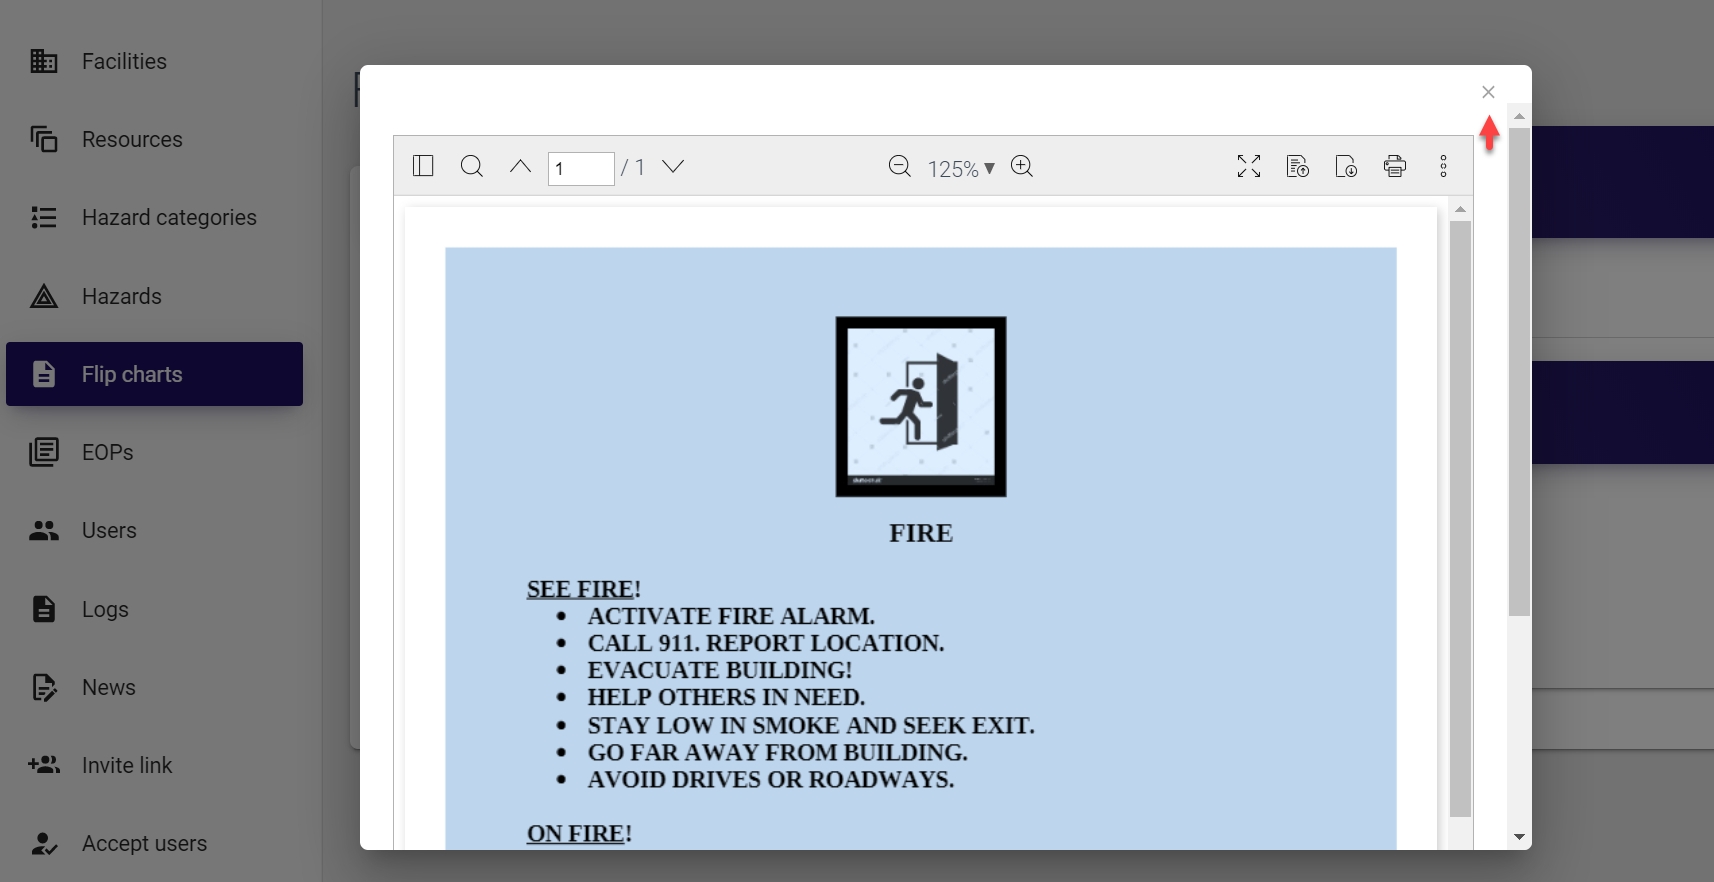
- Click the entry to open EOP details. The EOP details screen opens and the current document is shown in the preview pop-up window. You can go through the document and then exit the preview mode by clicking the cross sign icon in the top right corner of the pop-up window.

- On the EOP screen, update all required details. Here, you can:
To change the facility, either select it from the drop-down list or search by typing few first letters of the facility name in the search field.

To update the EOP version, open the Select file tab of the form, click Choose file, select the file from your PC and click Upload.

Successful upload is confirmed by the Saved! pop-up.
Once the new document is uploaded, it is saved as the latest version of EOP under the Versions tab and becomes the current active EOP for the facility.
All versions of the EOP are saved in the system and you can download any document by clicking its name in the Versions tab.
-
Finally, in the top bar menu of the EOP screen, select Save.
Selecting Ok also saves the data and directs you back to the EOPs list.Selecting Close directs you back to the EOPs list without saving the data.
Selecting Delete removes the entire EOP entry and after the deletion confirmation directs you back to the EOPs list.

Deleting EOPs
If needed, any emergency operations plan can be deleted from MO EOP database. The permission to delete EOPs is granted to Super admins (within entire system), District admins (for corresponding districts) and Facility admins (for corresponding facilities).
To delete an EOP:
-
Select EOPs from the left-side navigation menu.
-
Find the required entry. You can search for a document by typing at least three first letters of the district or facility it refers to in the search field at the top of the list.

- Click the entry to open EOP details. The EOP details screen opens and the current document is shown in the preview pop-up window. You can go through the document and then exit the preview mode by clicking the cross sign icon in the top right corner of the pop-up window.
- On the EOP details screen, simply click Delete in the top bar menu and select OK in the pop-up confirmation window to confirm your choice.
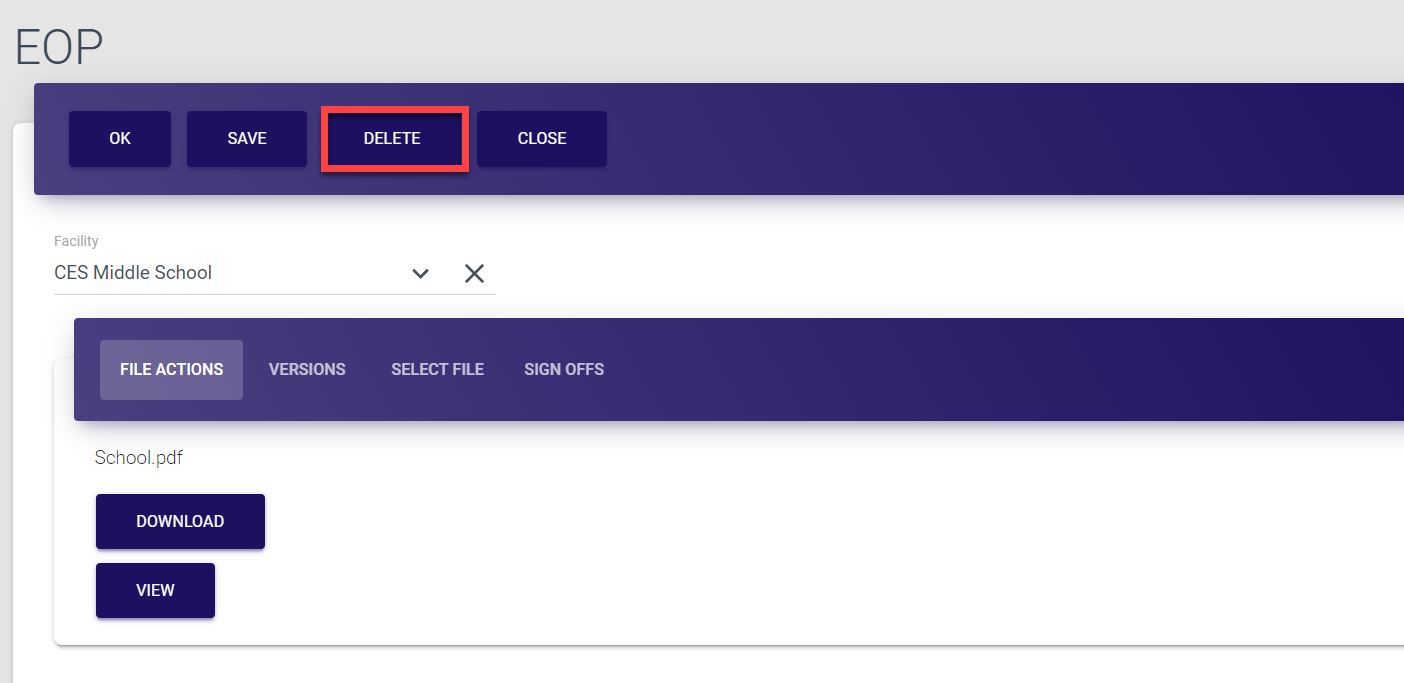
The Deleted! message is briefly displayed on the screen to confirm successful completion of the operation. The entry is now deleted and removed from the EOPs list.

Managing flip charts 
As a Super admin, you have access to the complete range of functionality related to flip charts. By default, the list of EOPs and flip charts is auto-updated every time an admin uploads documents from Trisk. However, it is also possible to add flip charts manually as well as to update the uploaded files or to delete those that are no longer in use.
Flip charts are usually created and uploaded for facilities. Each facility can have as many flip charts as required.
Adding flip charts
Even though the list is pre-populated, you can always add any new flip chart for a facility. The permission to add flip charts is granted to Super admins (within entire system), District admins (for corresponding districts) and Facility admins (for corresponding facilities).
To add a flip chart:
-
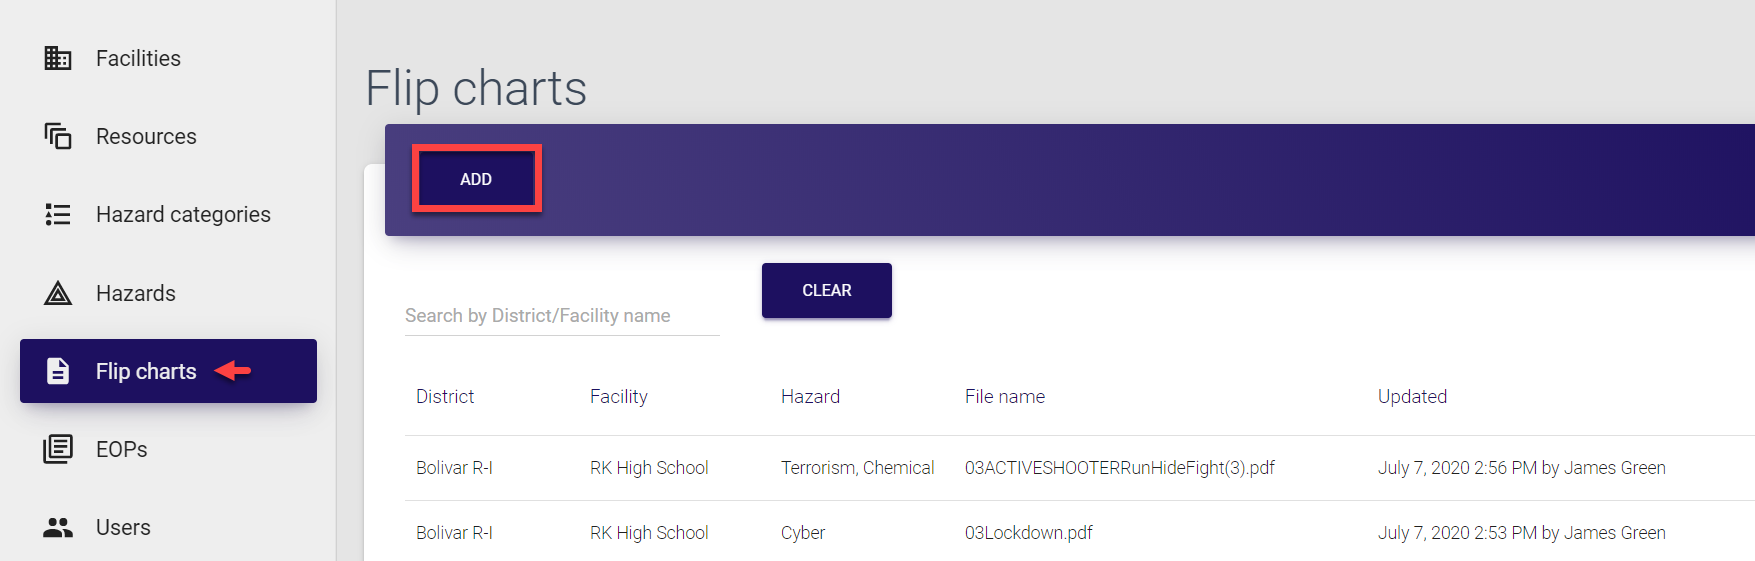
Select Flip charts from the left-side navigation menu.
-
Click Add in the top bar of the page to open the Flip chart form.
-
In the Flip chart form, select the facility the document refers to. You can either select it from the drop-down list or search by typing few first letters of the facility name in the search field.
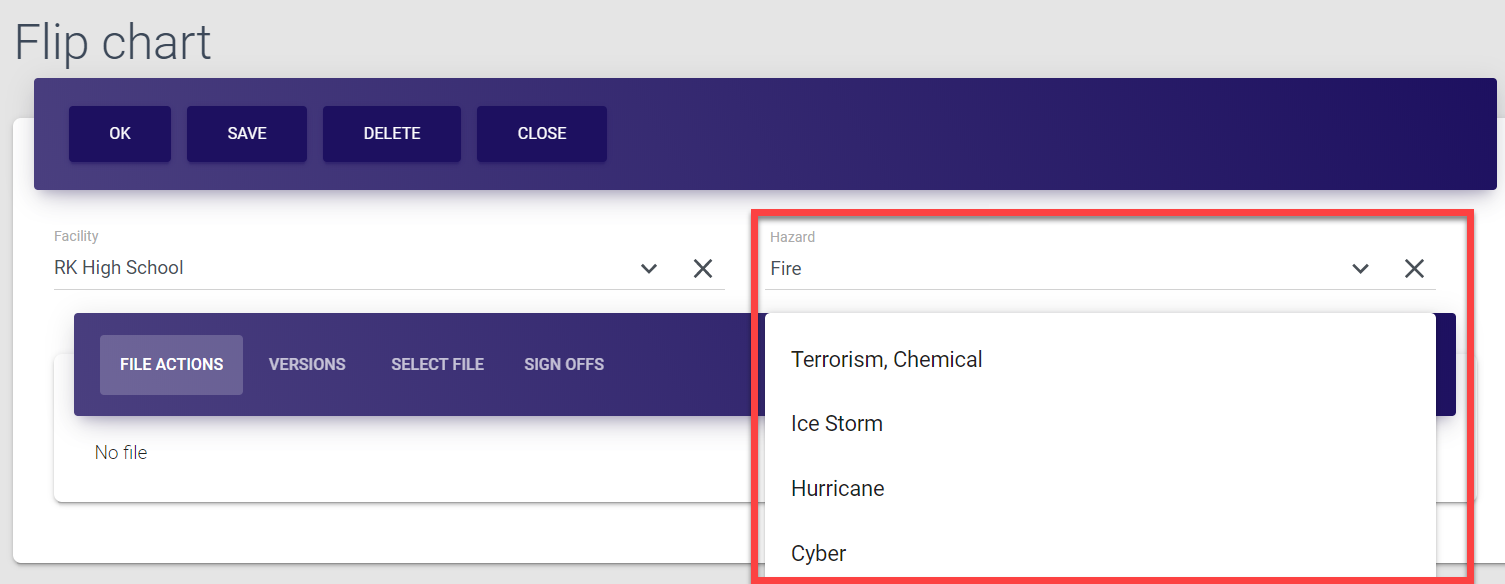
-
Select the hazard type. Same as with facilities, you can either select it from the drop-down list or search by typing few first letters of the hazard name in the search field. All hazard options are configured in the Hazards section.
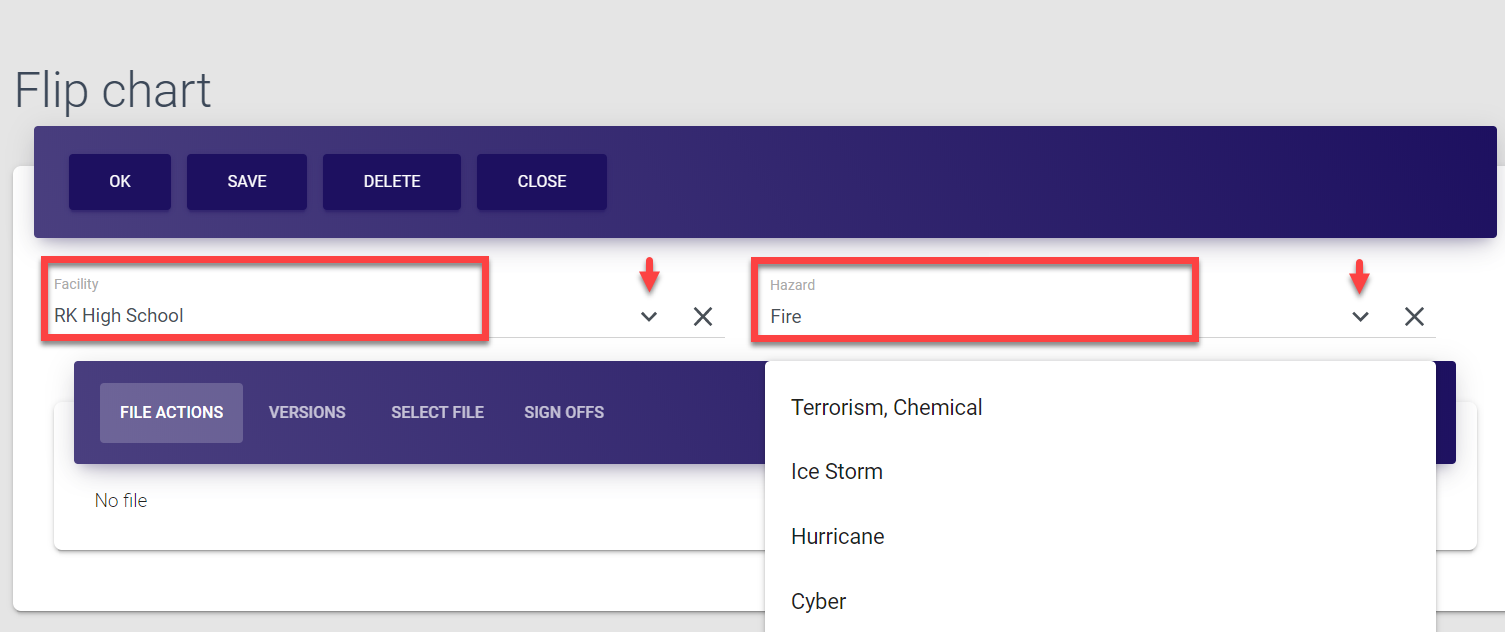
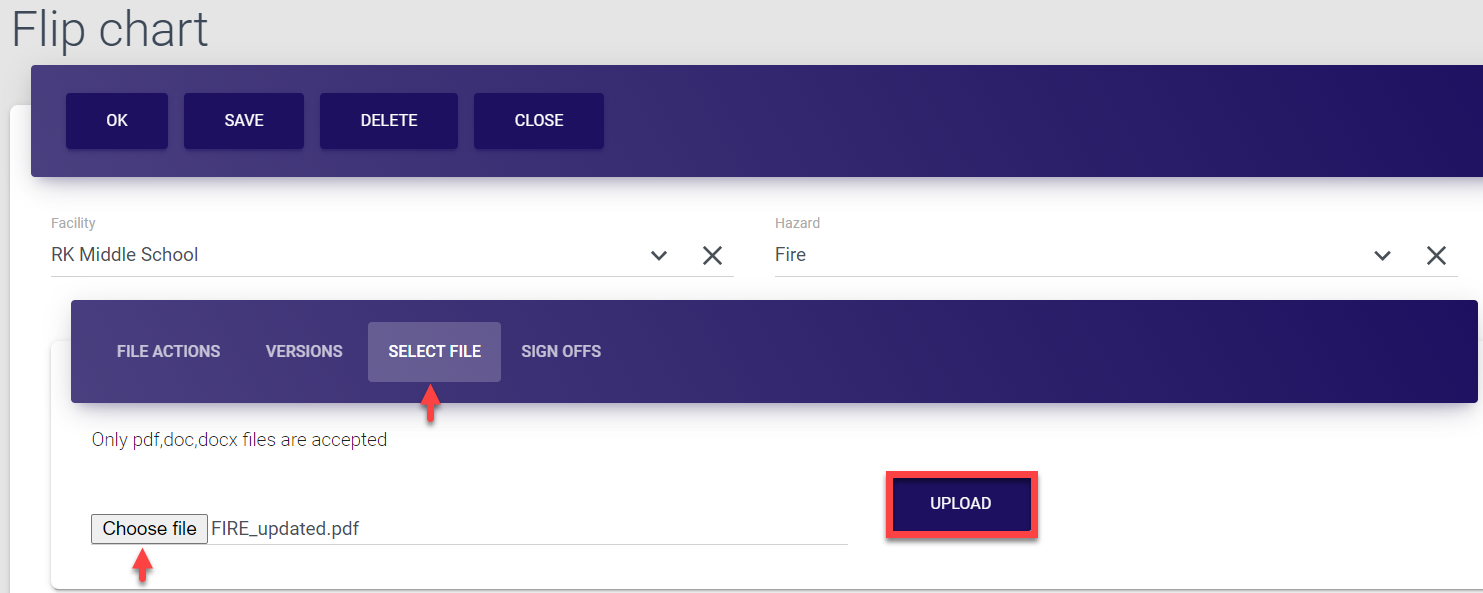
- Now, upload the document. For that, open the Select file tab of the form, click Choose file, select the file from your PC and click Upload.
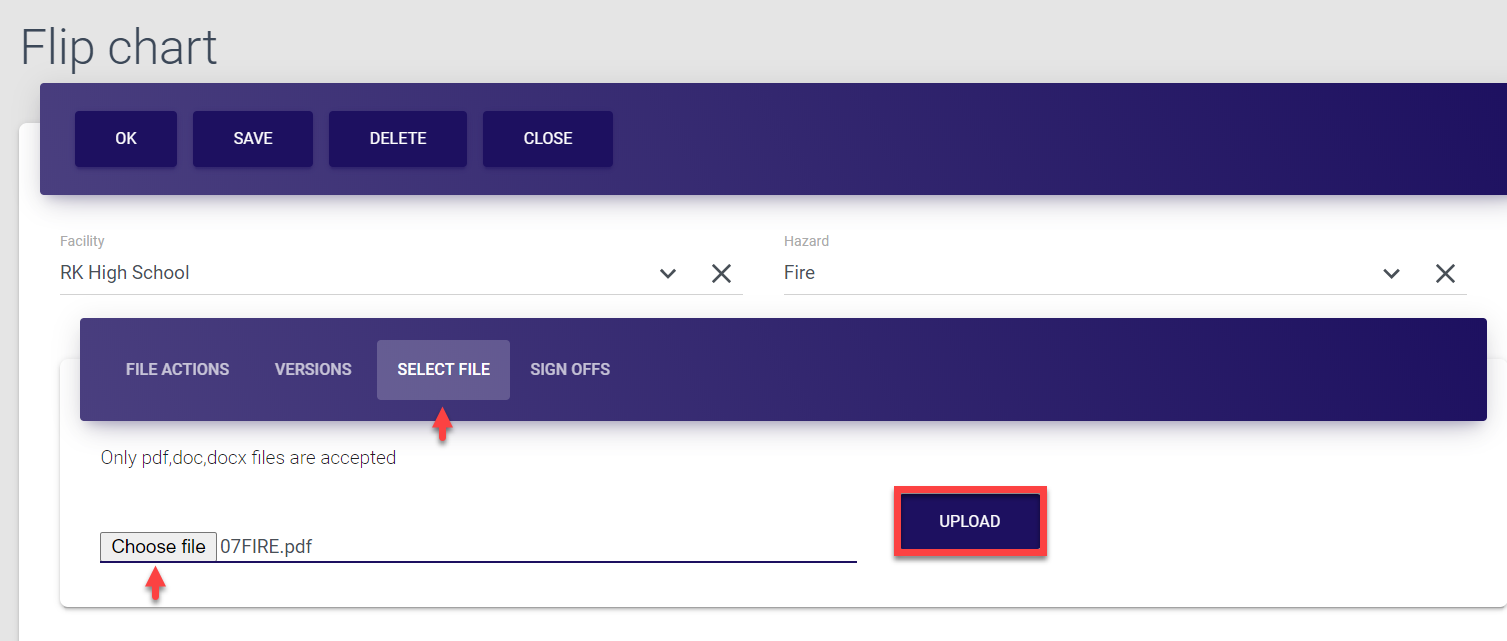
Successful upload is confirmed by the Saved! pop-up.
The file is now visible under the File actions tab, from where it can be downloaded and previewed. It is also distributed between corresponding users who can then go through the document and give their sign-off (confirmation that they’ve read it).
-
Finally, in the top bar menu of the Flip chart screen, select Save.
Selecting Ok also saves the data and directs you back to the Flip charts list.Selecting Close directs you back to the Flip charts list without saving the data.
Selecting Delete removes the entire flip chart entry and after the deletion confirmation directs you back to the Flip charts list.

Each added Flip chart entry is saved separately, even though the facility and hazard could be the same. If you want to update an existing entry rather than adding a new one for a facility, refer to the section below.
Updating flip charts
Any flip chart details can be updated in MO EOP control panel whenever required. The permission to update flip charts is granted to Super admins (within entire system), District admins (for corresponding districts) and Facility admins (for corresponding facilities).
To update a flip chart:
-
Select Flip charts from the left-side navigation menu.
-
Find the required entry. You can search for a flip chart by typing at least three first letters of the district or facility it refers to in the search field at the top of the list.

- Click the entry to open flip chart details. The Flip chart screen opens and the current document is shown in the preview pop-up window. You can go through the document and then exit the preview mode by clicking the cross sign icon in the top right corner of the pop-up window.
- On the Flip chart screen, update all required details. Here, you can:
To change the facility, either select it from the drop-down list or search by typing few first letters of the facility name in the search field.
To change the hazard type, either select it from the drop-down list or search by typing few first letters of the hazard name in the search field.
To update the flip chart version, open the Select file tab of the form, click Choose file, select the file from your PC and click Upload.
Successful upload is confirmed by the Saved! pop-up.
Once the new document is uploaded, it is saved as the latest version of the flip chart under the Versions tab and becomes the current active document for the facility.
All versions of the flip charts are saved in the system and you can download any document by clicking its name in the Versions tab.
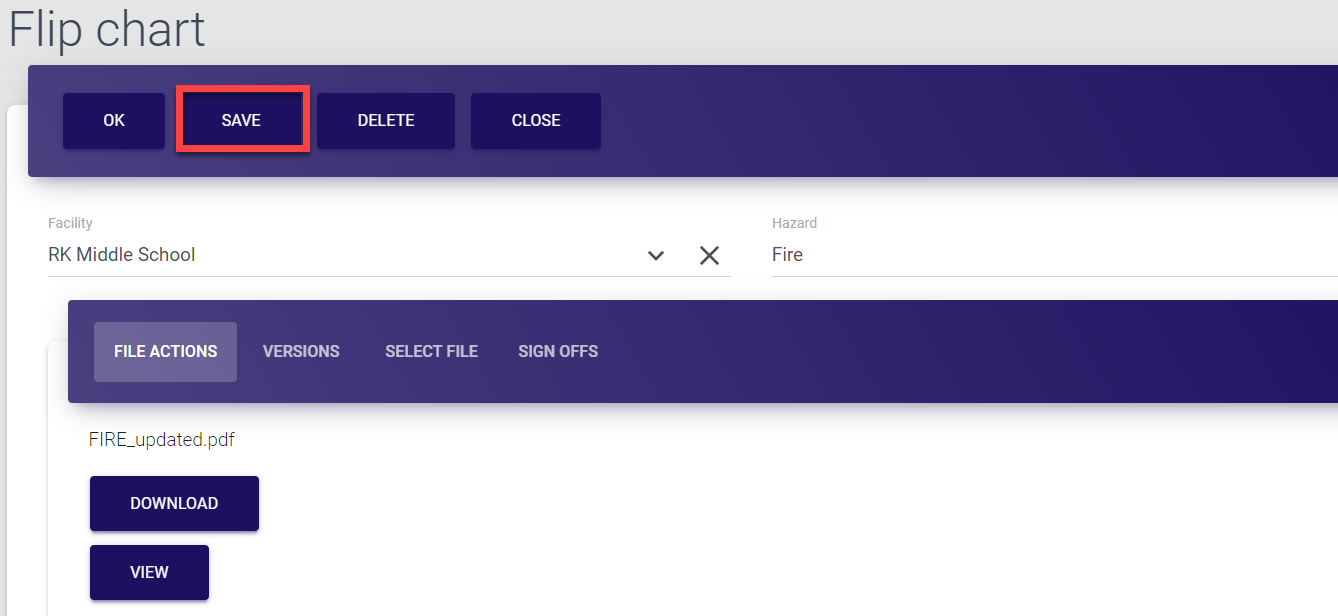
-
Finally, in the top bar menu of the Flip chart screen, select Save.
Selecting Ok also saves the data and directs you back to the Flip charts list.Selecting Close directs you back to the Flip charts list without saving the data.
Selecting Delete removes the entire flip chart entry and after the deletion confirmation directs you back to the Flip charts list.
Deleting flip charts
If needed, any flip chart can be deleted from MO EOP database. The permission to delete flip charts is granted to Super admins (within entire system), District admins (for corresponding districts) and Facility admins (for corresponding facilities).
To delete a flip chart:
-
Select Flip charts from the left-side navigation menu.
-
Find the required entry. You can search for a flip chart by typing at least three first letters of the district or facility it refers to in the search field at the top of the list.
- Click the entry to open flip chart details. The Flip chart screen opens and the current document is shown in the preview pop-up window. You can go through the document and then exit the preview mode by clicking the cross sign icon in the top right corner of the pop-up window.

- On the Flip chart screen, simply click Delete in the top bar menu and select OK in the pop-up confirmation window to confirm your choice.
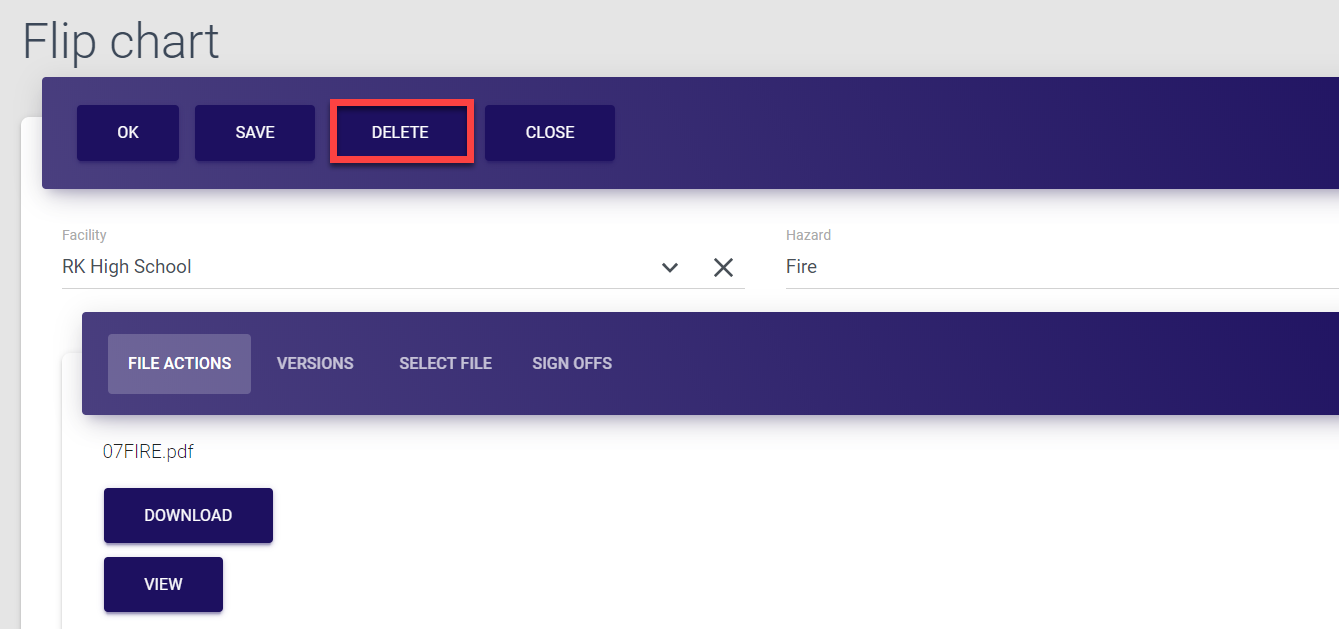
The Deleted! message is briefly displayed on the screen to confirm successful completion of the operation. The entry is now deleted and removed from the Flip charts list.
Managing resources 
As a Super admin, you have access to all resources as well as to the entire range of related available functionality. For example, you can add new resources, modify existing ones or delete those that are no longer needed.
By default, resources are added to MO EOP every time an admin uploads data from the Trisk system or manually adds resources to district and/or facility entries.
All resources are subdivided into three sections:
-
MO EOP resources - resources that apply to the entire system, or any resources added without a dedicated district/facility.
-
District resources - resources that apply to specific districts, either uploaded from Trisk or added manually via MO EOP panel.
-
Facility resources - resources that apply to specific facilities, either uploaded from Trisk or added manually via MO EOP panel.
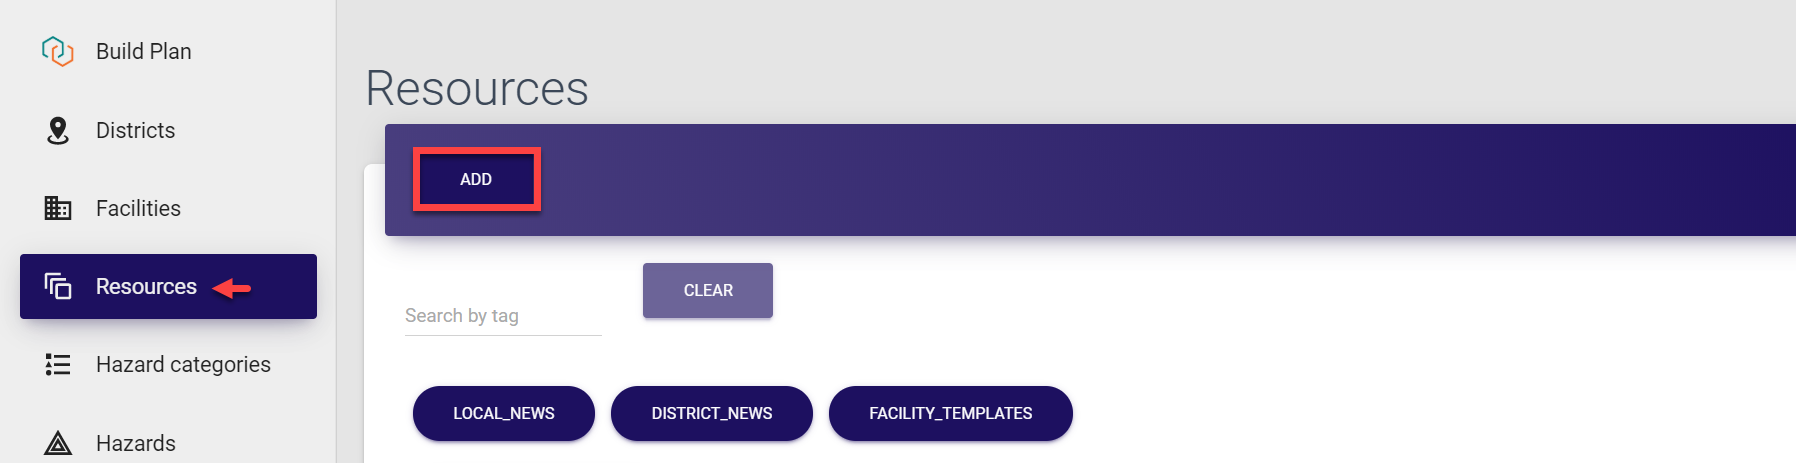
The list of all resources is located under the Resources tab of the MO EOP navigation menu. Here, you can:
Adding resources
Resources in this section (MO EOP / District / Facility resources) can only be added by Super admin.
To add a resource:
-
Select Resources from the left-side navigation menu.
-
Click Add in the top bar of the page to open the Resource form.
-
In current implementation, all the fields of the form are optional, however, we recommend to provide as much information as possible for easier operation and management.
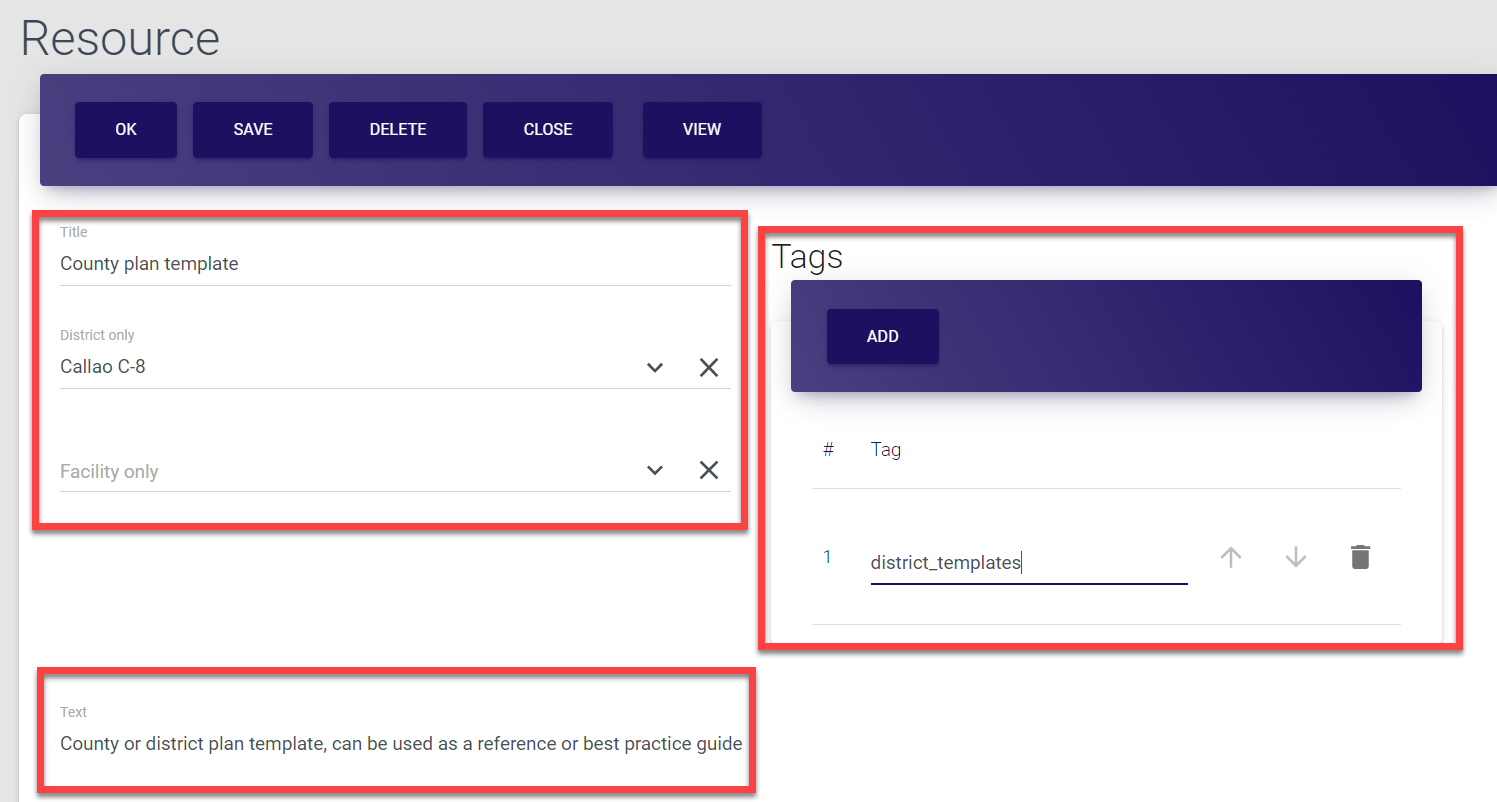
In the form, provide general information about the resource:
-
Resource name,
-
Resource area reference (if the resource refers to any particular district/facility, select the district/facility from the drop-down list in the corresponding field),
-
Resource tag (it is highly recommended to use tags as they simplify the search and management of resources),
-
Resource description (this text appears on the Resource summary card and helps to explain the purpose/content of added materials).
If you do not select any district or facility when adding a resource, it is assumed that the resource refers to the entire state/system and it will be saved under the MO EOP resources tab of the Resources section.
If you select a district when adding a resource, the resource will be saved under the District resources tab.
If you select a facility (or both district and facility) when adding a resource, the resource will be saved under the Facility resources tab.

- At this stage, select Save in the top bar menu of the Resource screen. This basically creates a new resource entry in the database and now, all the materials you might add in the next step, will be assigned accordingly.
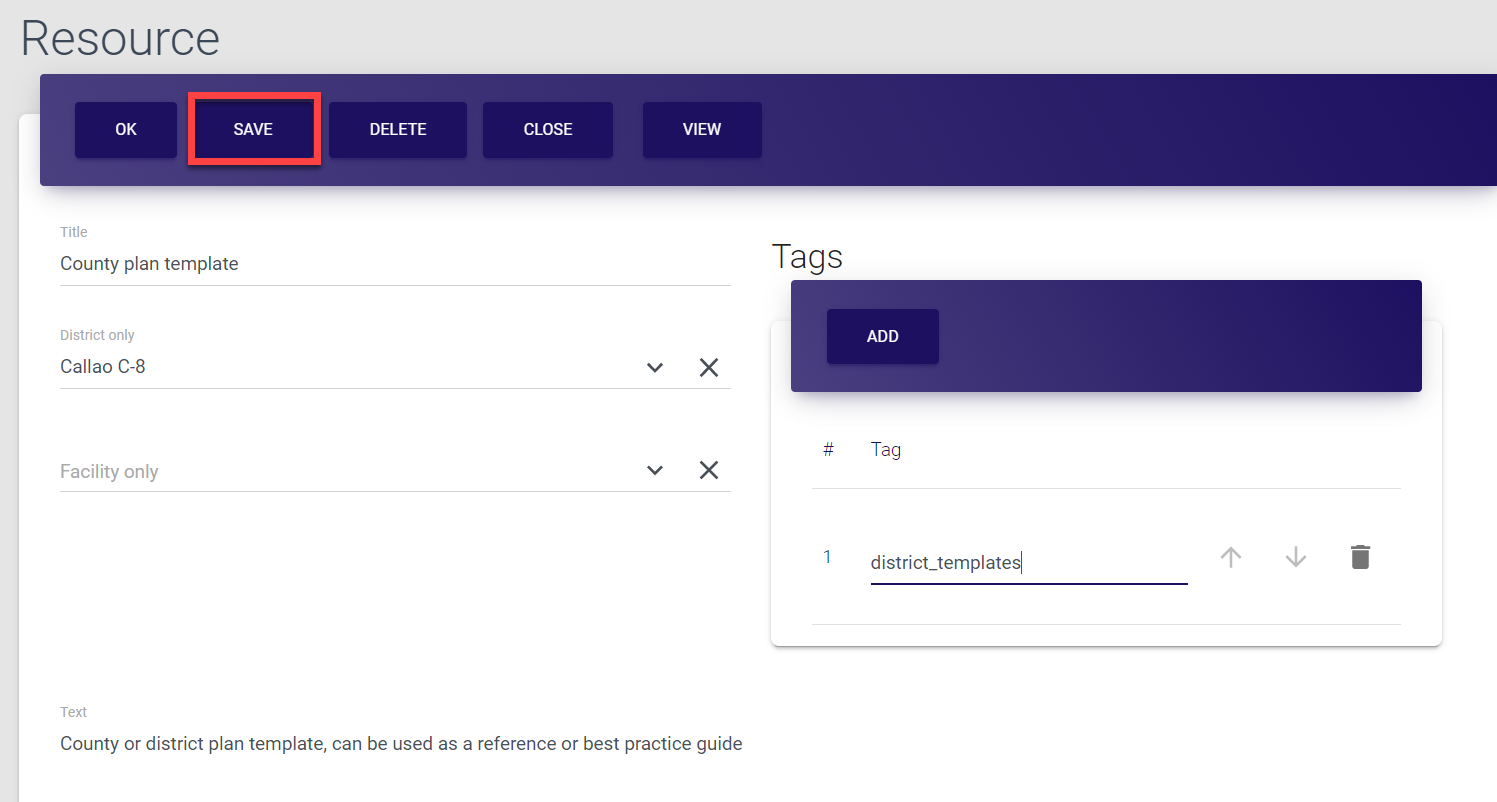
Once you save the data, your action is confirmed by the brief pop-up notification displayed at the bottom of the page. The new entry is now created and added to the Resources list.
If you skip this step and proceed to adding materials without saving your entry, all added files/links will be saved in the Resources section of the control panel under the MO EOP resources tab.
Each uploaded file must not exceed 20 Mb.

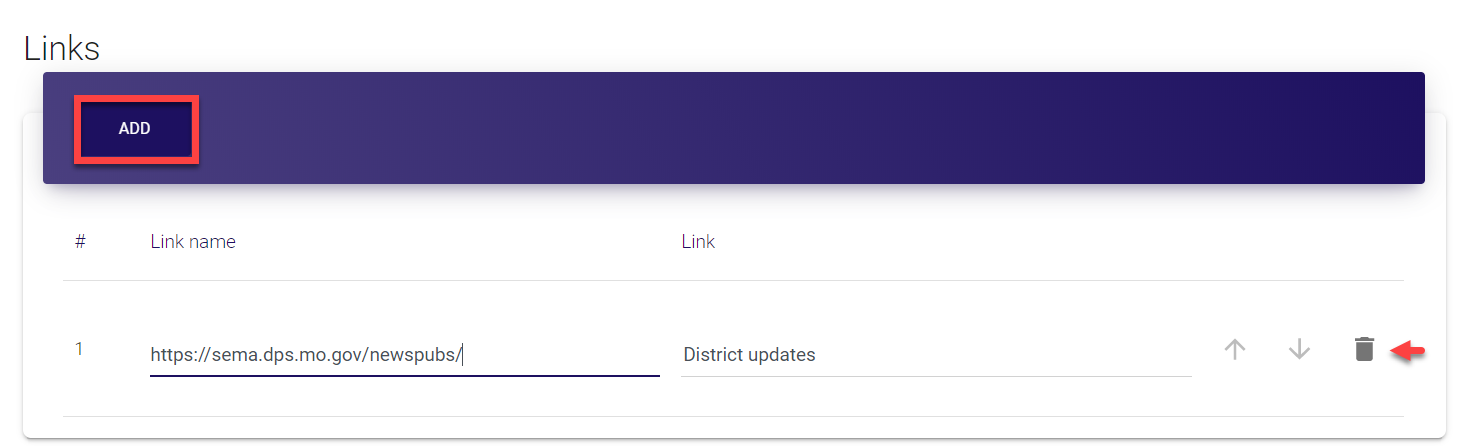
- To add a link, click Add and provide the link URL and name. You can repeat the process to add as many links as needed.
Once the link is added, the following options become available:
-
You can update the link details in the editable fields.
-
You can delete the link by clicking the trash can icon against required item.
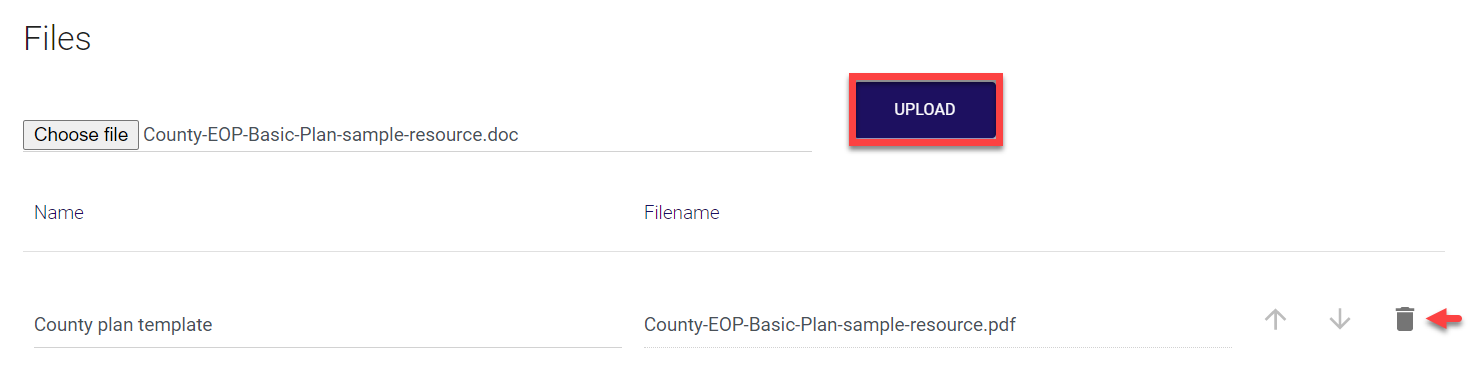
- To add a file, click Choose file, select the file from your PC, and press Upload. You can repeat the process to add as many files as needed.
Once the file is uploaded, the following options become available:
-
You can update the file name in the editable field (by default, the name is the same as the uploaded file name).
-
You can delete the file by clicking the trash can icon against required item.
You can upload files basically in any format - documents as well as images. Images are saved in the format they are uploaded while all documents are automatically converted to PDF format.
-
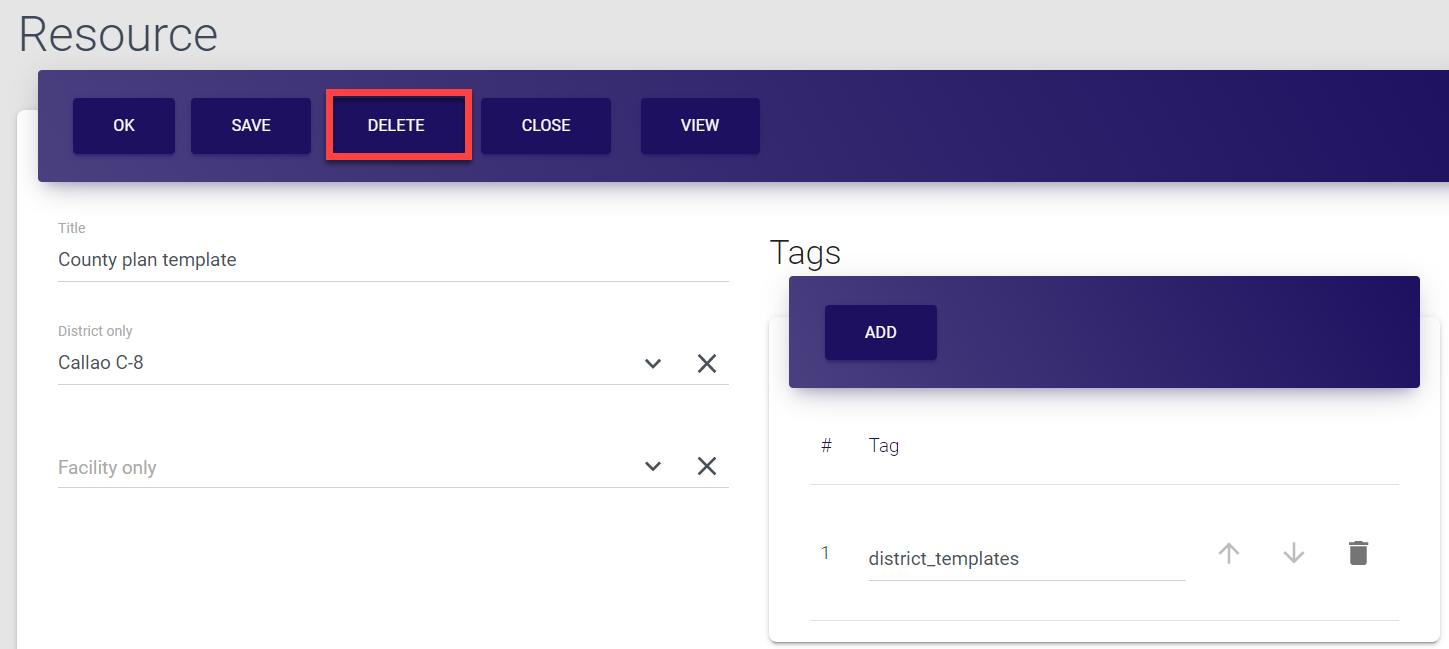
Finally, in the top bar menu of the Resource screen, select Save again.
Selecting Ok also saves the data and directs you back to the Resources screen.Selecting Close directs you back to the Resources screen without saving the data.
Selecting Delete removes the entire Resource entry and after the deletion confirmation directs you back to the Resources screen.
Selecting View opens the Resource summary card.
Once you save the data, your action is confirmed by the brief pop-up notification displayed at the bottom of the page. The resource entry is saved and added to the list under the corresponding tab (MO EOP resources, District resources or Facility resources).
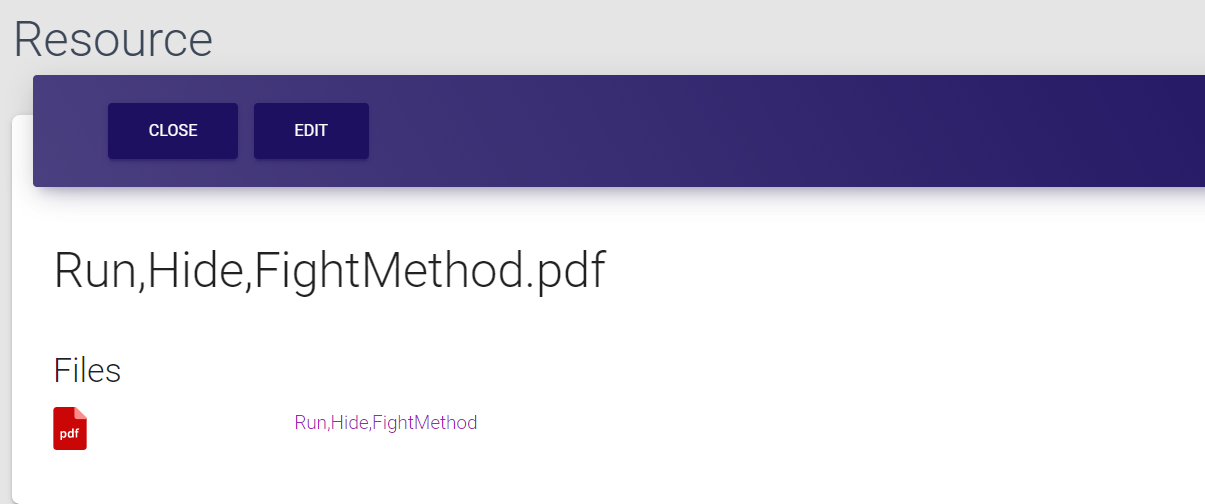
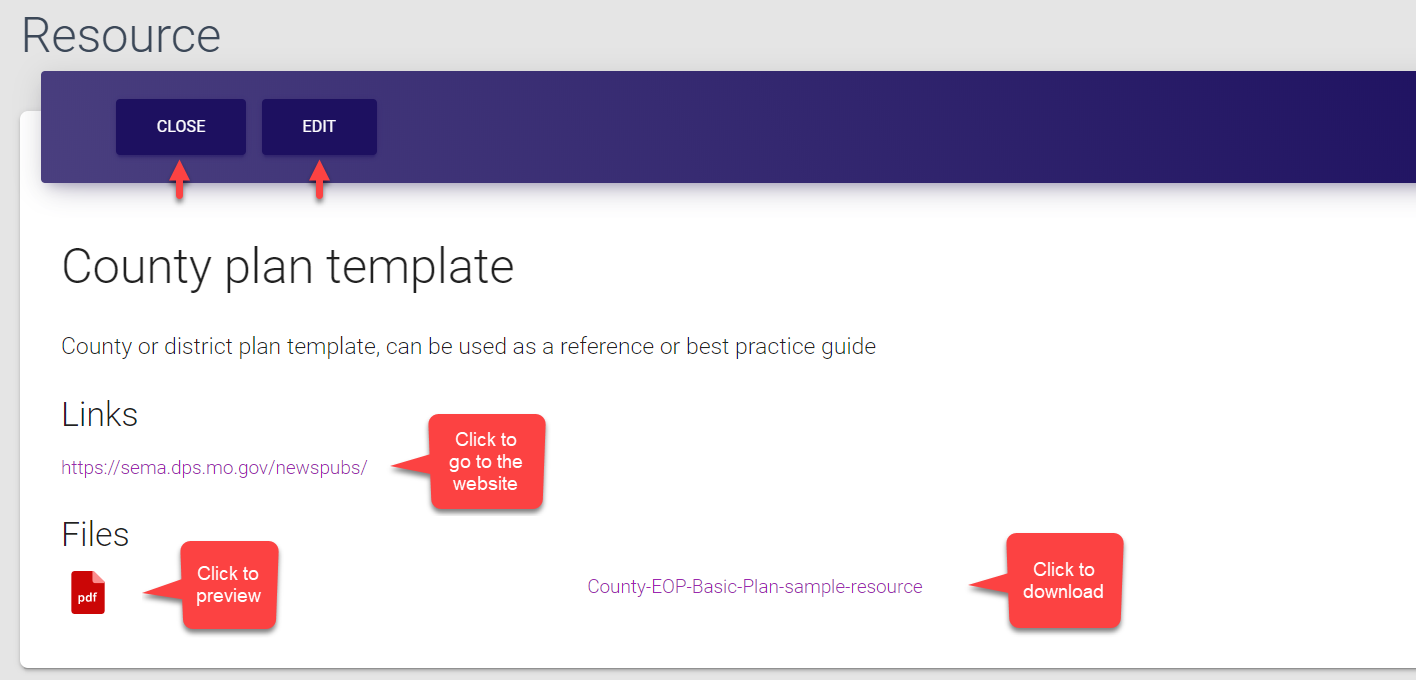
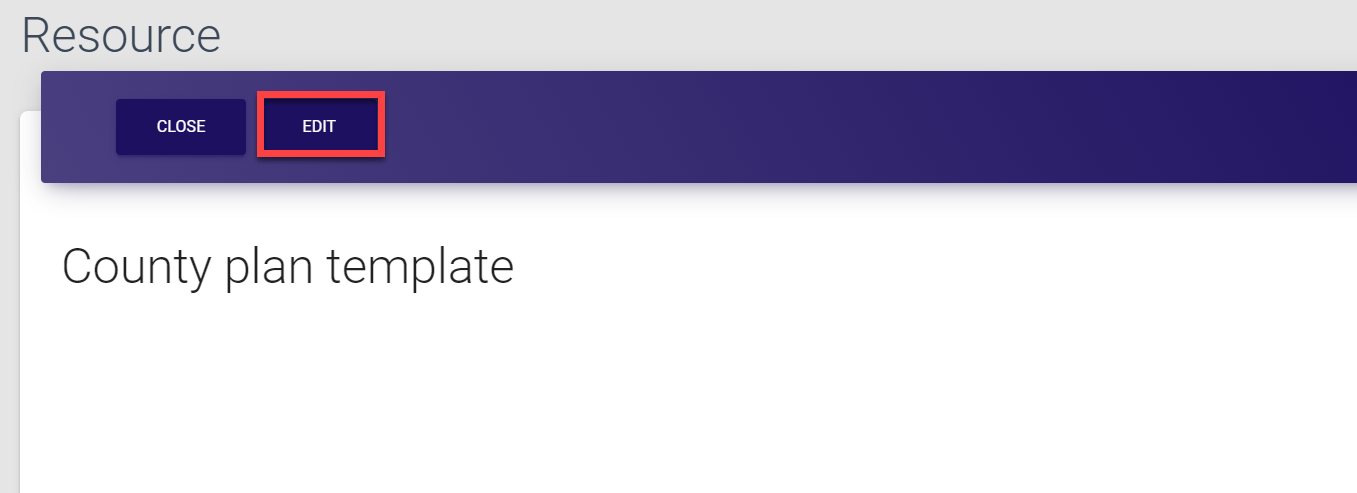
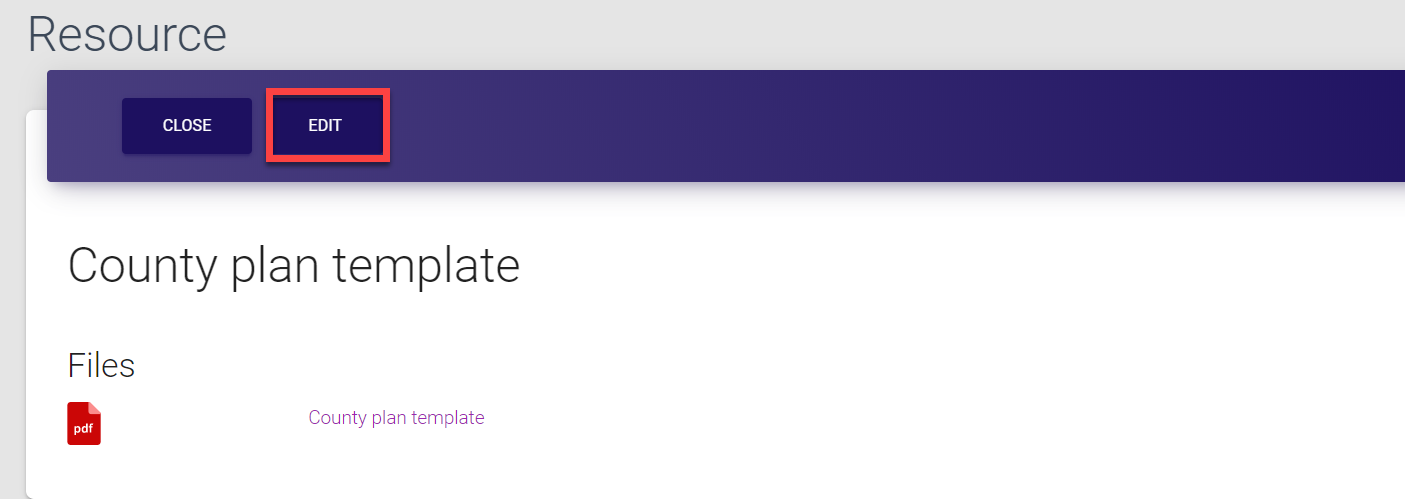
Resource summary card
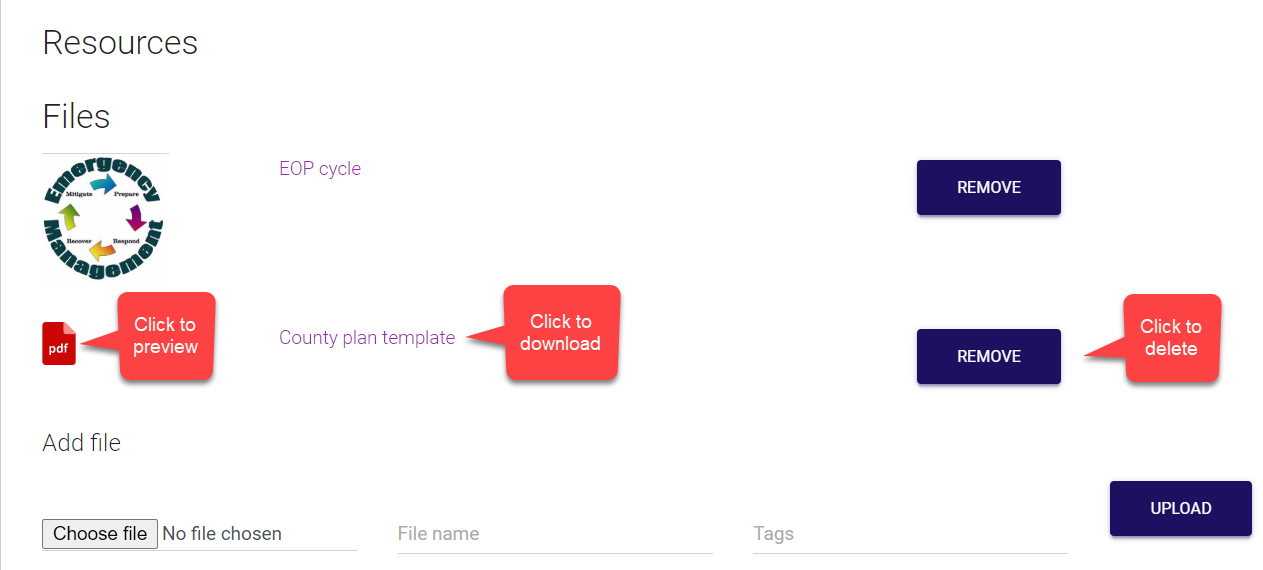
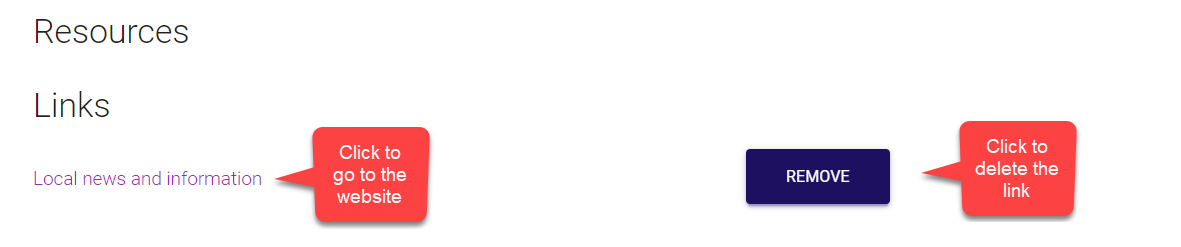
Whenever you select any entry from the Resource list, you are navigated to the Resource summary card. This card contains brief information about the resource, like its name, description and the list of added materials (links and files). Here, you can:
-
Open added links
-
Preview any file by clicking its icon
-
Download any file by clicking its name
-
Edit resource details by clicking Edit and navigating to the Resource form
-
Exit the screen and go back to the Resources list by clicking Close
Updating resources
As a Super admin, you have access to information about all resources and can update any details, whenever required.
To update resource information:
-
Select Resources from the left-side navigation menu.
-
Find the required entry. Note that resources can be searched only by tags added at the time of resource creation or addition to MO EOP, district or facility.
Make sure to check all the resource sections (MO EOP resources, District resources and Facility resources) as currently, search does not fetch the results automatically on the current screen but rather keeps them on the corresponding section screen.
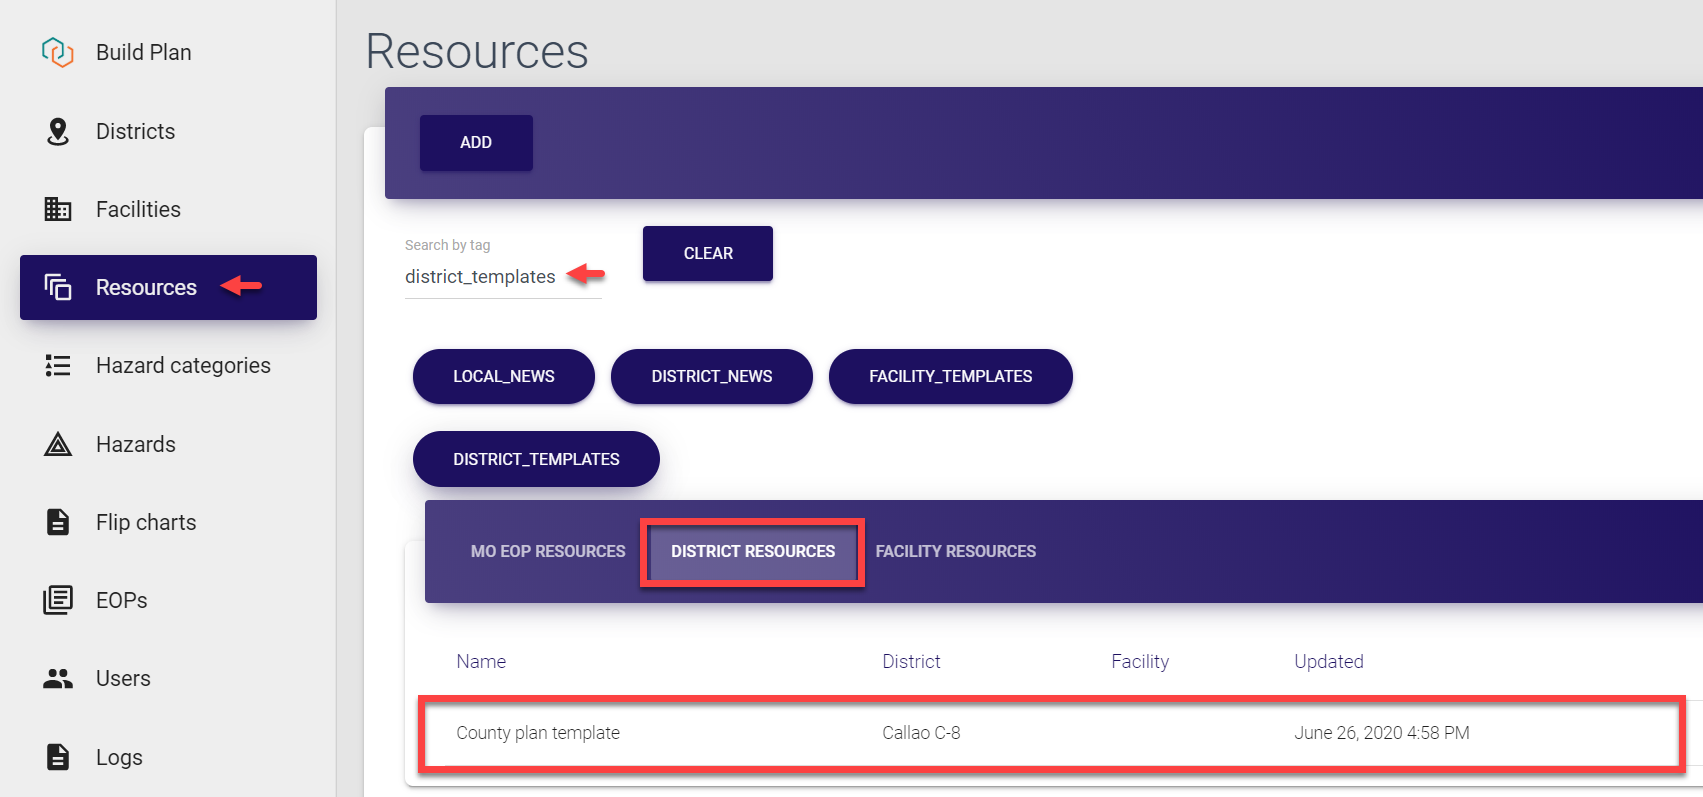
- Select the entry to open the Resource summary card, and click Edit in the top bar menu to navigate to the Resource details screen.
- Here you can add, remove or change any information about a resource.
4.1. Update general information about the resource:
-
Resource name,
-
Resource area reference (if the resource refers to any particular district/facility, select the district/facility from the drop-down list in the corresponding field),
-
Resource tag (it is highly recommended to use tags as they simplify the search and management of resources),
-
Resource description (this text appears on the Resource summary card and helps to explain the purpose/content of added materials).
If you do not select or remove any district or facility for a resource, it is assumed that the resource refers to the entire state/system and it will be saved under the MO EOP resources tab of the Resources section.
Resource with selected district is saved under the District resources tab.
Resource with selected facility (or both district and facility) is saved under the Facility resources tab.
4.2. Update the resource materials. The resource can include both: Links and Files.
Each uploaded file must not exceed 20 Mb.
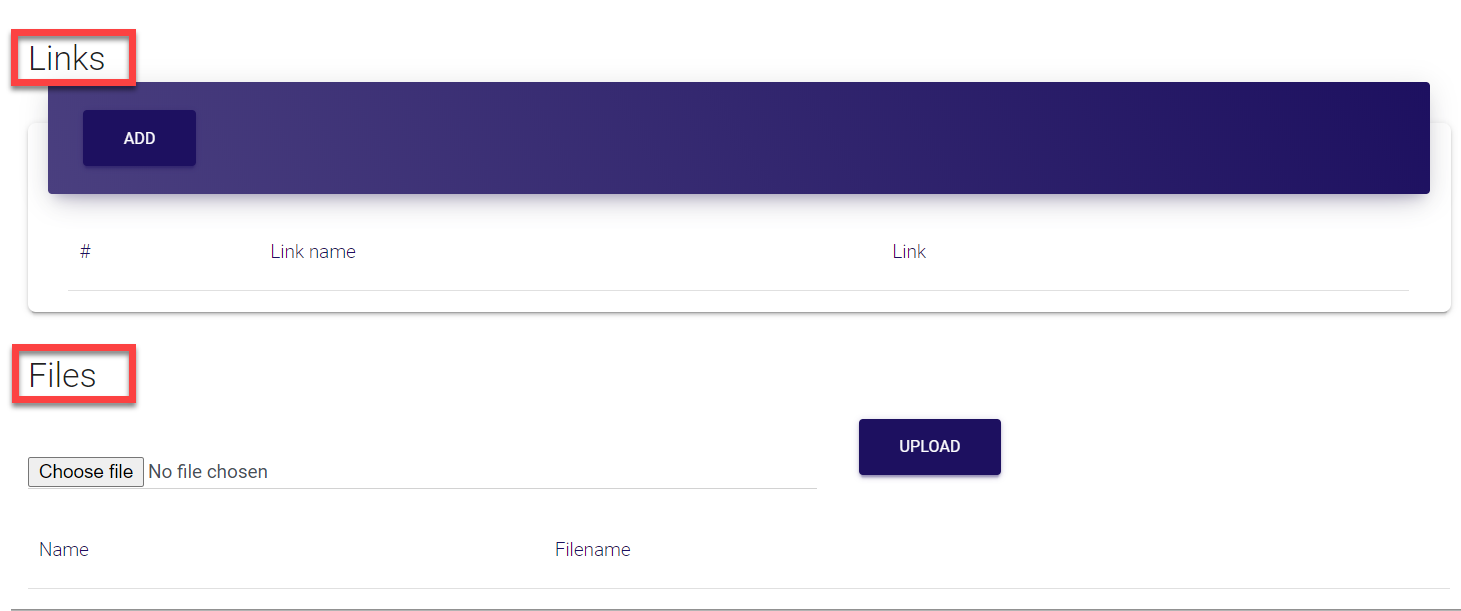
-
To add a link, click Add and provide the link URL and name. You can repeat the process to add as many links as needed.
-
To update the link, simply change the details in the editable fields.
-
To delete the link, click the trash can icon against required item.

-
To add a file, click Choose file, select the file from your PC, and press Upload. You can repeat the process to add as many files as needed.
-
To update the file name, simply change the details in the editable field.
-
To delete the file, click the trash can icon against required item.
You can upload files basically in any format - documents as well as images. Images are saved in the format they are uploaded while all documents are automatically converted to PDF format.

-
Finally, in the top bar menu of the Resource screen, select Save.
Selecting Ok also saves the data and directs you back to the Resources screen.Selecting Close directs you back to the Resources screen without saving the data.
Selecting Delete removes the entire Resource entry and after the deletion confirmation directs you back to the Resources screen.
Selecting View opens the Resource summary card.

Once you save the data, your action is confirmed by the brief pop-up notification displayed at the bottom of the page. The resource entry is updated and saved in the list under the corresponding tab (MO EOP resources, District resources or Facility resources).
Deleting resources
If needed, any resource can be deleted from MO EOP database. The permission to delete resources is granted only to Super admins.
To delete a resource:
-
Select Resources from the left-side navigation menu.
-
Find the required entry. Note that resources can be searched only by tags added at the time of resource creation or addition to MO EOP, district or facility.
Make sure to check all the resource sections (MO EOP resources, District resources and Facility resources) as currently, search does not fetch the results automatically on the current screen but rather keeps them on the corresponding section screen.

- Select the entry to open the Resource summary card, and click Edit in the top bar menu to navigate to the Resource details screen.
- On the Resource details screen, simply click Delete in the top bar menu and select OK in the pop-up confirmation window to confirm your choice.
The Deleted! message is briefly displayed on the screen to confirm successful completion of the operation. The entry is now deleted and removed from the Resources list as well as from the corresponding District/Facility entry (if applicable).
Managing districts 
As a Super admin, you have access to all districts as well as to the full range of related available functionality. For example, you can view the list of all districts, add new districts, or modify existing ones. You can also add specific resources to each area, assign tags for easier search etc.
Note that there is no option to delete districts from MO EOP to ensure database integrity and to avoid system errors.
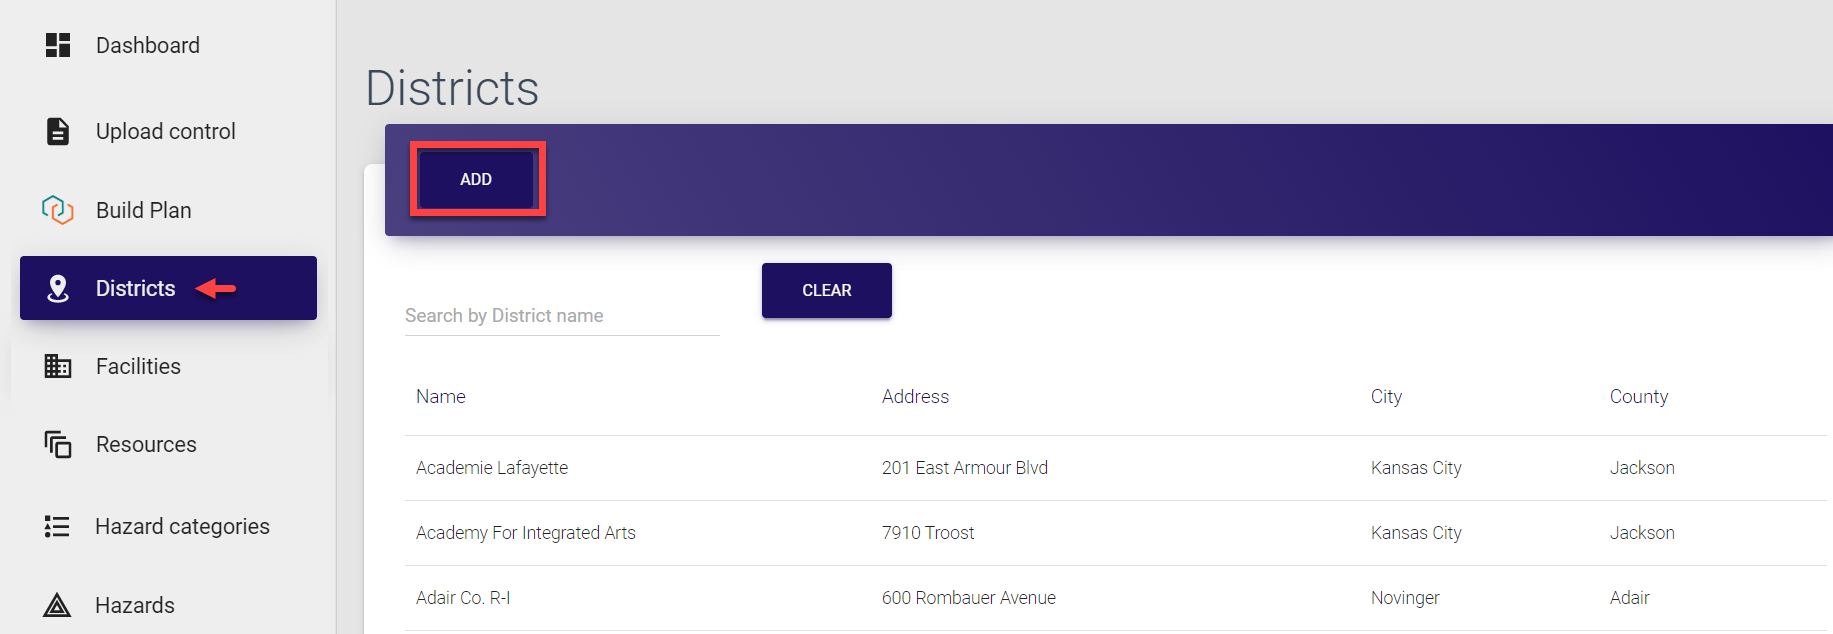
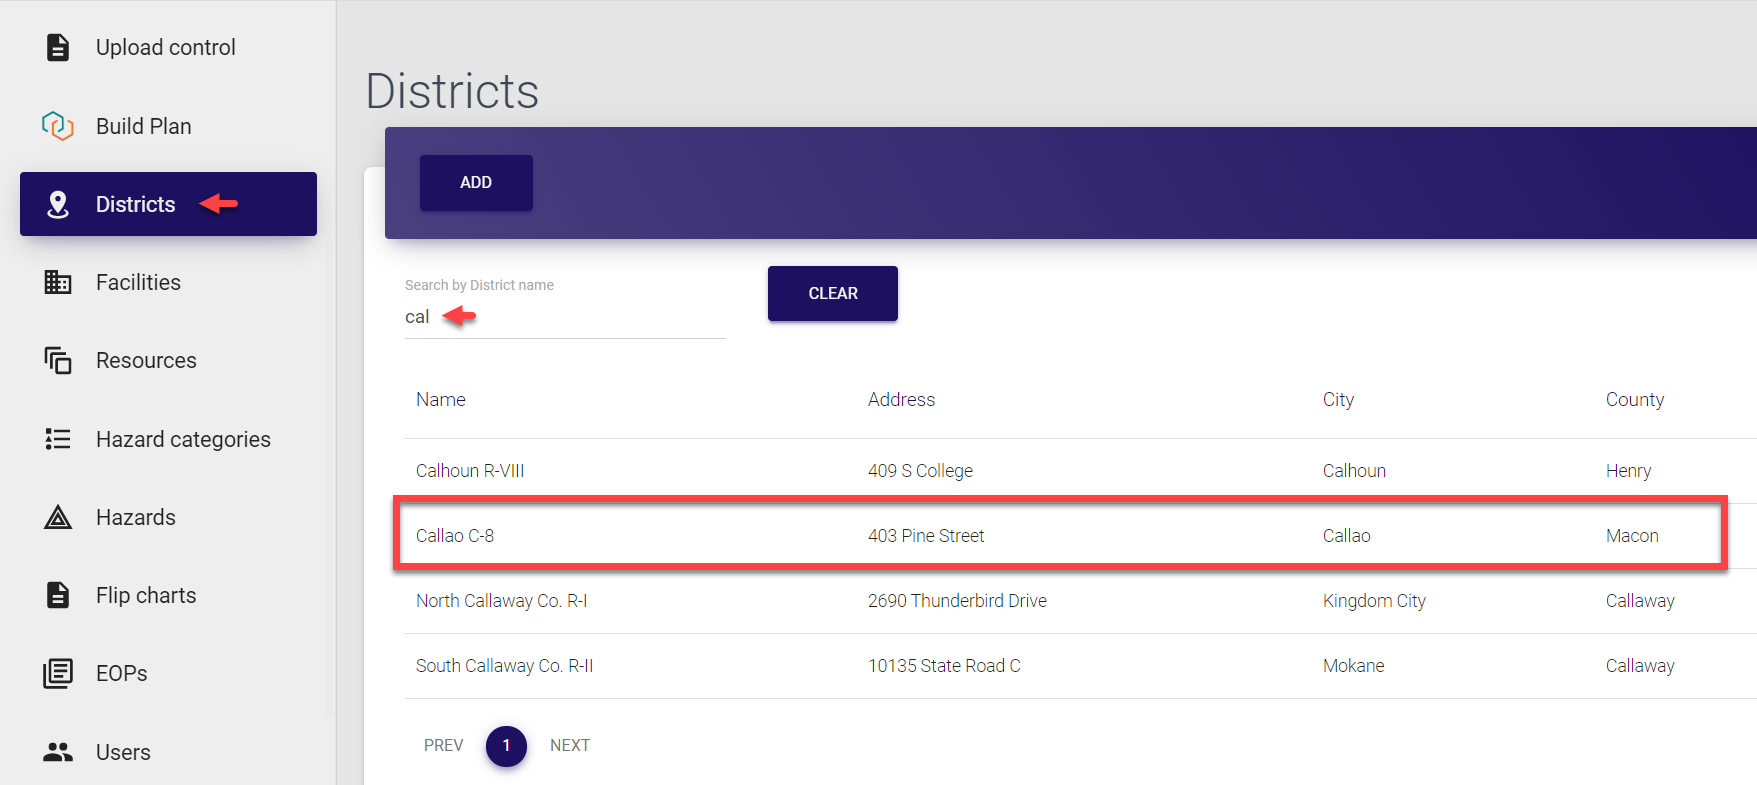
The MO EOP panel already contains the list of districts for the state you are operating in. This data is fed from our database and is the backbone of the entire system. The list of all districts is located under the Districts tab of the navigation menu. Here, you can:
Adding districts
Even though the list is pre-populated, you can always add any new district.
To add a district:
-
Select Districts from the left-side navigation menu.
-
Click Add in the top bar of the page to open the District form.
-
In current implementation, all the fields of the form are optional, however, we recommend to provide as much information as possible for easier operation and management.
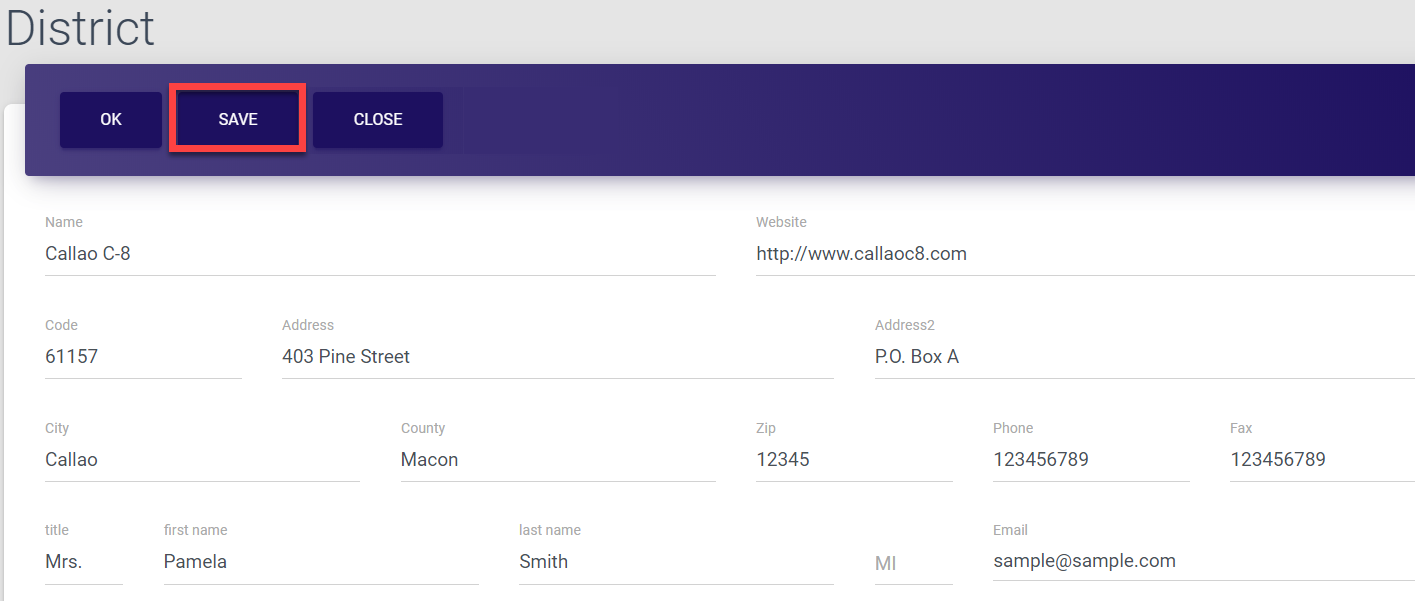
Fill the first part of the form:
- provide the name and website for a district,
- include details of the contact person (name, address, phone number etc.)
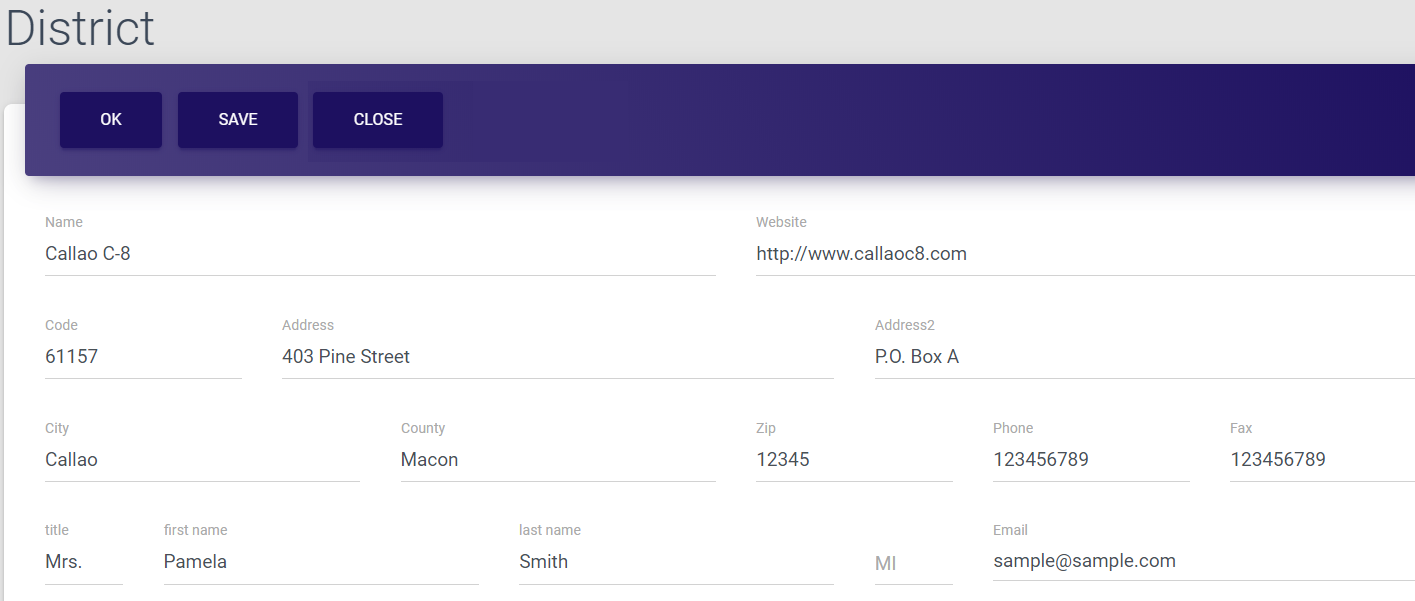
- At this stage, select Save in the top bar menu of the District screen. This basically creates a new district in the database and now, all the resources you might add in the next step, will be assigned accordingly.
Once you save the data, your action is confirmed by the brief pop-up notification displayed at the bottom of the page. The new district is now created and added to the Districts list.
If you skip this step and proceed to adding resources without saving your district, all resources will be saved in the Resources section of the control panel under the MO EOP resources tab, instead of the District resources.
- Add resources, if required. Any useful additional data (besides EOPs and flip charts which are saved separately) can be considered as a resource. It could be any relevant area plans or layouts, templates, district safety recommendations etc.
Each uploaded resource must not exceed 20 Mb.
The Resources part of the District form is subdivided into two sections - Files and Links.
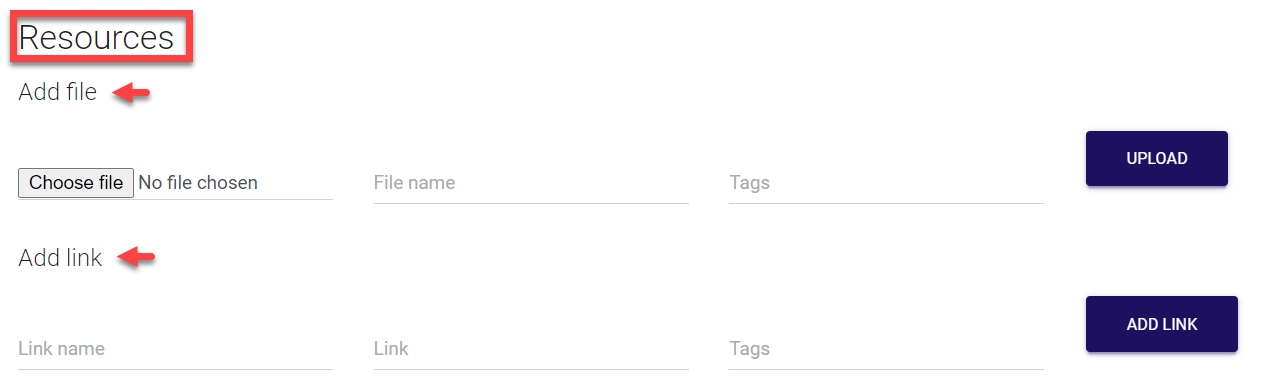
- To add a file, click Choose file and select the file from your PC, then provide the file name and tag. Tags are later used for easier identification, grouping and search of uploaded documents. Once done, click Upload. You can repeat the process to add as many files as needed.
You can upload files basically in any format - documents as well as images. Images are saved in the format they are uploaded while all documents are automatically converted to PDF format.

Once the file is uploaded, the following options become available:
-
You can preview the file in the pop-up window by clicking its icon.
-
You can download the file by clicking its name.
-
You can delete the uploaded file by clicking Remove against required item.

- To add a link, provide the link name, the URL and tag. Same as with file, tags are later used for easier identification, grouping and search of uploaded data. Once done, click Add link. You can repeat the process to add as many links as needed.

Once the link is added, the following options become available:
-
You can open the link by clicking its name.
-
You can delete the link by clicking Remove against required item.

Once your resources are uploaded, they are also included in the Resources section of the MO EOP control panel under the District resources tab. Here you can add, edit or delete uploaded data too, if needed.
Notes:
-
If you add a resource in the District form without specifying the district name, it will be saved in the Resources section under the MO EOP resources tab, instead of the District resources.
-
If you delete the district entry with uploaded resource, the resource will still be saved and will remain in the Resources section of the control panel under the MO EOP resources tab.
-
Finally, in the top bar menu of the District screen, select Save again.
Selecting Ok also saves the data and directs you back to the Districts list.Selecting Close directs you back to the Districts list without saving the data.
Once you save the data, your action is confirmed by the brief pop-up notification displayed at the bottom of the page. The resources are saved and added to the district.
Updating districts
As a Super admin, you have access to information about all districts and can update any details, whenever required.
To update district information:
-
Select Districts from the left-side navigation menu.
-
Find the required entry. You can search for a district by typing at least three first letters of the its name in the search field at the top of the list.
- Click the entry to open the District screen, where you can add, remove or change any information about a district. Here, you can:
- Update the name or website of the district, or any contact person details (name, address, phone number etc.)

- Update resources. The Resources part of the District form is subdivided into two sections - Files and Links.
Each uploaded resource must not exceed 20 Mb.

-
To add a file, click Choose file and select the file from your PC, then provide the file name and tag. Tags are later used for easier identification, grouping and search of uploaded documents. Once done, click Upload. You can repeat the process to add as many files as needed.
You can upload files basically in any format - documents as well as images. Images are saved in the format they are uploaded while all documents are automatically converted to PDF format.

-
To preview the file in the pop-up window, click its icon.
-
To download the file, click its name.
-
To delete the uploaded file, click Remove against required item.
- To add a link, provide the link name, the URL and tag. Same as with file, tags are later used for easier identification, grouping and search of uploaded data. Once done, click Add link. You can repeat the process to add as many links as needed.

-
To open the link, click its name.
-
To delete the link, click Remove against required item.

Modified resources are also updated in the Resources section of the MO EOP control panel under the District resources tab. Here you can add, edit or delete uploaded data too, if needed.
Note:
- If you delete the district name from the form, saved resources will be moved from the District resources to the MO EOP resources tab in the Resources section of the control panel.
-
Finally, in the top bar menu of the District screen, select Save.
Selecting Ok also saves the data and directs you back to the Districts list.Selecting Close directs you back to the Districts list without saving the data.

Once you save the data, your action is confirmed by the brief pop-up notification displayed at the bottom of the page. The District entry is now successfully updated.
Managing facilities 
As a Super admin, you have access to all facilities as well as to the full range of related available functionality. For example, you can view the list of facilities, add new facilities, or modify existing ones. You can also add specific resources to each facility, assign tags for easier search etc.
Note that there is no option to delete facilities from MO EOP to ensure database integrity and to avoid system errors.
Unlike the list of districts which is fed from our database, the list of facilities is synchronized whenever the admin uses the Upload control section to upload data to MO EOP control panel from the Trisk system, where the facilities are originally created and assigned to districts.
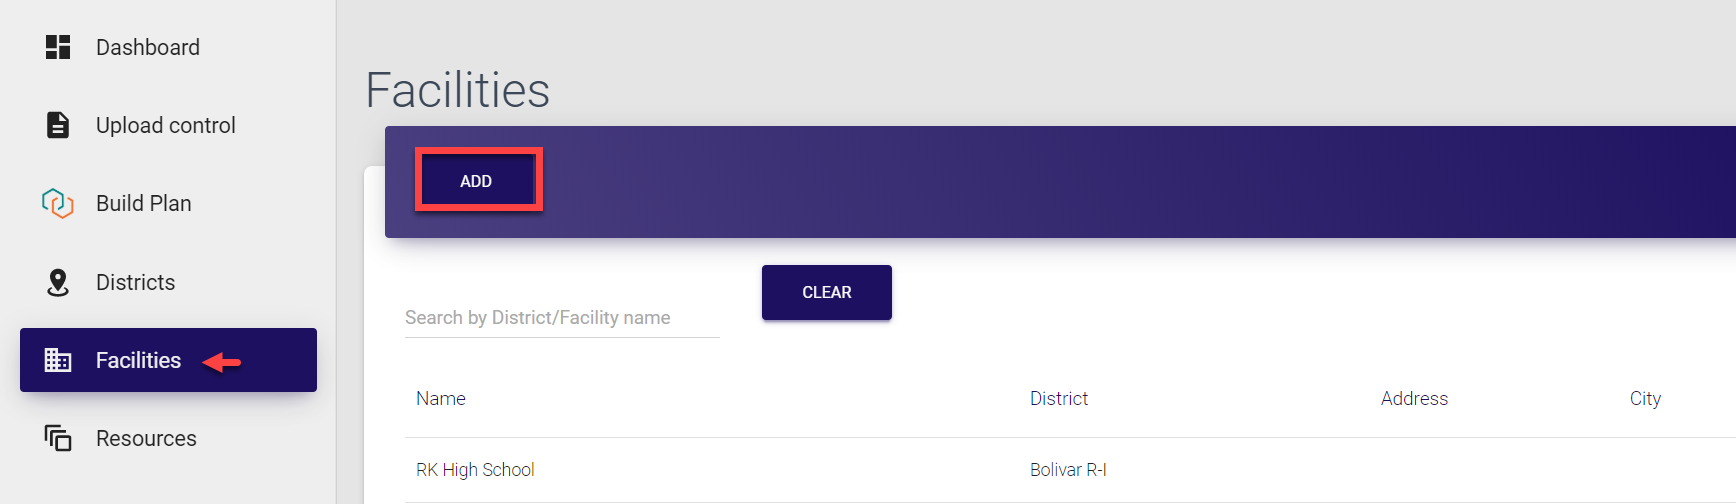
The list of all facilities is located under the Facilities tab of the MO EOP navigation menu. Here, you can:
Adding facilities
Facilities can be added by Super admin (within entire system) as well as by District admin (for corresponding districts).
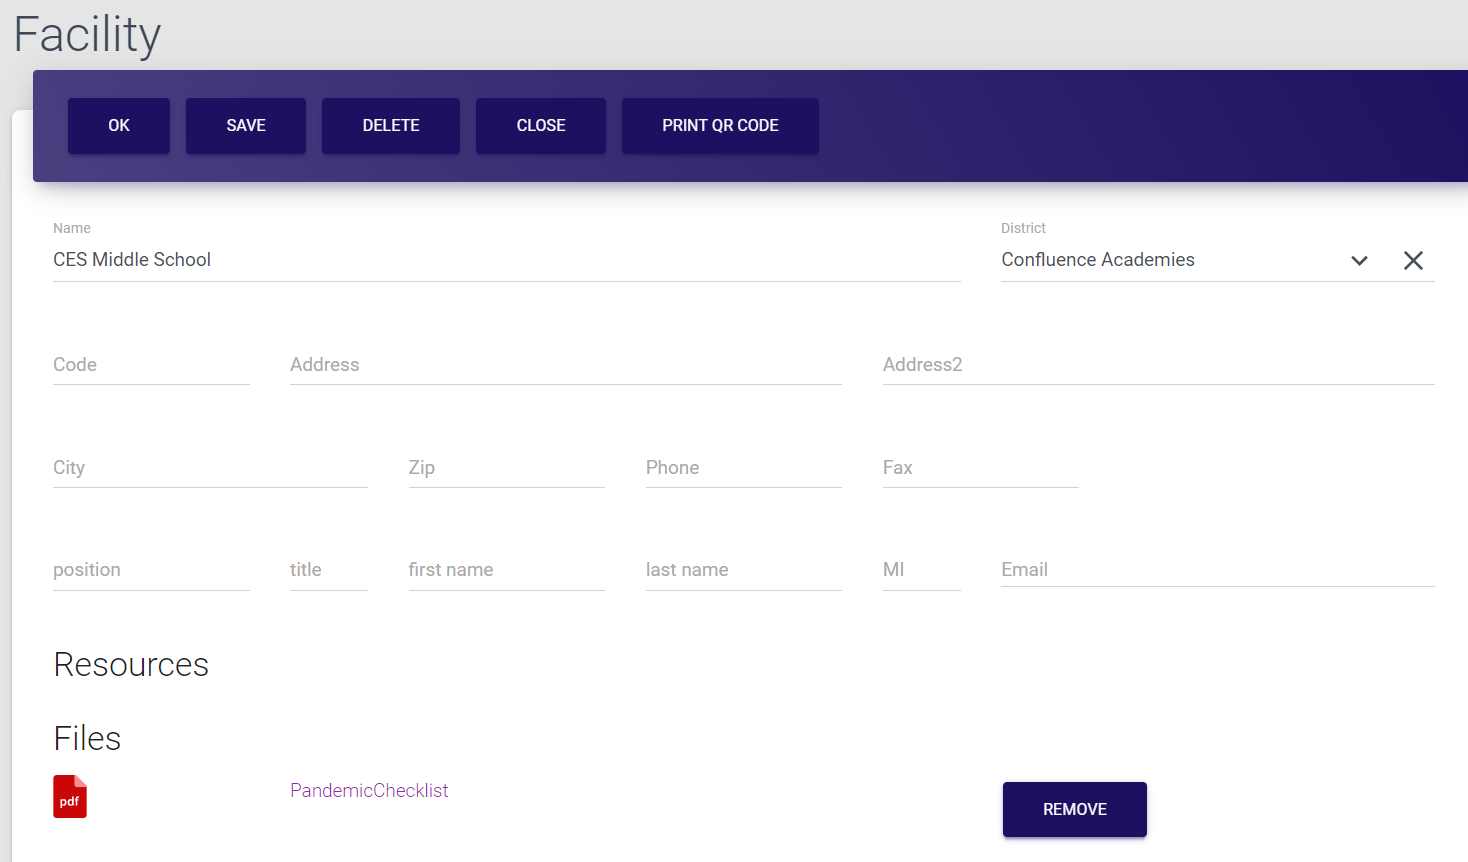
To add a facility:
-
Select Facilities from the left-side navigation menu.
-
Click Add in the top bar of the page to open the Facility form.
-
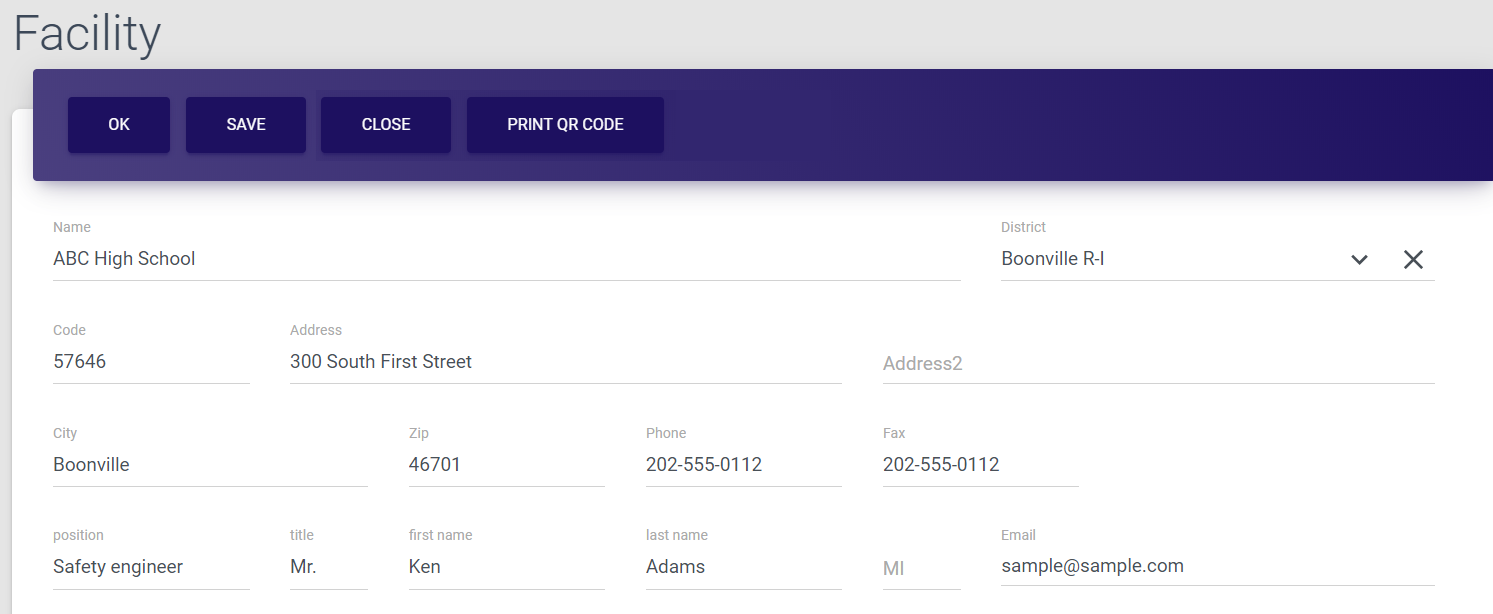
In current implementation, all the fields of the form are optional, however, we recommend to provide as much information as possible for easier operation and management.
Fill the first part of the form:
- provide the name of the facility and select the district it refers to,
- add the facility address,
- include the contact person details (name, email etc.)
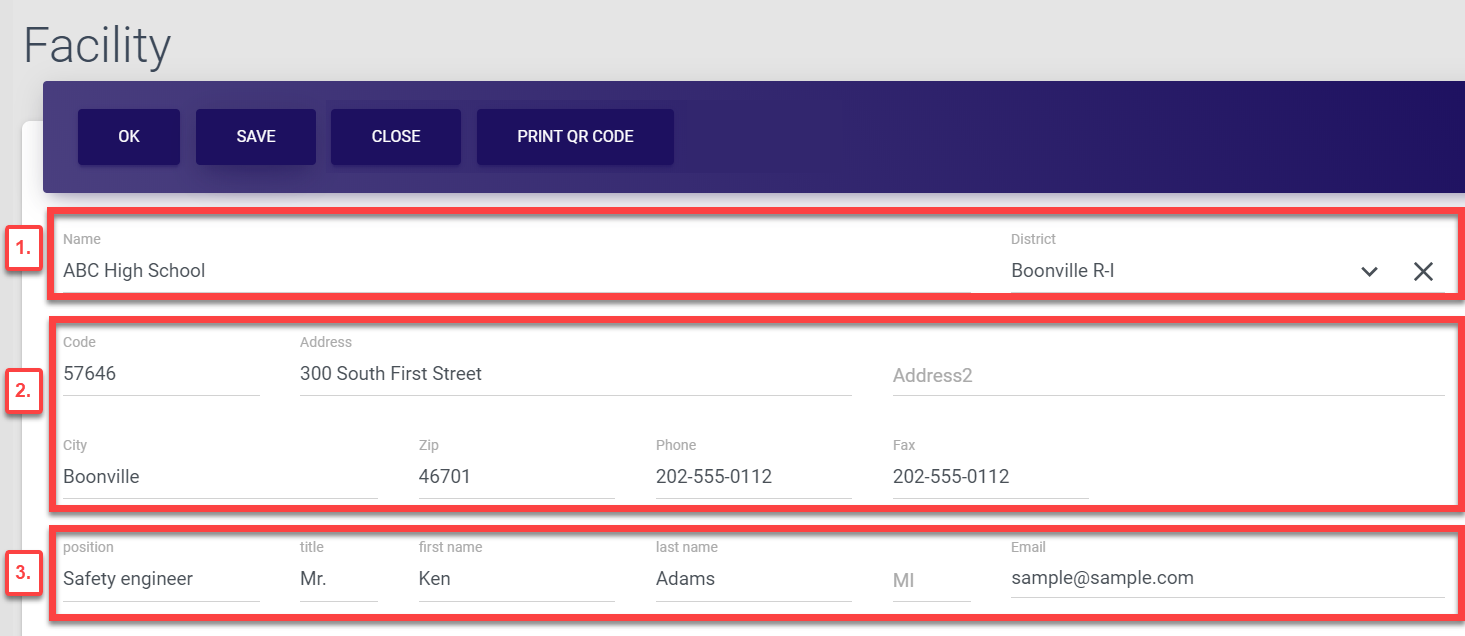
- At this stage, select Save in the top bar menu of the Facility screen. This basically creates a new facility in the database and now, all the resources you might add in the next step, will be assigned accordingly.

Once you save the data, your action is confirmed by the brief pop-up notification displayed at the bottom of the page. The new facility is now created and added to the Facilities list.
If you skip this step and proceed to adding resources without saving your facility, all resources will be saved in the Resources section of the control panel under the MO EOP resources tab, instead of the Facility resources.
- Add resources, if required. Any useful additional data (besides EOPs and flip charts which are saved separately) can be considered as a resource. It could be any relevant facility plans or layouts, templates, local safety recommendations etc.
Each uploaded resource must not exceed 20 Mb.
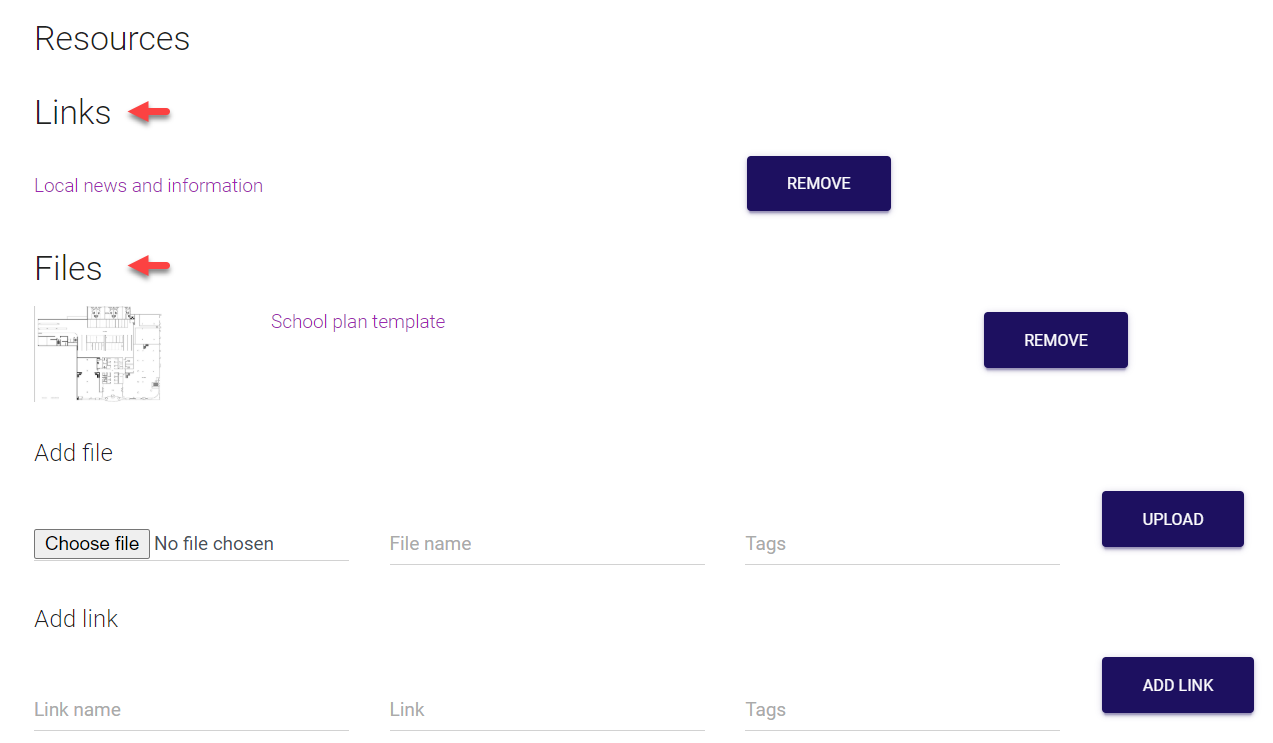
The Resources part of the Facility form is subdivided into two sections - Files and Links.

- To add a file, click Choose file and select the file from your PC, then provide the file name and tag. Tags are later used for easier identification, grouping and search of uploaded documents. Once done, click Upload. You can repeat the process to add as many files as needed.
You can upload files basically in any format - documents as well as images. Images are saved in the format they are uploaded while all documents are automatically converted to PDF format.

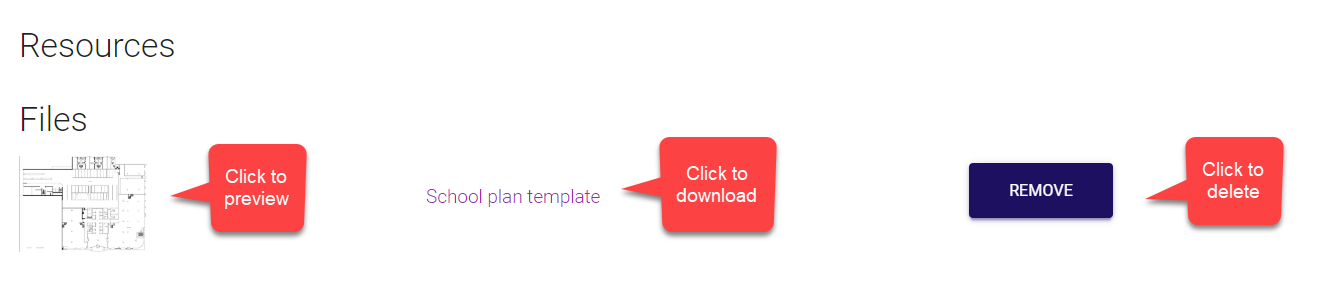
Once the file is uploaded, the following options become available:
-
You can preview the file in the pop-up window by clicking its icon.
-
You can download the file by clicking its name.
-
You can delete the uploaded file by clicking Remove against required item.
- To add a link, provide the link name, the URL and tag. Same as with file, tags are later used for easier identification, grouping and search of uploaded data. Once done, click Add link. You can repeat the process to add as many links as needed.

Once the link is added, the following options become available:
-
You can open the link by clicking its name.
-
You can delete the link by clicking Remove against required item.
Once your resources are uploaded, they are also included in the Resources section of the MO EOP control panel under the Facility resources tab. Here you can add, edit or delete uploaded data too, if needed.

Notes:
-
If you add a resource in the Facility form without specifying the facility name, it will be saved in the Resources section under the MO EOP resources tab, instead of the Facility resources.
-
If you delete the facility entry with uploaded resource, the resource will still be saved and will remain in the Resources section of the control panel under the MO EOP resources tab.
-
Finally, in the top bar menu of the Facility screen, select Save again.
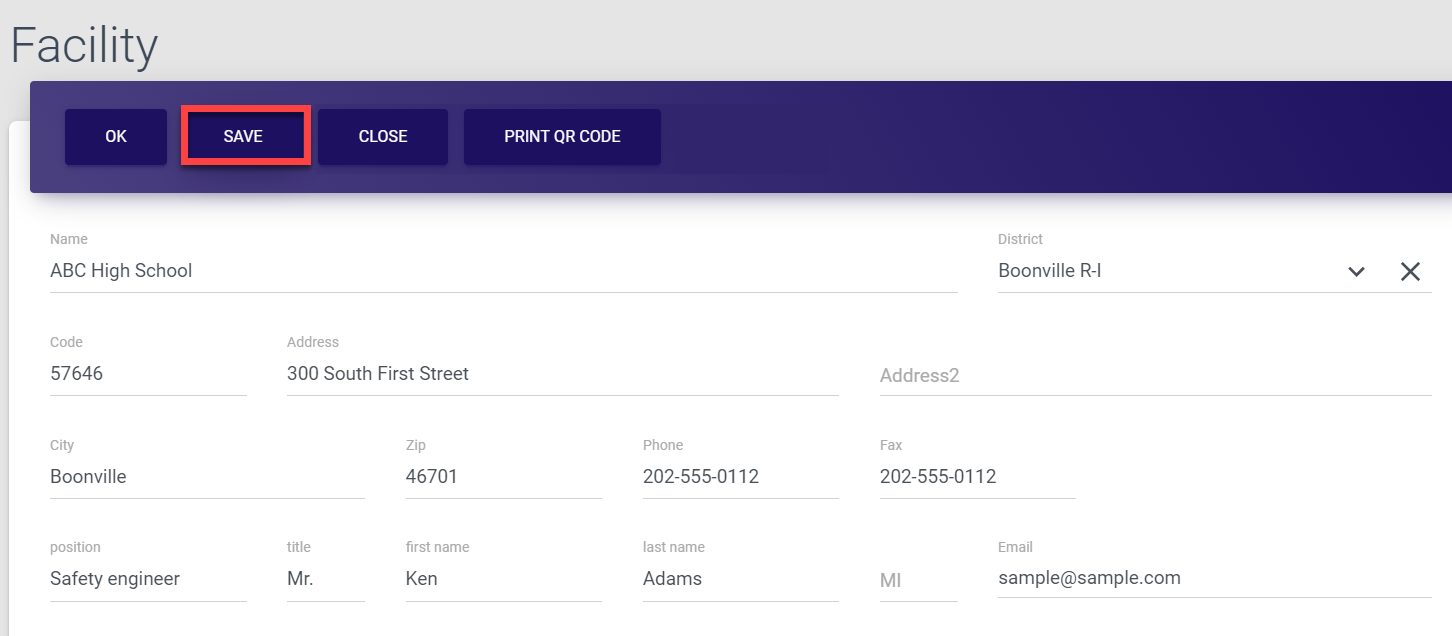
Selecting Ok also saves the data and directs you back to the Facilities list.Selecting Close directs you back to the Facilities list without saving the data.
Selecting Print QR code opens a new page with generated facility QR code. You can save it and share it as required.
Once you save the data, your action is confirmed by the brief pop-up notification displayed at the bottom of the page. The resources are saved and added to the facility.
Updating facilities
As a Super admin, you have access to information about all facilities and can update any details, whenever required.
To update facility information:
-
Select Facilities from the left-side navigation menu.
-
Find the required entry. You can search for a facility by typing at least three first letters of the its name in the search field at the top of the list.
Note that you can also search facilities by district. Same way, start typing the district name in the search field and the list will be filtered accordingly.
- Click the entry to open the Facility screen, where you can add, remove or change any information about a facility. Here, you can:
- Update the name, district and/or the address of the facility, or any contact person details (name, email etc.)
- Update resources. The Resources part of the Facility form is subdivided into two sections - Files and Links.
Each uploaded resource must not exceed 20 Mb.
-
To add a file, click Choose file and select the file from your PC, then provide the file name and tag. Tags are later used for easier identification, grouping and search of uploaded documents. Once done, click Upload. You can repeat the process to add as many files as needed.
You can upload files basically in any format - documents as well as images. Images are saved in the format they are uploaded while all documents are automatically converted to PDF format.

-
To preview the file in the pop-up window, click its icon.
-
To download the file, click its name.
-
To delete the uploaded file, click Remove against required item.

- To add a link, provide the link name, the URL and tag. Same as with file, tags are later used for easier identification, grouping and search of uploaded data. Once done, click Add link. You can repeat the process to add as many links as needed.

-
To open the link, click its name.
-
To delete the link, click Remove against required item.

Modified resources are also updated in the Resources section of the MO EOP control panel under the Facility resources tab. Here you can add, edit or delete uploaded data too, if needed.
Note:
- If you delete the facility name from the form, saved resources will be moved from the Facility resources to the MO EOP resources tab in the Resources section of the control panel.
-
Finally, in the top bar menu of the Facility screen, select Save.
Selecting Ok also saves the data and directs you back to the Facilities list.Selecting Close directs you back to the Facilities list without saving the data.
Selecting Print QR code opens a new page with generated facility QR code. You can save it and share it as required.
Once you save the data, your action is confirmed by the brief pop-up notification displayed at the bottom of the page. The Facility entry is now successfully updated.
Managing hazard categories 
As a Super admin, you have access to all functionality related to hazard categories. The categories are limited by default to the following major types of hazards:
-
Natural
-
Tech
-
Human
-
Hazardous materials
However, you can modify them, add new ones or delete those that no longer apply. Hazard categories are further used in the Hazards section to group various kinds of hazards under one umbrella. For example, Natural hazard category might include such hazards as ice storm, tornado, earthquake etc. Hazards, in their turn, are used whenever Flip charts are added. This is a perfect and easy way to quickly identify what flip chart is created for what type of emergency.
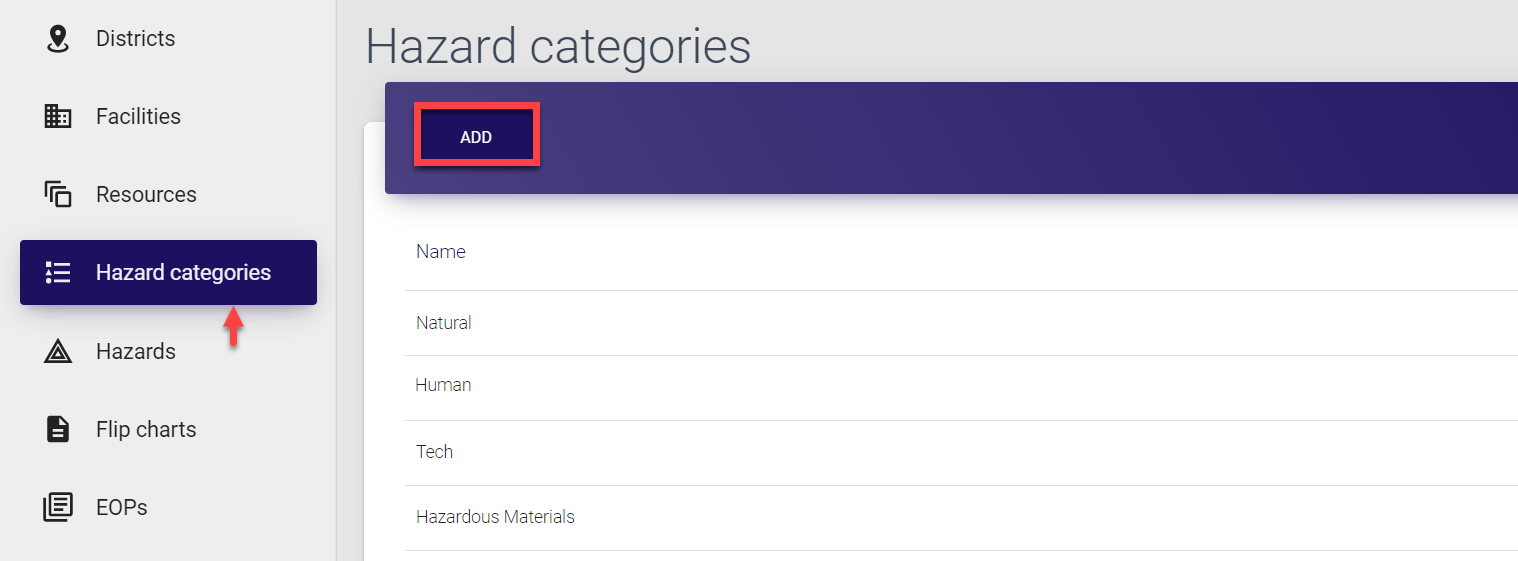
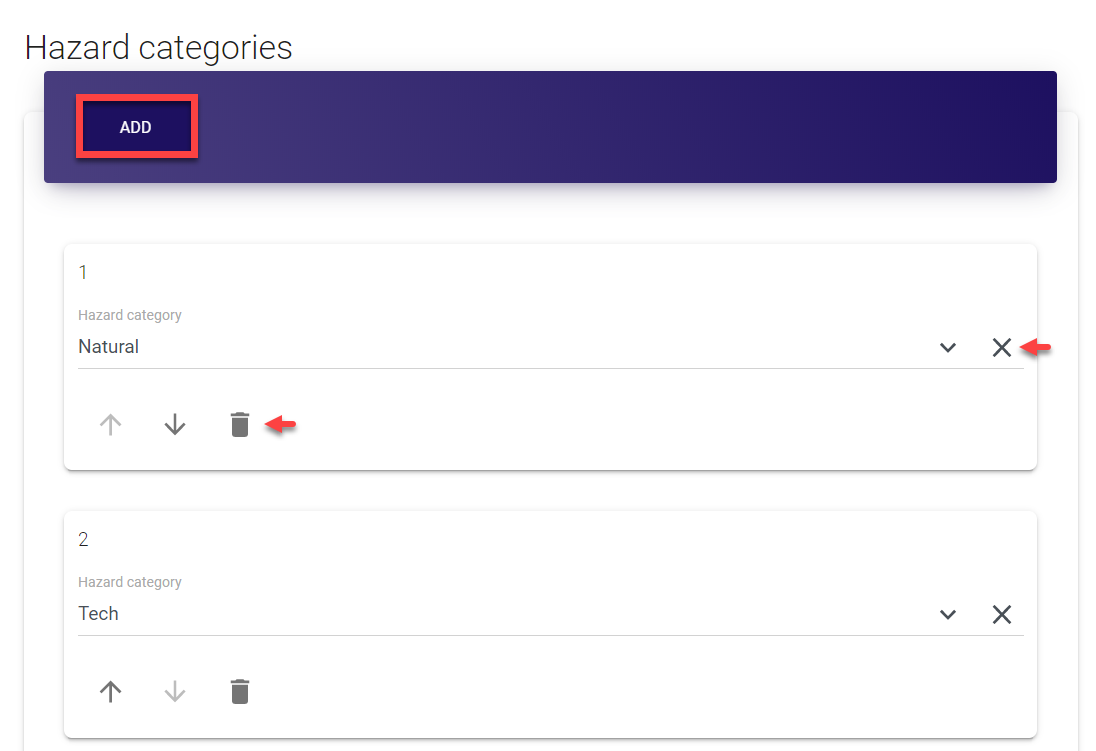
The list of all categories is located under the Hazard categories tab of the navigation menu. Here, you can:
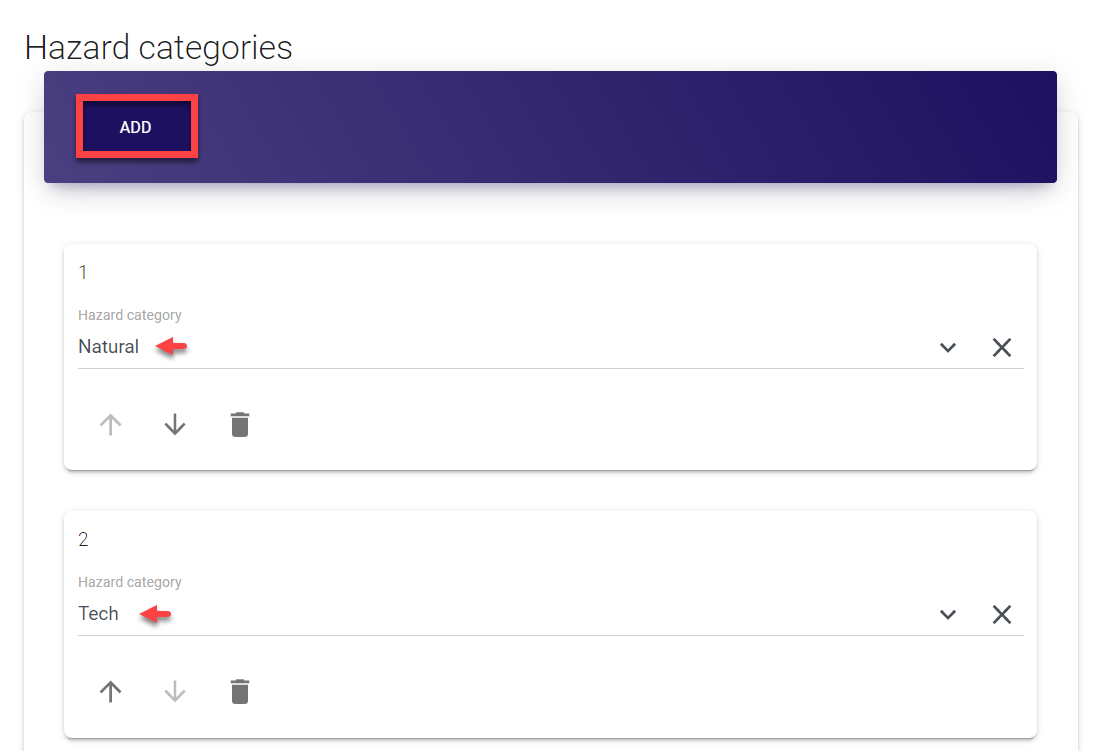
Adding hazard categories
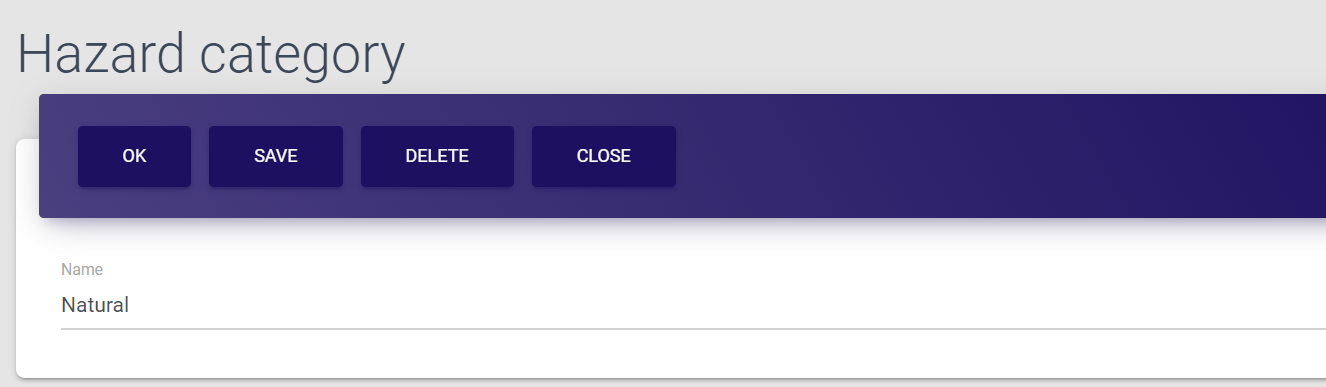
To add a hazard category:
-
Select Hazard categories from the left-side navigation menu.
-
Click Add in the top bar of the page to open the Hazard category screen.
-
Here, simply enter the name of a new category in the editable field, and click Save.
Selecting Ok also saves the data and directs you back to the Hazard categories list.Selecting Close directs you back to the Hazard categories list without saving the data.
Selecting Delete removes the entry and after the deletion confirmation directs you back to the Hazard categories list.
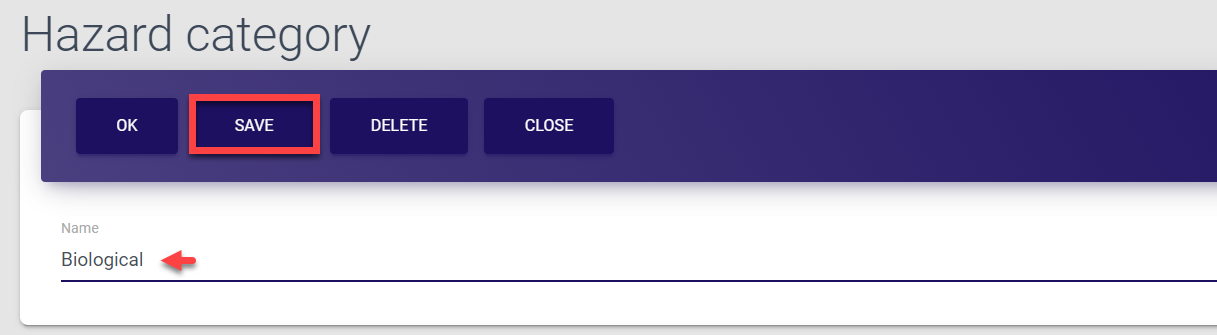
Once you save the data, your action is confirmed by the brief pop-up notification displayed at the bottom of the page. The new category is now created and added to the Hazard categories list.
Updating hazard categories
To update a hazard category:
-
Select Hazard categories from the left-side navigation menu.
-
Find the required entry in the list and click it to open the Hazard category screen.
-
Here, simply update the name of a new category in the editable field, and click Save.
Selecting Ok also saves the data and directs you back to the Hazard categories list.Selecting Close directs you back to the Hazard categories list without saving the data.
Selecting Delete removes the entry and after the deletion confirmation directs you back to the Hazard categories list.

Once you save the data, your action is confirmed by the brief pop-up notification displayed at the bottom of the page. The category is now updated and saved in the Hazard categories list.
Deleting hazard categories
To delete a hazard category:
-
Select Hazard categories from the left-side navigation menu.
-
Find the required entry in the list and click it to open the Hazard category screen.
-
Here, simply click Delete in the top bar menu and select OK in the pop-up confirmation window to confirm your choice.
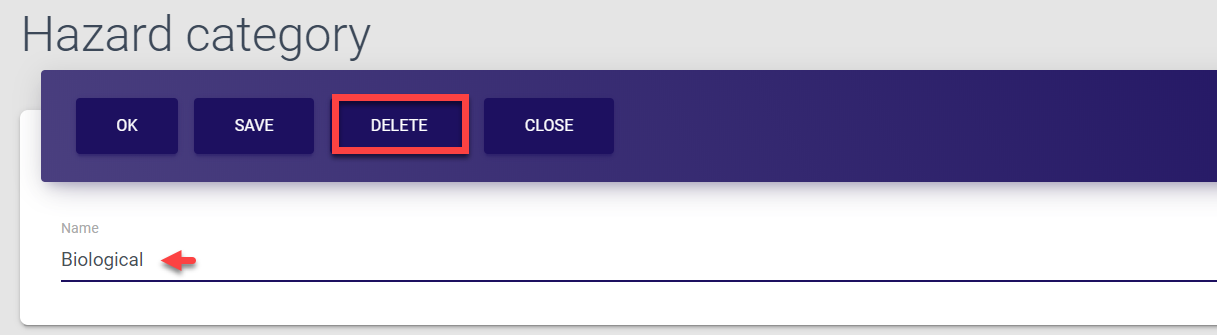
The Deleted! message is briefly displayed on the screen to confirm successful completion of the operation. The entry is now deleted and removed from the Hazard categories list.
Managing hazards 
As a Super admin, you have access to all functionality related to hazard categories and hazards. You can modify hazard entries, add new ones or delete those that no longer apply.
Hazards are used whenever Flip charts are added. This is a perfect and easy way to quickly identify what flip chart is created for what type of emergency.
The list of all hazards is located under the Hazards tab of the navigation menu. Here, you can:
Adding hazards
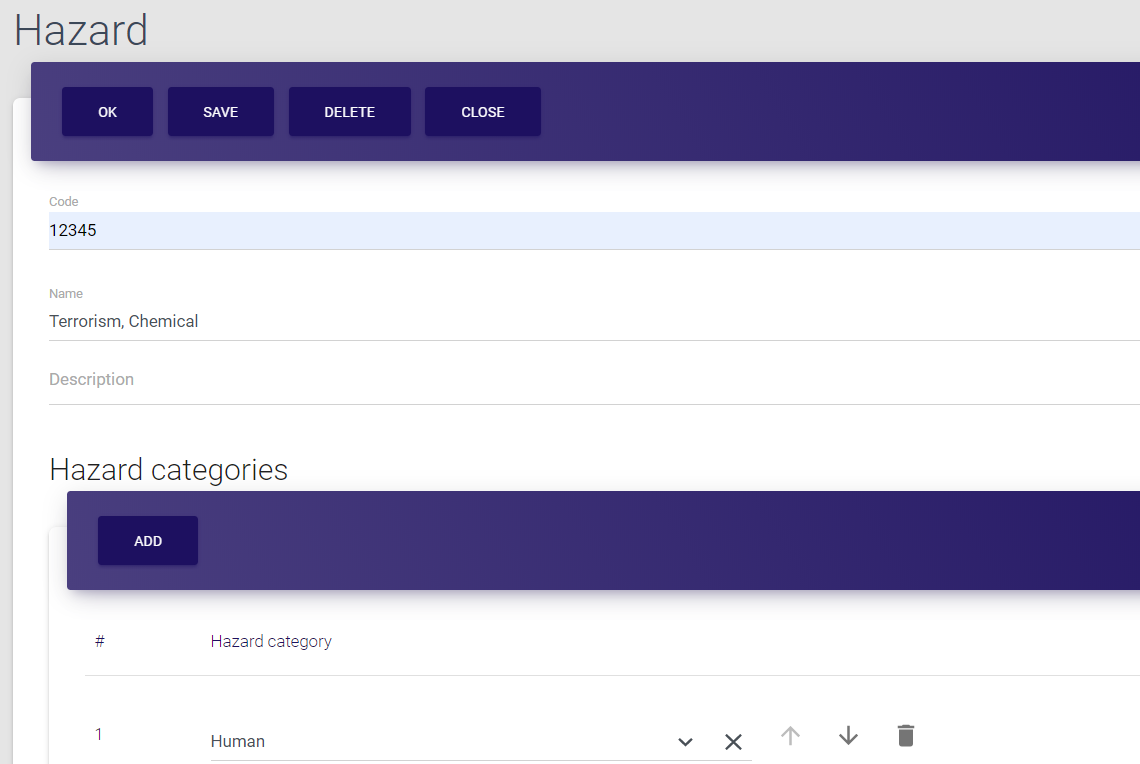
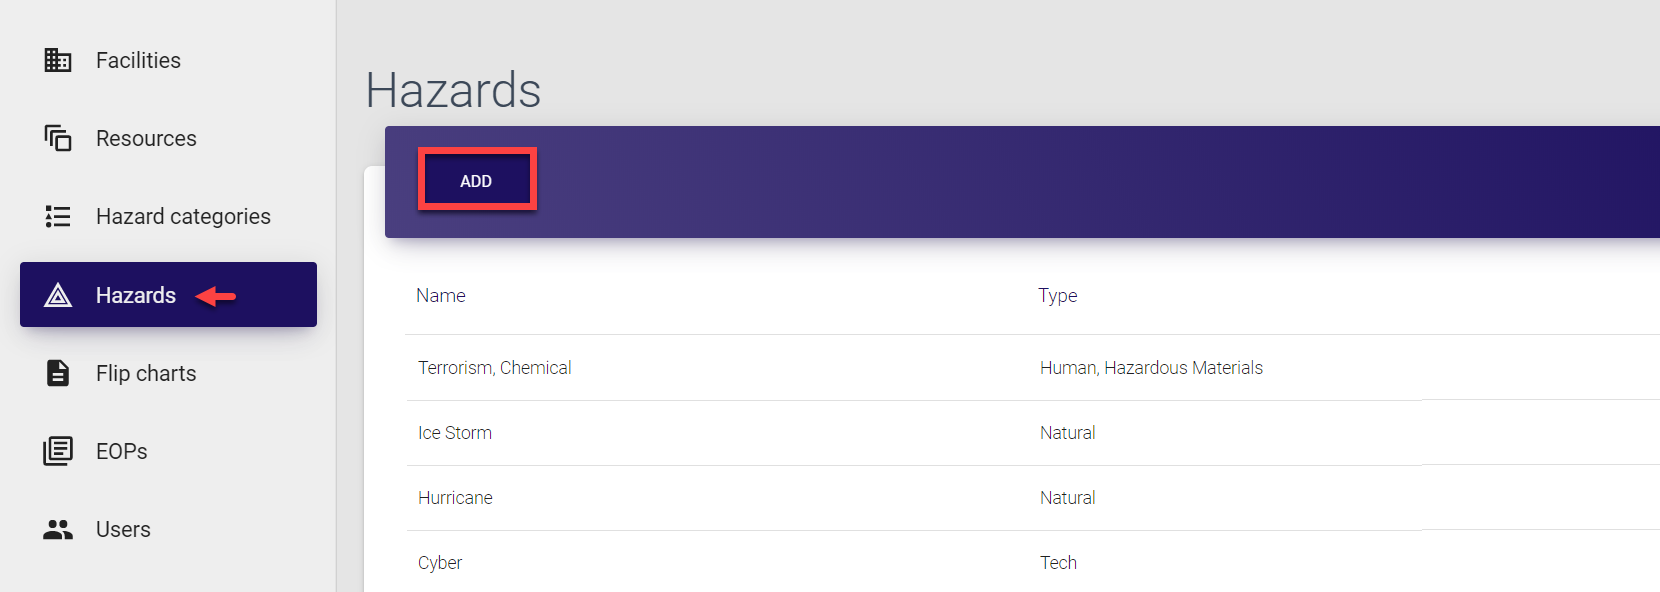
To add a hazard:
-
Select Hazards from the left-side navigation menu.
-
Click Add in the top bar of the page to open the Hazard screen.
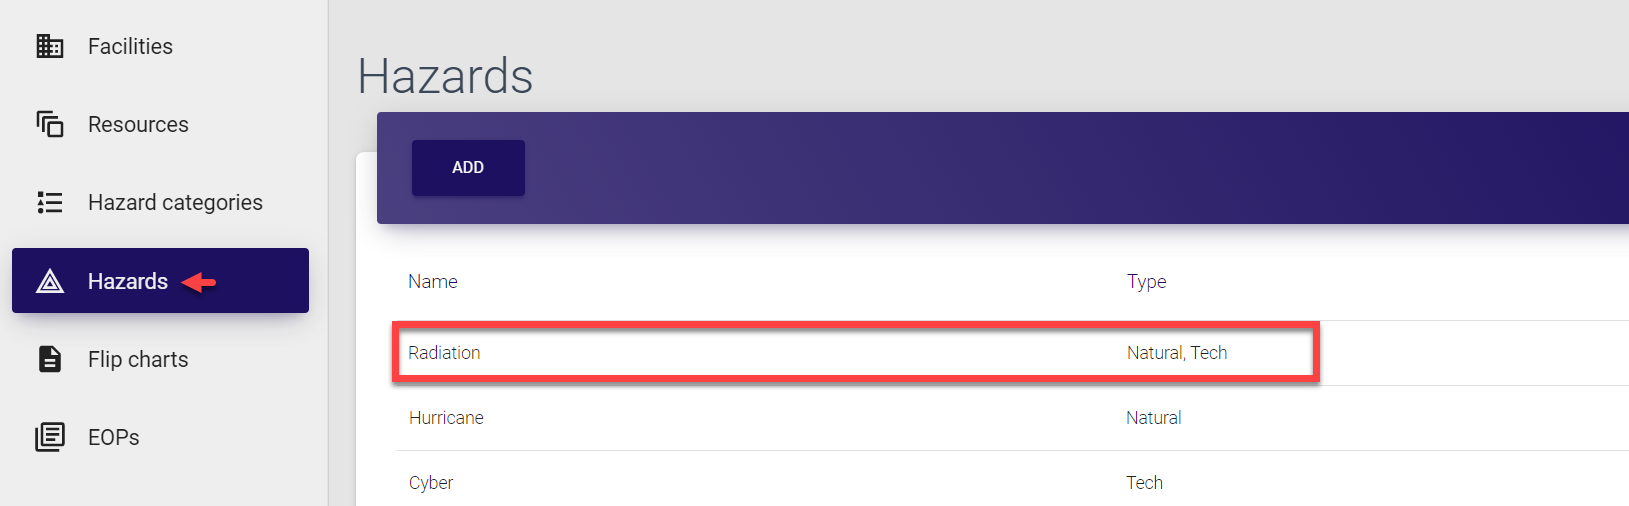
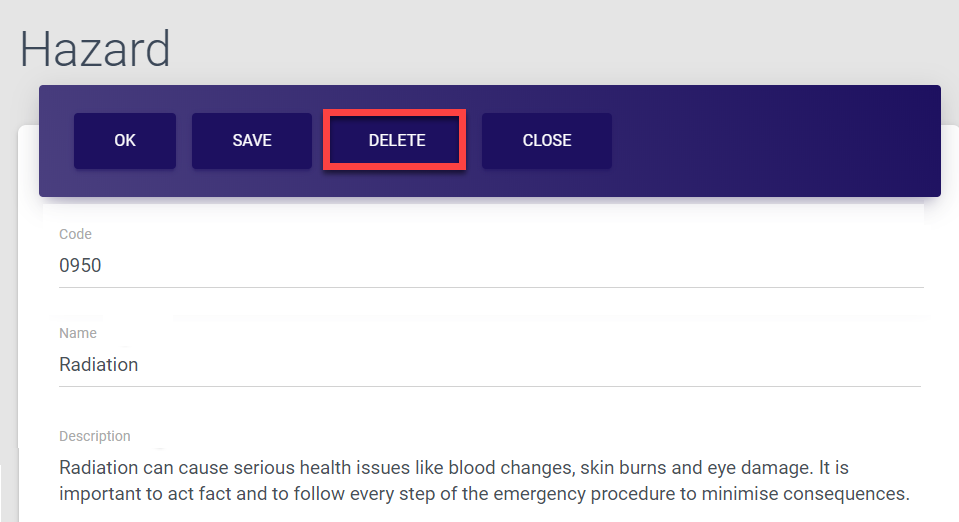
- Provide the code, name and description of the hazard. In the current implementation, there are no mandatory fields, however, we recommend to provide as many details as possible for easier operation and management of data.

-
Under the Hazard categories, click Add and select the category from the drop-down list or by typing initial letters of the hazard category in the editable field. The list contains all options added in the Hazard categories section.
You can add several hazard categories, if applicable for the hazard. For example, in our example, we select both Natural and Tech categories for radiation hazard, as radiation can be the result of both natural or technical calamities.
-
Finally, in the top bar menu of the Hazard screen, select Save.
Selecting Ok also saves the data and directs you back to the Hazards list.Selecting Close directs you back to the Hazards list without saving the data.
Selecting Delete removes the entry and after the deletion confirmation directs you back to the Hazards list.

Once you save the data, your action is confirmed by the brief pop-up notification displayed at the bottom of the page. The new entry is now created and added to the Hazards list.
Updating hazards
To update a hazard:
-
Select Hazards from the left-side navigation menu.
-
Find the required entry in the list and click it to open the Hazard screen.
- Update the code, name and/or description of the hazard. In the current implementation, there are no mandatory fields, however, we recommend to provide as many details as possible for easier operation and management of data.

-
Under the Hazard categories, update the category by selecting required option from the drop-down list or by typing initial letters of the hazard category in the editable field. The list contains all options added in the Hazard categories section.
You can add several hazard categories, if applicable for the hazard. For example, in our example, we select both Natural and Tech categories for radiation hazard, as radiation can be the result of both natural or technical calamities.
To clear the hazard category field, click the cross sign icon against the required item.To delete the category field, click the trash can icon against the required item.
-
Finally, in the top bar menu of the Hazard screen, select Save.
Selecting Ok also saves the data and directs you back to the Hazards list.Selecting Close directs you back to the Hazards list without saving the data.
Selecting Delete removes the entry and after the deletion confirmation directs you back to the Hazards list.

Once you save the data, your action is confirmed by the brief pop-up notification displayed at the bottom of the page. The entry is now updated and saved in the Hazards list.
Deleting hazards
To delete a hazard:
-
Select Hazards from the left-side navigation menu.
-
Find the required entry in the list and click it to open the Hazard screen.

- Here, simply click Delete in the top bar menu and select OK in the pop-up confirmation window to confirm your choice.
The Deleted! message is briefly displayed on the screen to confirm successful completion of the operation. The entry is now deleted and removed from the Hazards list.
Managing news 
News section is great in keeping users updated about the latest EOP changes. There are three major news categories that MO EOP admin can use to inform everyone or any specific district users:
-
MO EOP updates: these updates refer to the entire system or US state and are available for every registered MO EOP user;
-
District news: these news are usually created and shared with specific district(s);
-
FAQ: useful general reference information in the form of questions and answers, available to all registered MO EOP users.
As a Super admin, you have access to the entire functionality related to news.
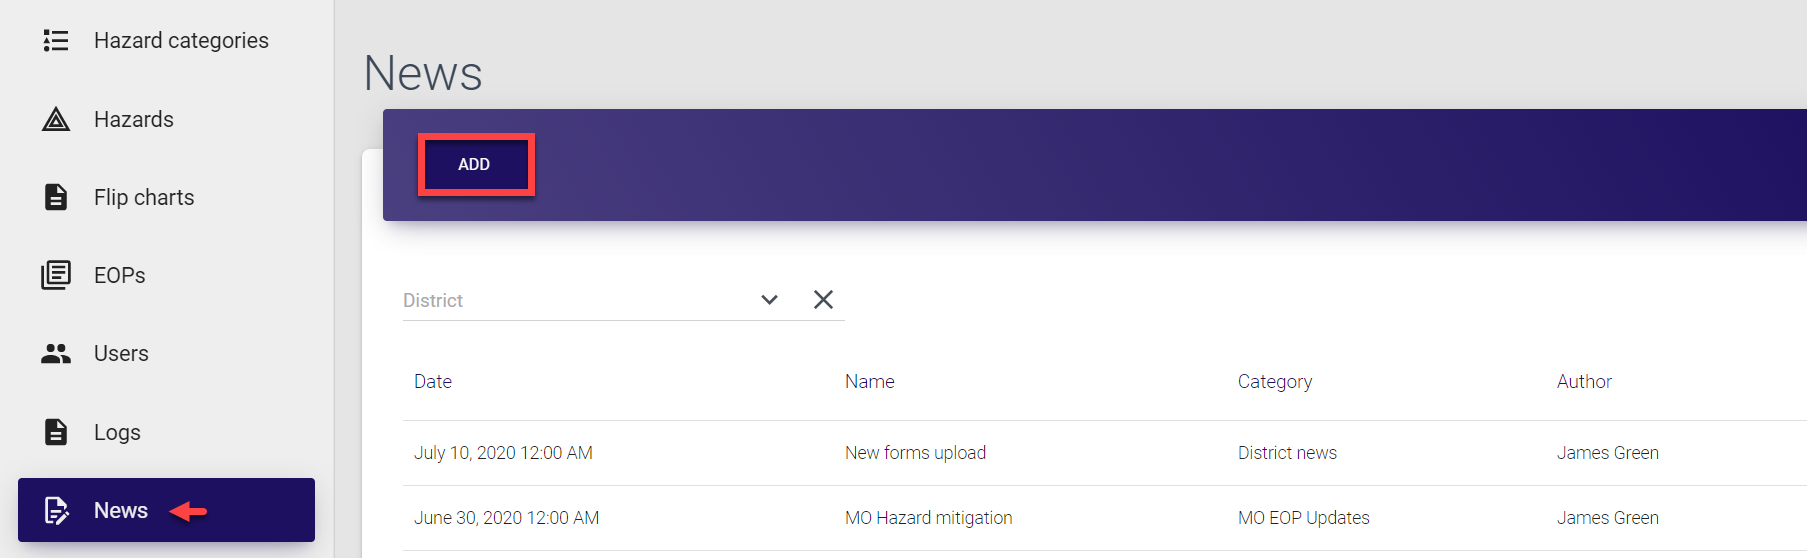
The list of all news is located under the News tab of the navigation menu. Here, you can:
Adding news
The permission to add news is granted only to Super admins.
To add news:
-
Select News from the left-side navigation menu.
-
Click Add in the top bar of the page to open the News form.
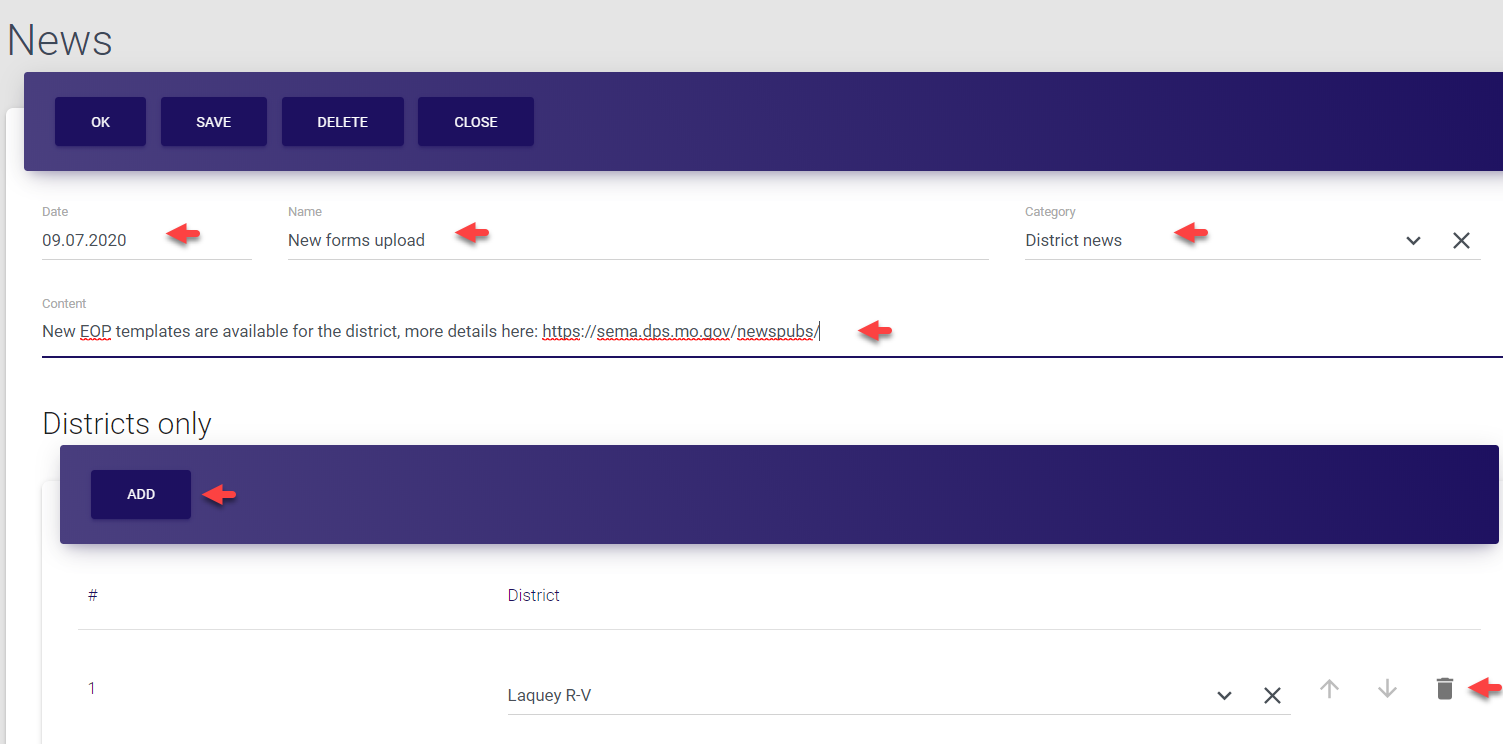
- In current implementation, all the fields of the form are optional, however, we recommend to provide as much information as possible for easier operation and management:
- Select the date. By default, the current date is displayed, however, you can select any other date from the drop-down calendar.
- Provide the name or short description of the news that will appear as the news title.
- Select the news category. Both FAQ and MO EOP Updates will be shown to all registered users, while District news will be displayed only to the users of selected district, see step 4 below.
- In the Content field, describe the news in more detail.
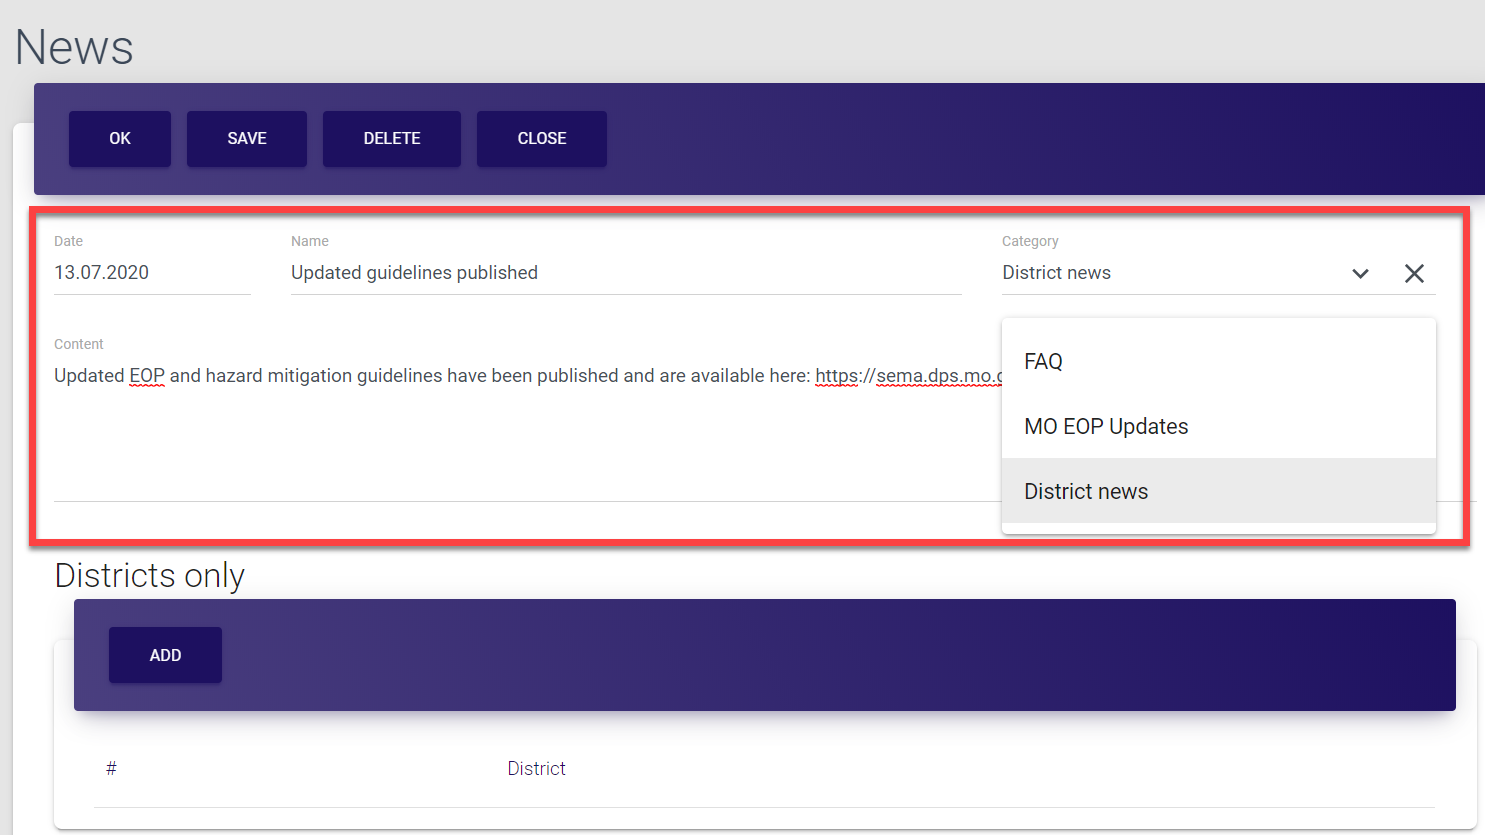
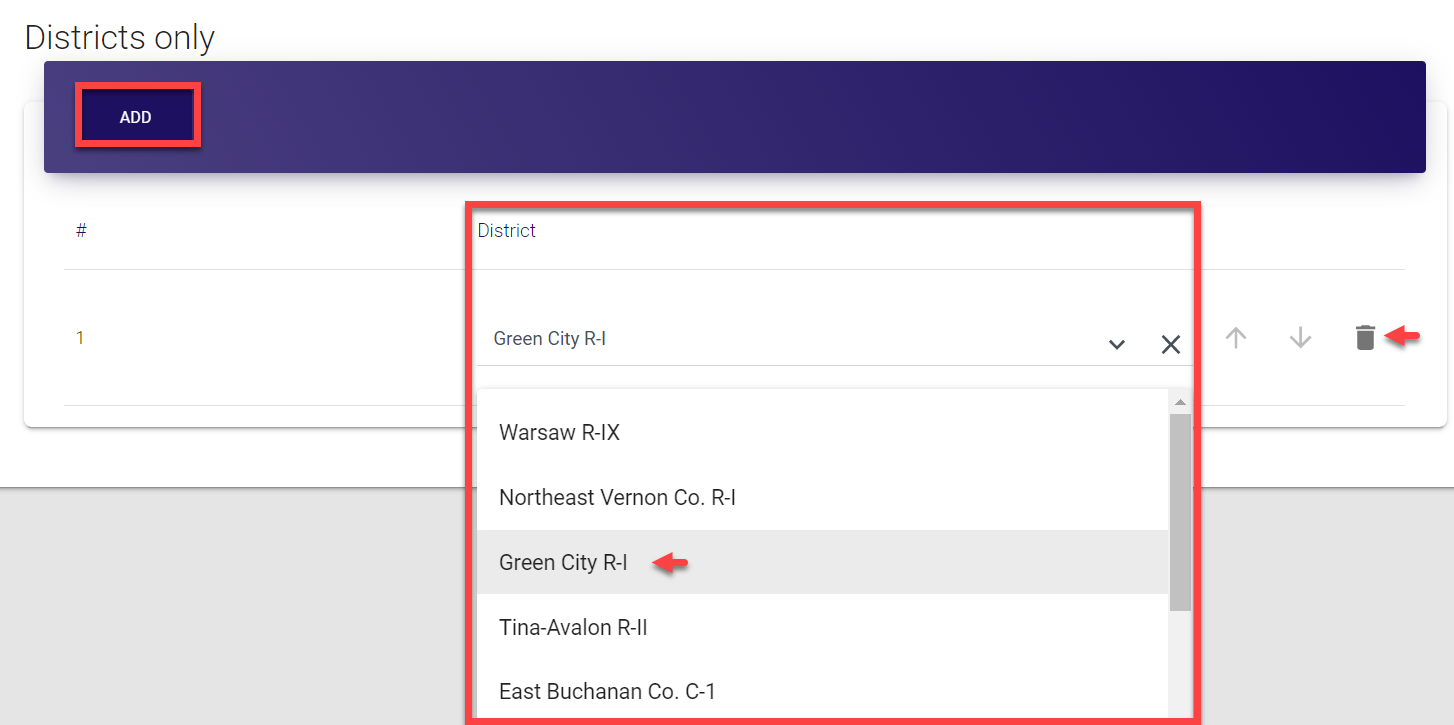
- If you selected FAQ or MO EOP Updates as the news category, you can skip this step. If you selected District news, select the district(s) in the next section of the News form. For that, click Add and select the required district from the drop-down list or use automatic search by typing at least three initial letters in the editable field. You can add as many districts as required.
You can press the trash can icon to delete the district or click the cross sign icon to simply clear the field.
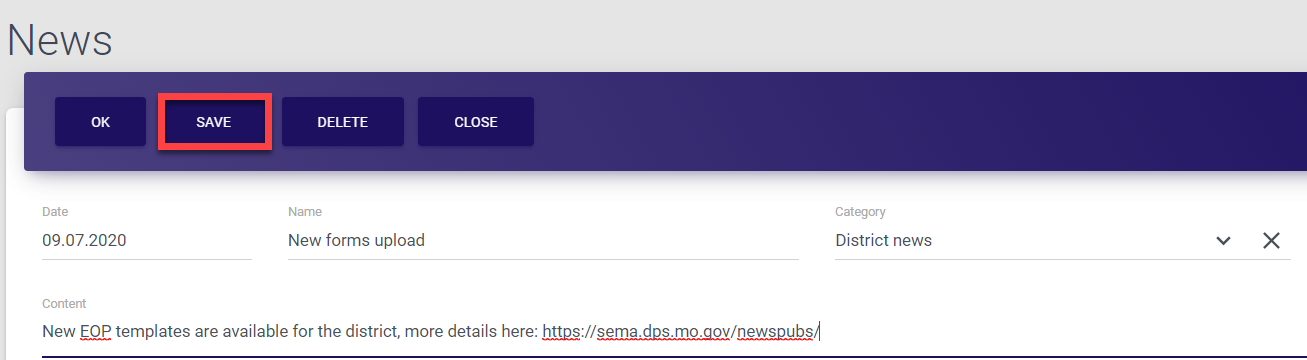
-
In the top bar menu of the News screen, select Save.
Selecting Ok also saves the data and directs you back to the News list.Selecting Close directs you back to the News list without saving the data.
The Delete option can only be used for existing news entries and is not applicable in this case.
Once you save the data, your action is confirmed by the brief pop-up notification displayed at the bottom of the page.
The entry is saved and added to the News list. According to selected news category, it is now available to either all registered users or users of specified districts. Besides the News section of MO EOP control panel, the news are also displayed on the Dashboard to make sure everyone stays updated on latest developments.
Updating news
As a Super admin, you have access to information about all news and can update any details, whenever required.
To update news:
-
Select News from the left-side navigation menu.
-
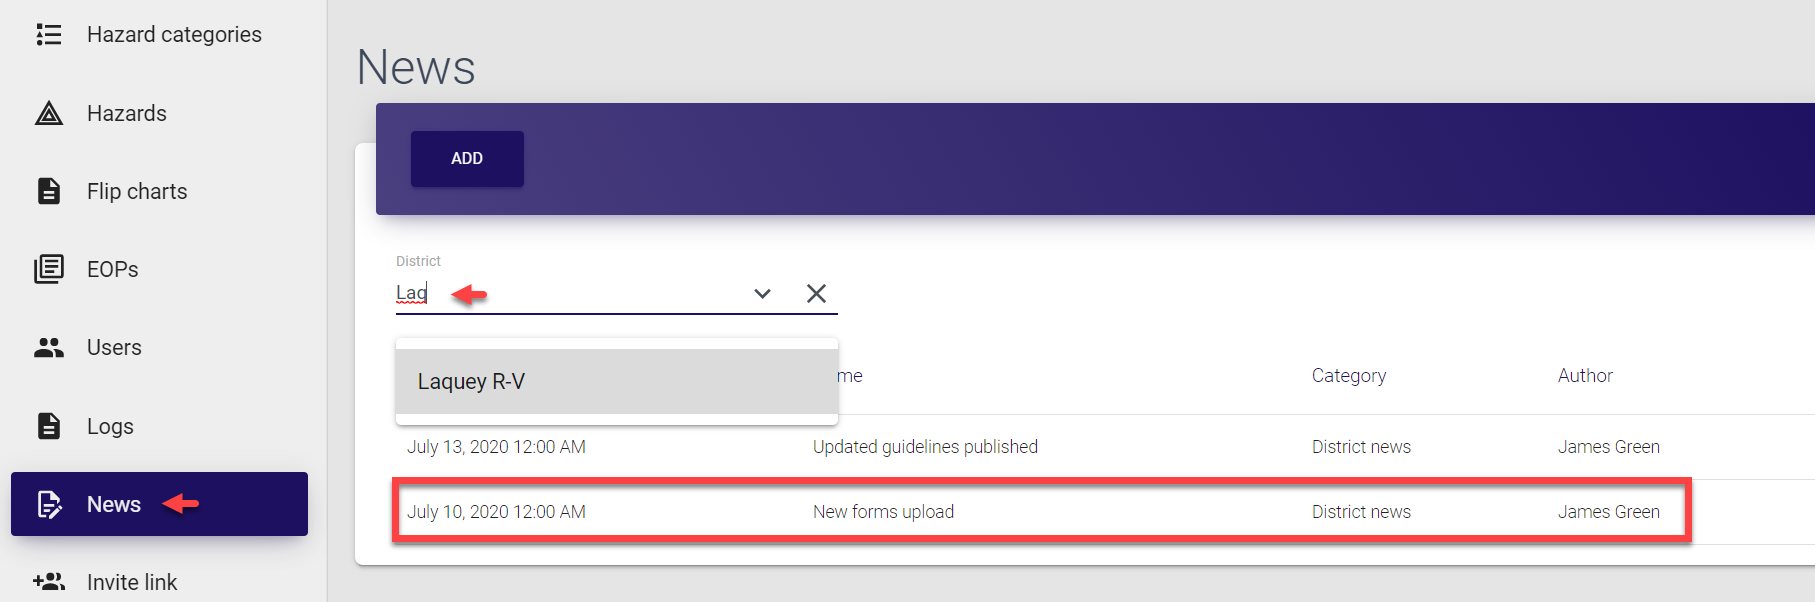
Find the required entry. You can search for a news by district. For that, simply start typing the first few letters of the its name in the search field at the top of the list.
- Click the entry to open news details. On the News screen, make required changes. Here, you can:
-
Change the date by selecting required option from the drop-down calendar.
-
Update the name of the news that appears as the news title.
-
Update the news category. Both FAQ and MO EOP Updates are shown to all registered users, while District news are displayed only to the users of selected district.
-
In the Content field, update the detailed description of the news.
-
If the District news category is selected, update/add/delete the current districts. Click Add to add new district(s), press the trash can icon to delete the district or click the cross sign icon to simply clear the field.
-
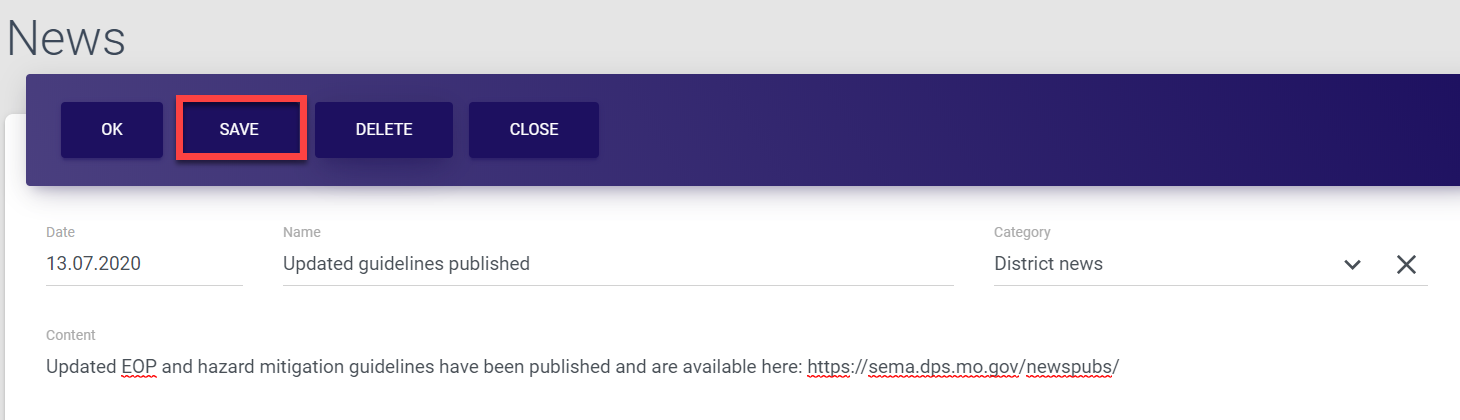
Finally, in the top bar menu of the News screen, select Save.
Selecting Ok also saves the data and directs you back to the News list.Selecting Close directs you back to the News list without saving the data.
Selecting Delete removes the entire News entry and after the deletion confirmation directs you back to the News list.
Once you save the data, your action is confirmed by the brief pop-up notification displayed at the bottom of the page.
The entry is updated and saved in the News list. According to the updated news category, it is now available to either all registered users or users of specified districts. Besides the News section of MO EOP control panel, the updated news are also displayed on the Dashboard to make sure everyone stays updated on latest developments.
Deleting news
If needed, any news entry can be deleted from MO EOP. The permission to delete news is granted only to Super admins.
To delete news:
-
Select News from the left-side navigation menu.
-
Find the required entry. You can search for a news by district. For that, simply start typing the first few letters of the its name in the search field at the top of the list.

- Click the entry to open news details. On the News screen, simply click Delete in the top bar menu and select OK in the pop-up confirmation window to confirm your choice.
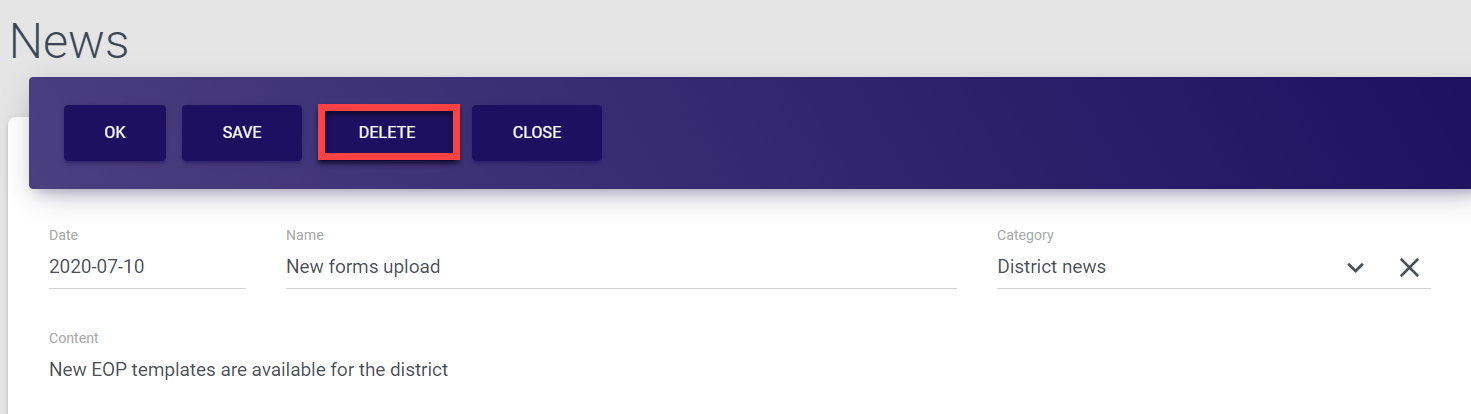
The Deleted! message is briefly displayed on the screen to confirm successful completion of the operation. The entry is now deleted and removed from the News list as well as from the Dashboard of corresponding users.
Managing users 
As a Super admin, you have access to the entire spectrum of operations related to user management, including:
Inviting users
New users can join MP EOP only by invitation. According to the current implementation, a user with any particular role can invite users with a lower ranking role, for example:
-
Super admins can invite District admins, Facility admins, Users and First respondents;
-
District admins can invite Facility admins and Users;
-
Facility admins can only invite Users.
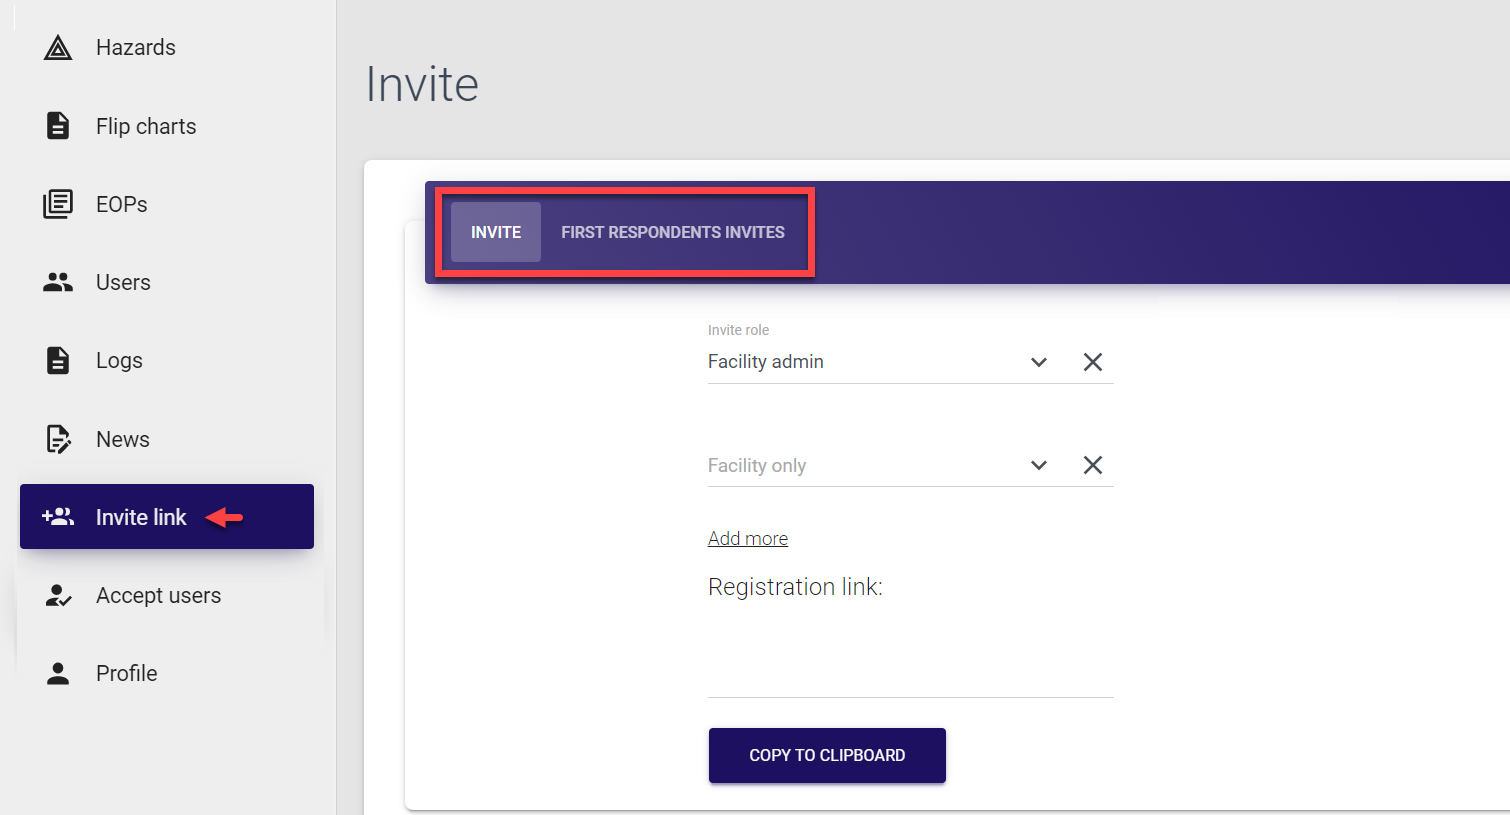
The invites are created and shared in the Invite link section of the control panel. As a Super admin, here you can:
Inviting admins and users
To invite an admin or a user:
-
Select Invite link in the left-side navigation menu. The required form is opened by default.
-
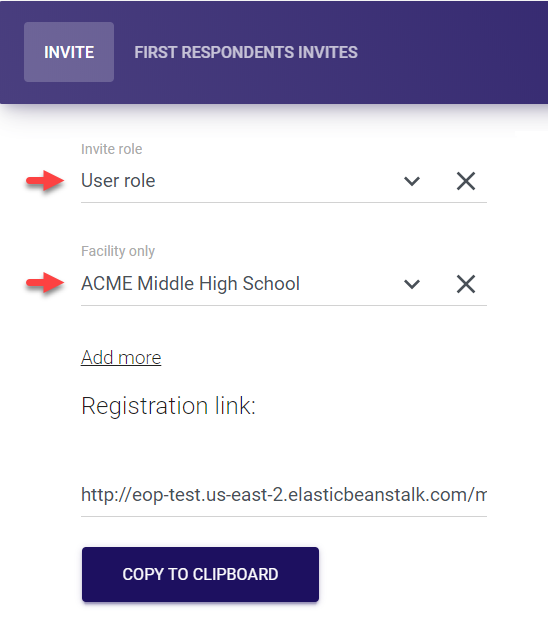
Select the user role (District admin / Facility admin / User) from the Invite role drop-down list and corresponding district/facility.
The district/facility field is mandatory. You need to specify the district/facility for successful completion of registration process.
| Inviting District admins | Inviting Facility admins | Inviting Users |
|---|---|---|
 |
 |
 |
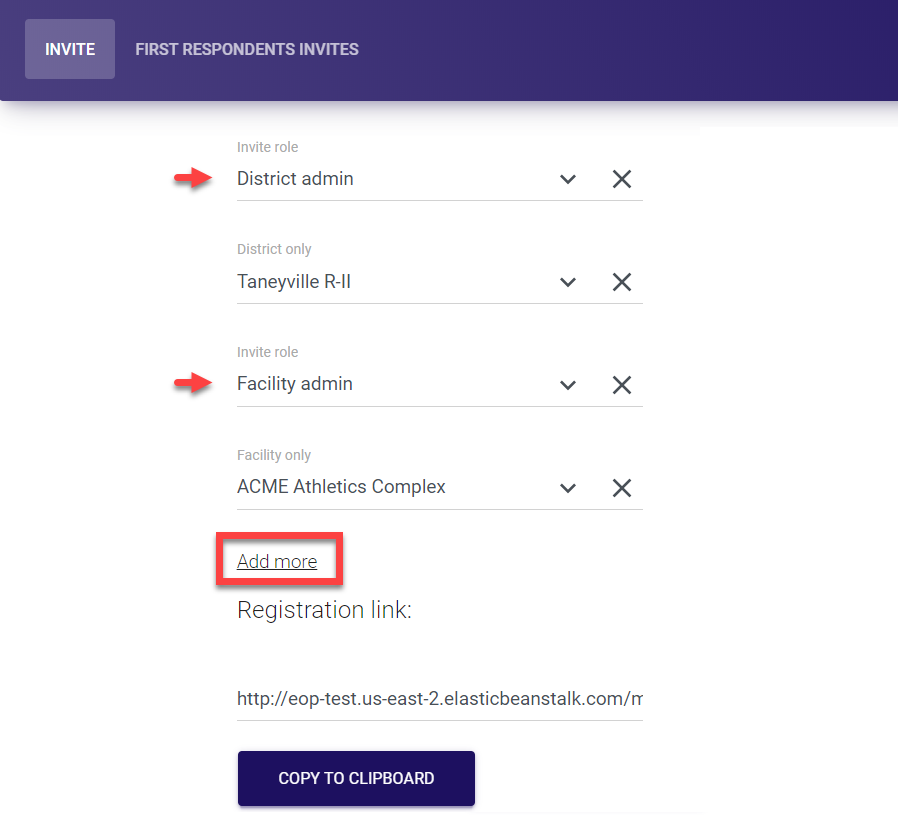
We support multi-account registration and login, i.e. one user can be invited and registered with two or more different roles. For example, you can assign one user both District admin and Facility admin roles, or two District admin roles for two different districts etc.
To add roles for invited user, simply click Add more and provide corresponding details.
- The registration link is generated automatically. Simply click Copy to clipboard and share the link to invite a person using any preferred method of communication.
Inviting First respondents
To invite a First respondent:
-
Select Invite link in the left-side navigation menu and click First respondents invites to open the required form.
-
Specify the email of the invite recipient and click Create invite.
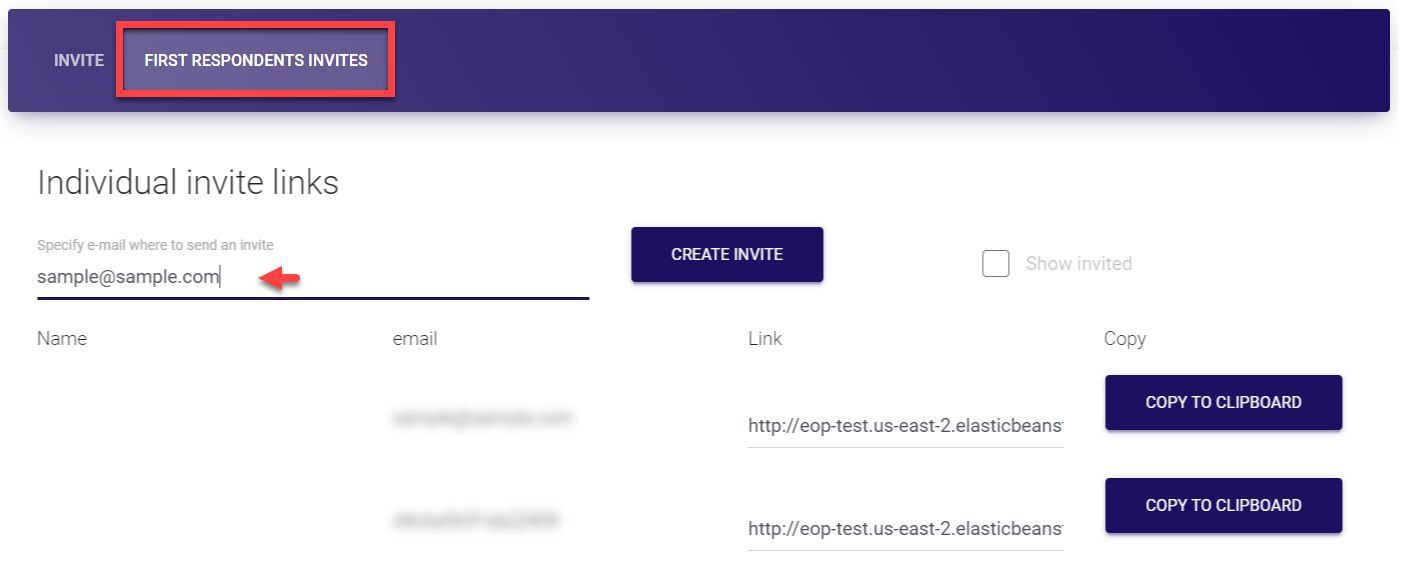
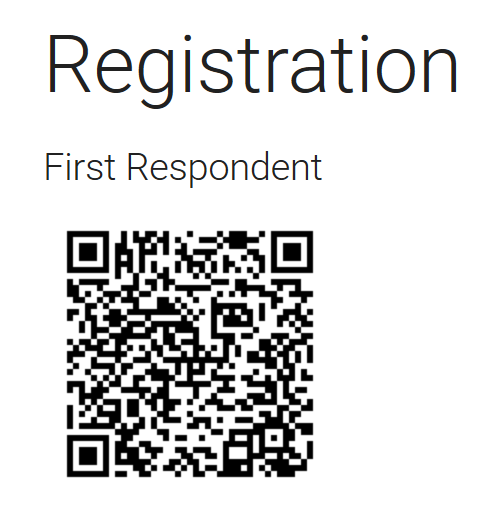
This generates the link with a QR code, which is now displayed at the top of the list. At the same time, the invited user receives the link via the specified email. A Super admin can also use the Copy to clipboard option to share the link in any other way, if needed.
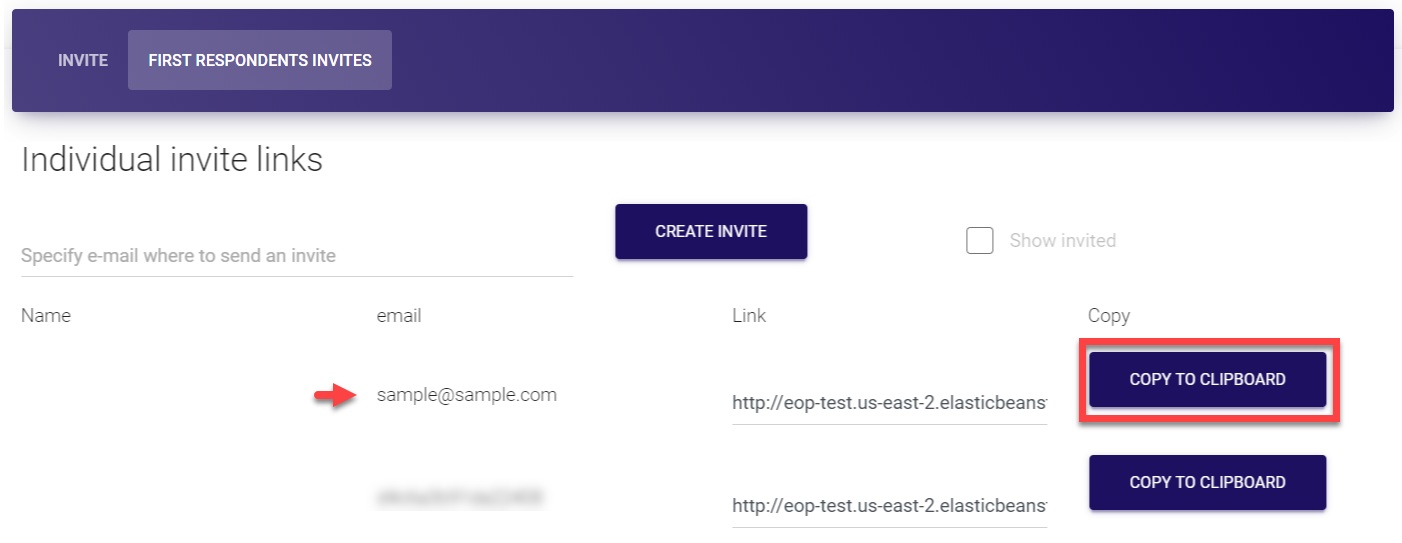
The link contains the QR code which can be used by First respondent to log in to MO EOP mobile app. This type of login does not require any login credentials (like email or password) but rather immediately provides access to the required data.
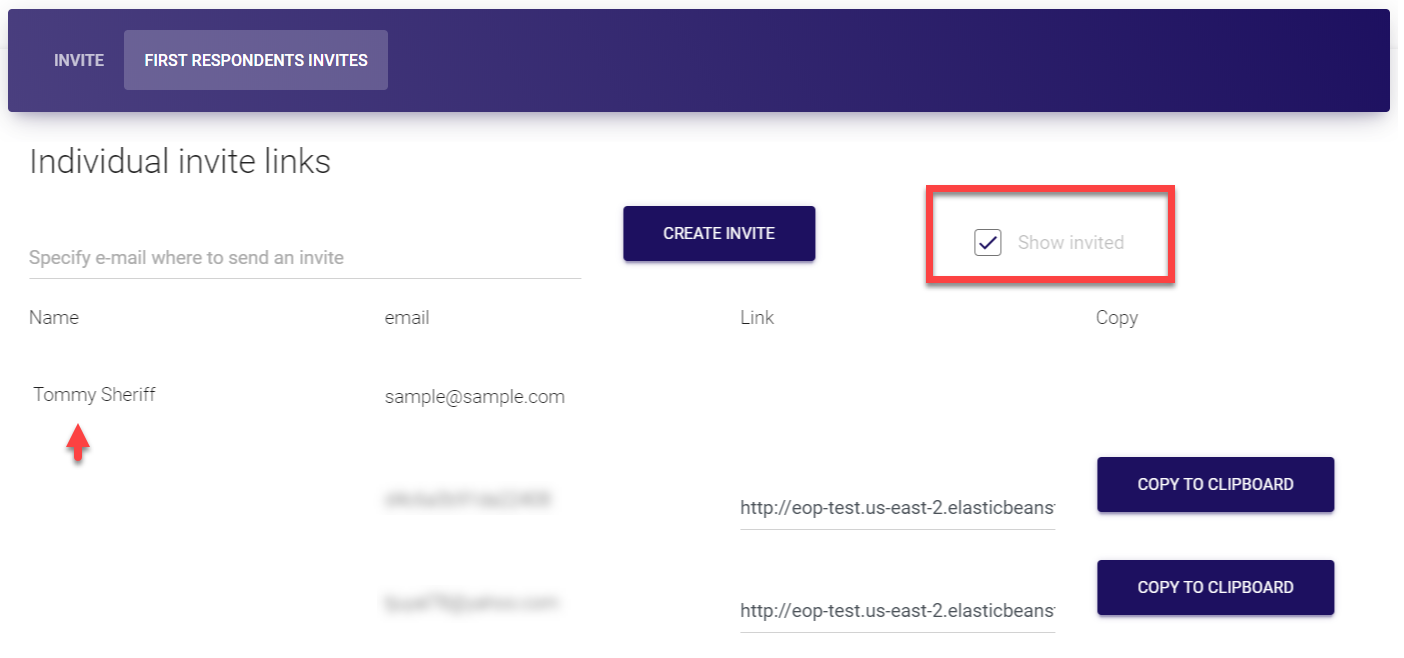
Once the First respondent uses the QR code to access the system, his email with the corresponding link are removed from the Invite page as by default, the list contains only pending invites. If you need to see the list of all invited users, both active and inactive, you can use the Show invited checkbox.
Accepting user requests
Each invited user joining request needs to be approved to avoid any unauthorized access. A Super admin has permission to accept all incoming requests - from users either invited by them or by anyone else in the system (District and Facility admins).
To accept user joining request:
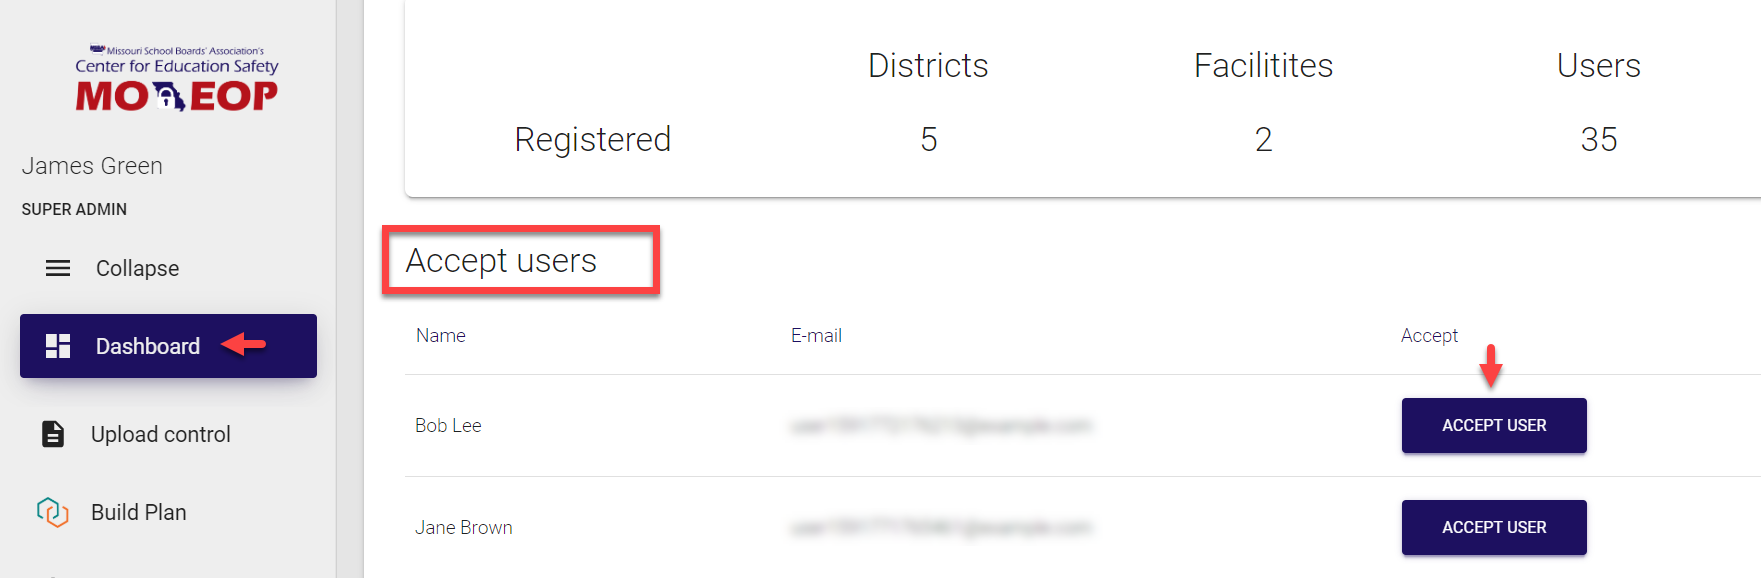
- Select Accept users from the left-side navigation menu. Here you can see the list of all invited users, both pending and approved (with check marks against their names).
You can use the filter in the top left corner to refine the displayed list by the user role. The logged in user can see all users with lower ranking roles, for example, a Super admin will see District admins, Facility admins and Users; District admin will see only Facility admins and Users and so on.
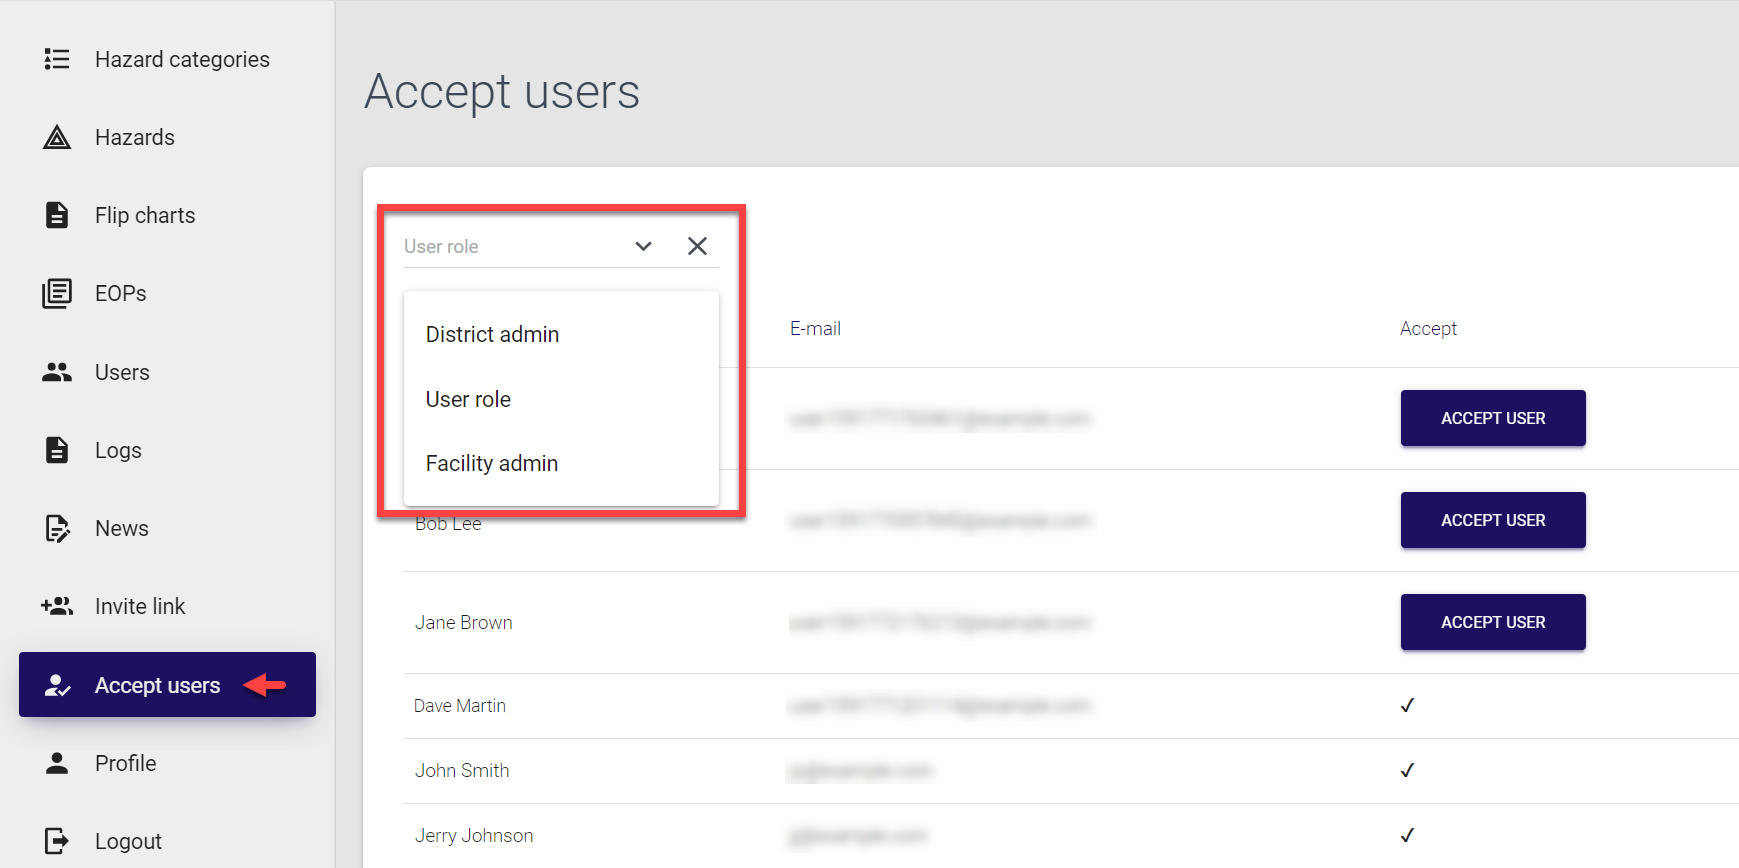
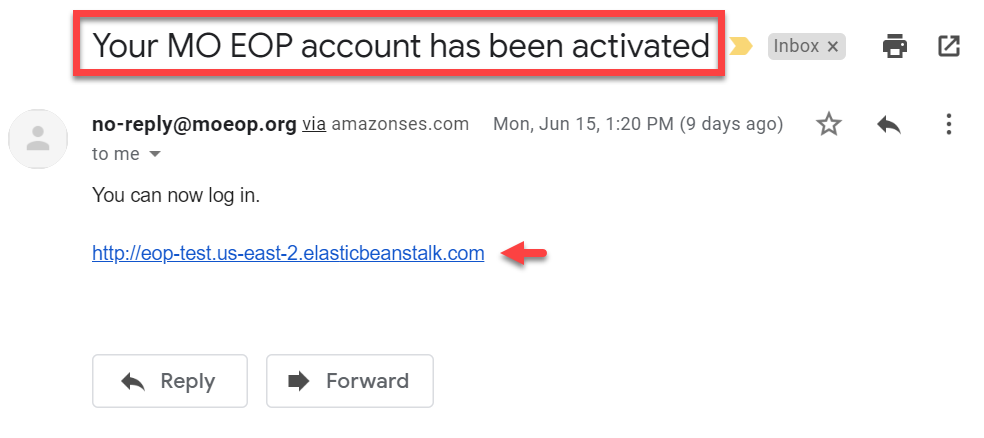
- Click Accept user against the names of the required user to approve their request and open their access to the system.
The Accept user button changes to a check mark, and the invited user receives an email about their account activation. The email contains the link that can be used to automatically log in to MO EOP.
Alternatively, you can accept user joining requests directly from the MO EOP dashboard. Note that only pending requests are displayed here under the Accept users title. Simply click Accept user against the required user to activate their account, and to remove the request from the dashboard.
Adding users
Apart from the standard process of inviting and accepting new users, a Super admin can add new users by manually entering their details in the Users section. Note that this way, a Super admin can also provide the password, which, however, can later be changed by the added user in their profile page.
To add a user:
-
Select Users from the left-side navigation menu.
-
Click Add in the top bar of the page to open the User form.
- Fill the form with new user details.
-
Specify the name and email of the user to be added (these fields are mandatory). This email will be used as the username at the time of new user login.
If you choose to activate user account later, you can also check the Inactive box. Leaving the check box empty will allow the user to access ME EOP as soon as their details are saved.
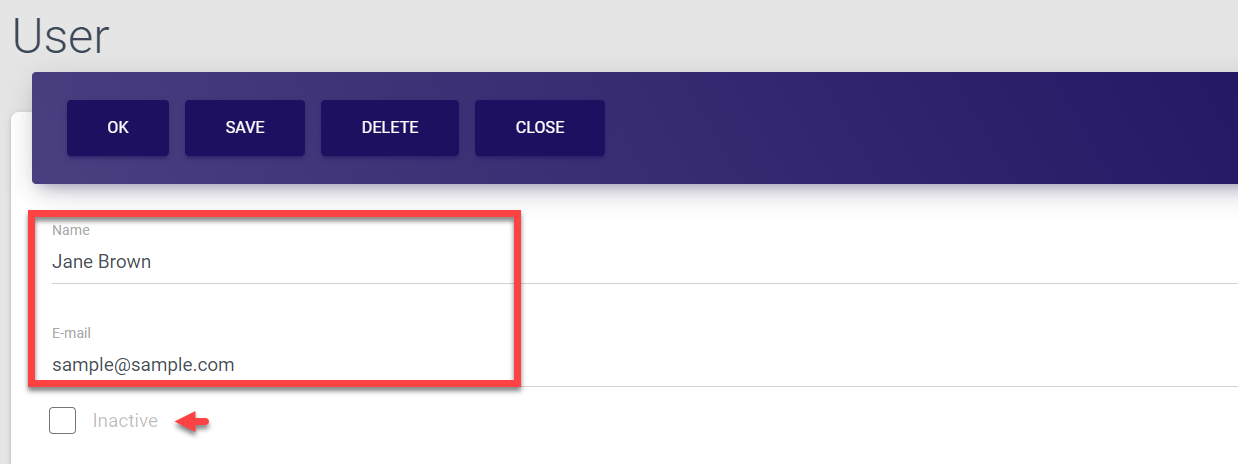
Note that email id must be unique. If the user with the same email already exists, the following message is displayed:

-
Click Add role and provide the required details: a user role, district and/or facility depending on the selected role. You can either select the district/facility from the drop-down list, or use automatic search by typing few initial letters right in the editable field.
You can assign several roles to a user. For that, just click Add role in the top bar and fill the fields again.
You can press the trash can icon to delete the Role or click the cross sign icon against any field to simply remove the content.
Note that for the role assignment to be processed correctly and successfully, you need to select the district/facility for the corresponding roles (District for District admin, Facility for Facility admin and User).

-
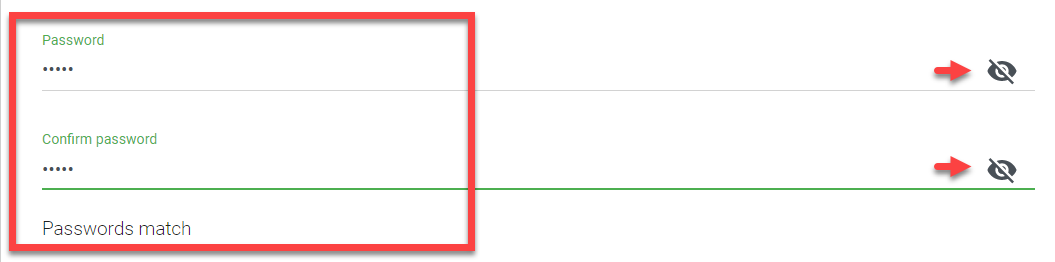
Provide and confirm the user password. You can use the eye icon to view entered password and check it for correctness. The password will be used by the added user to log in to MO EOP.
In the current implementation, the password field is not mandatory. If the password is not provided, a new account will still be saved and activated, and the newly added user can select the Forgot your password? option on the Login screen to create his own password.
-
In the top bar menu of the User screen, select Save.
Selecting Ok also saves the data and directs you back to the Users list.Selecting Close directs you back to the Users list without saving the data.
The Delete option can only be used for existing users and is not applicable in this case.

Once you save the data, your action is confirmed by the brief pop-up notification displayed at the bottom of the page. The new user account is now created and added to the Users list.
Note that currently there is no email or any other notification sent out to the added user about creation and activation of their MO EOP account, so you’ll need to share login credentials with the user choosing your preferred method of communication.
Updating user details
As a Super admin, you have access to information about all users and can update their details, whenever required.
To update user details:
-
Select Users from the left-side navigation menu.
-
Find the required user. You can search for a user by typing at least three first letters of the user name or email in the search field at the top of the list.
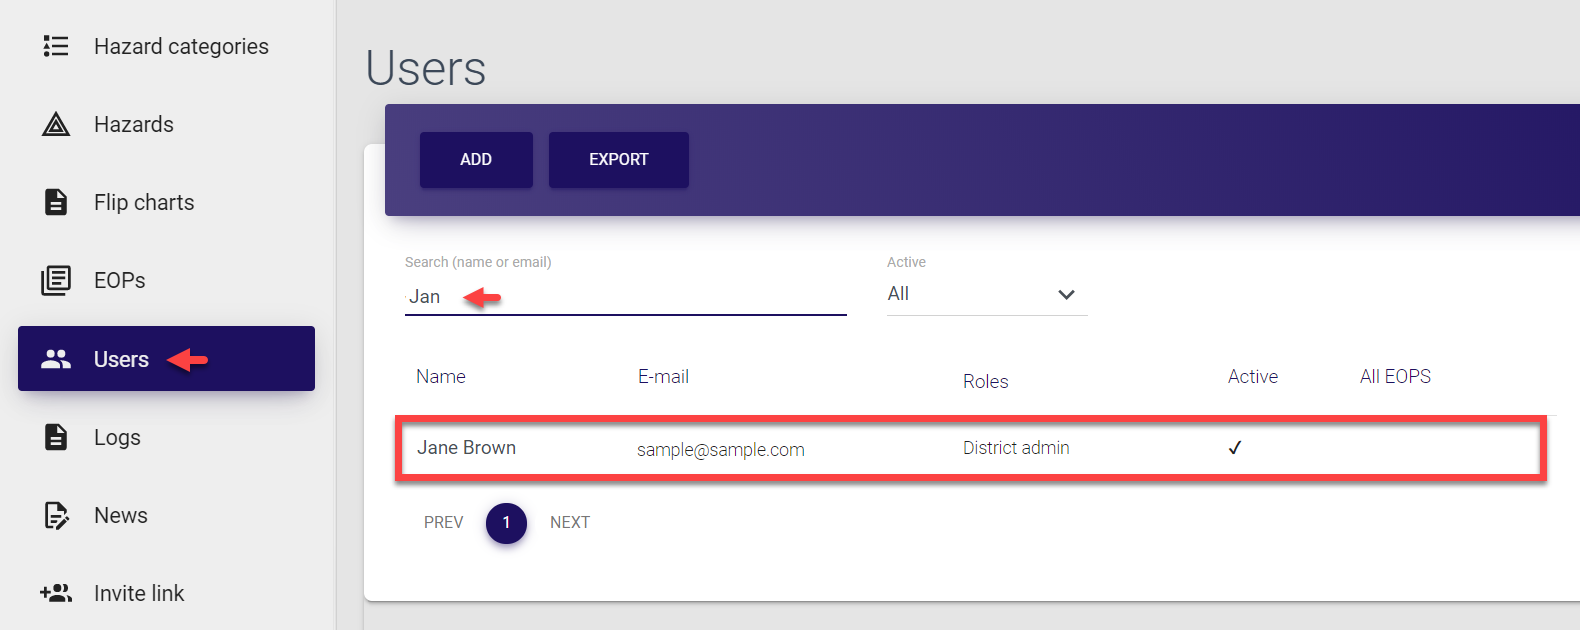
- Click the entry to open the User screen, where you can add, remove or change any information about a user. Here, you can:
-
Update the name or email of the user. These are the only mandatory fields of the User form. Note that email id must be unique and no two accounts can be created with the same email.
-
Change the activation status of the user. You can temporarily suspend the user account by checking the Inactive box, or make the user active by unchecking it.

-
Update the user role, district and/or facility depending on the selected role. You can either select the district/facility from the drop-down list, or use automatic search by typing few initial letters right in the editable field.
To assign additional role, click Add role in the top section bar and fill the fields again.
To delete a role, press the trash can icon against the corresponding entry.
Note that for the role assignment to be processed correctly and successfully, you need to select the district/facility for the corresponding roles (District for District admin, Facility for Facility admin and User).
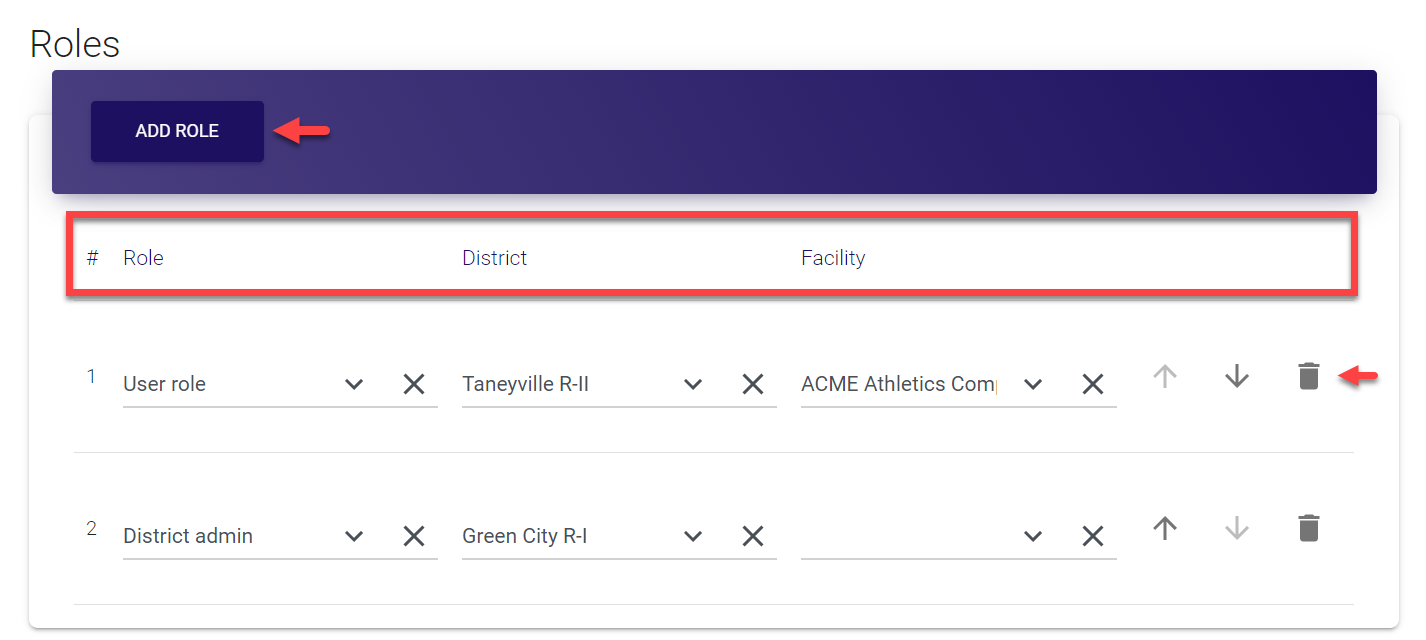
- Update the user password. You can use the eye icon to view entered password and check it for correctness. The user will need to use the updated password to continue accessing MO EOP.

-
In the top bar menu of the User screen, select Save.
Selecting Ok also saves the data and directs you back to the Users list.Selecting Close directs you back to the Users list without saving the data.
Selecting Delete removes the entire User entry and after the deletion confirmation directs you back to the Users list.
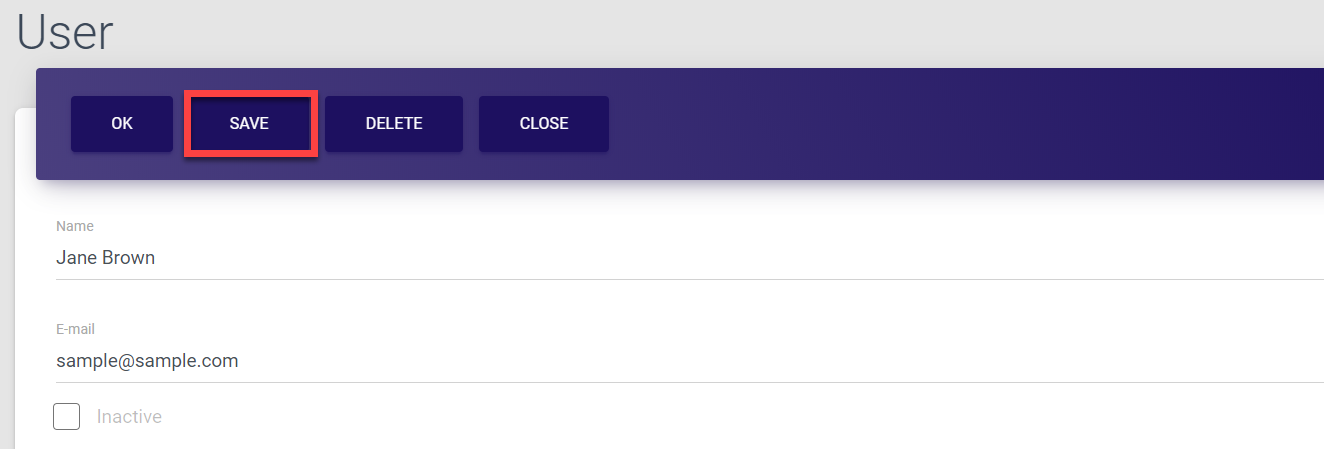
Once you save the data, your action is confirmed by the brief pop-up notification displayed at the bottom of the page. The user account details are now updated.

Deleting users
If needed, any user can be deleted from MO EOP and no longer have access to the system. The permission to delete users is granted only to Super admins.
To delete a user:
-
Select Users from the left-side navigation menu.
-
Find the required user. You can search for a user by typing at least three first letters of the user name or email in the search field at the top of the list.

- Click the entry to open user details. On the User details screen, simply click Delete in the top bar menu and select OK in the pop-up confirmation window to confirm your choice.
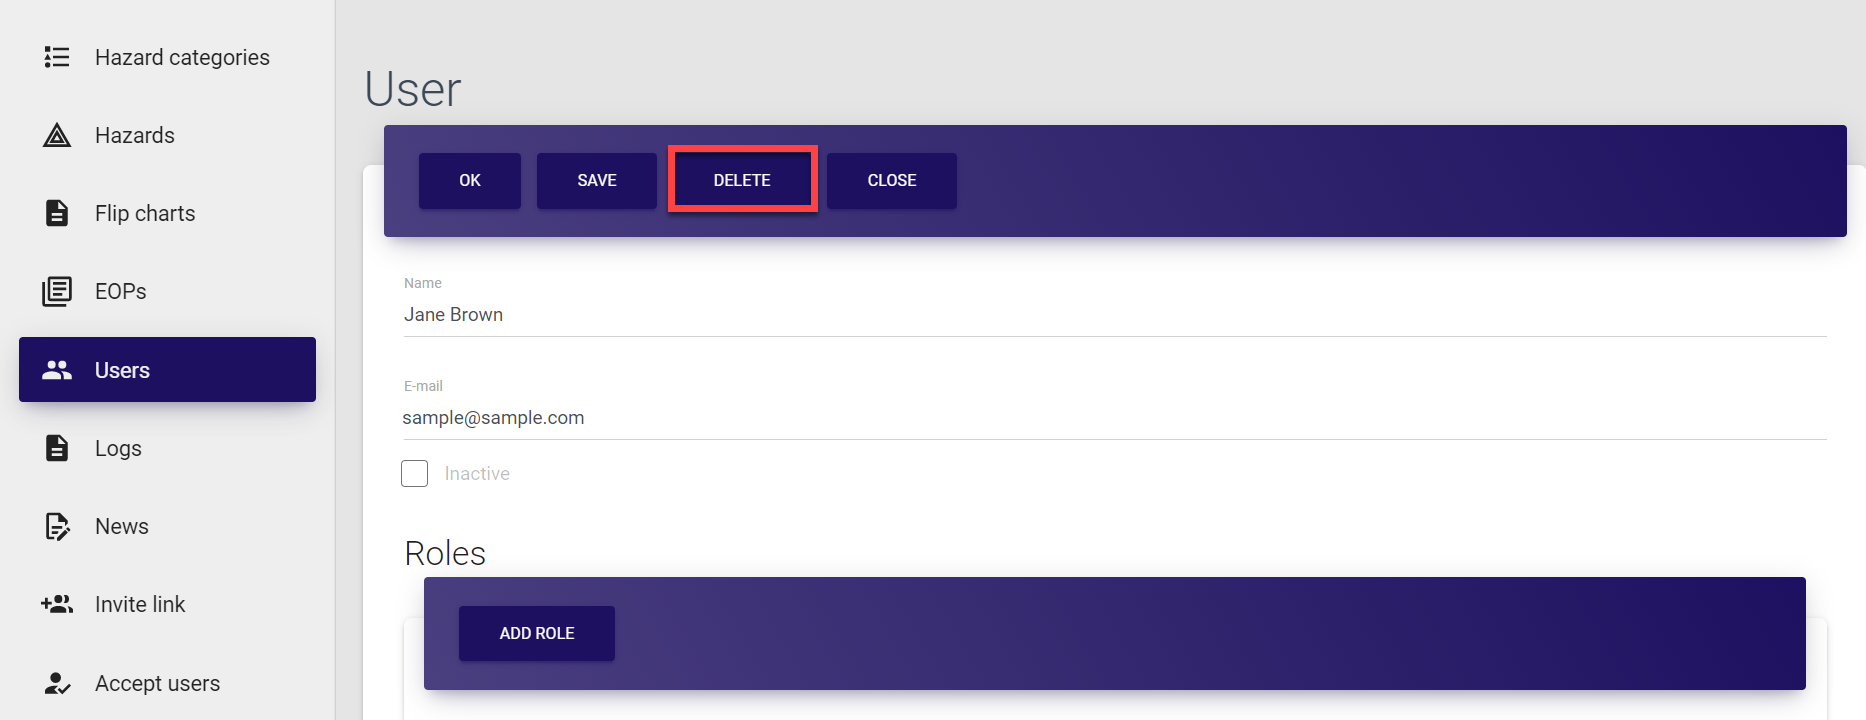
The Deleted! message is briefly displayed on the screen to confirm successful completion of the operation. The user is now deleted, removed from the Users list, and can no longer access MO EOP.
Exporting users
The information about all users can be exported, if needed. This functionality is only available to Super admins.
To export user details:
-
Select Users from the left-side navigation menu.
-
Click Export in the top bar and select the location for saving the CSV file with user data in your system.
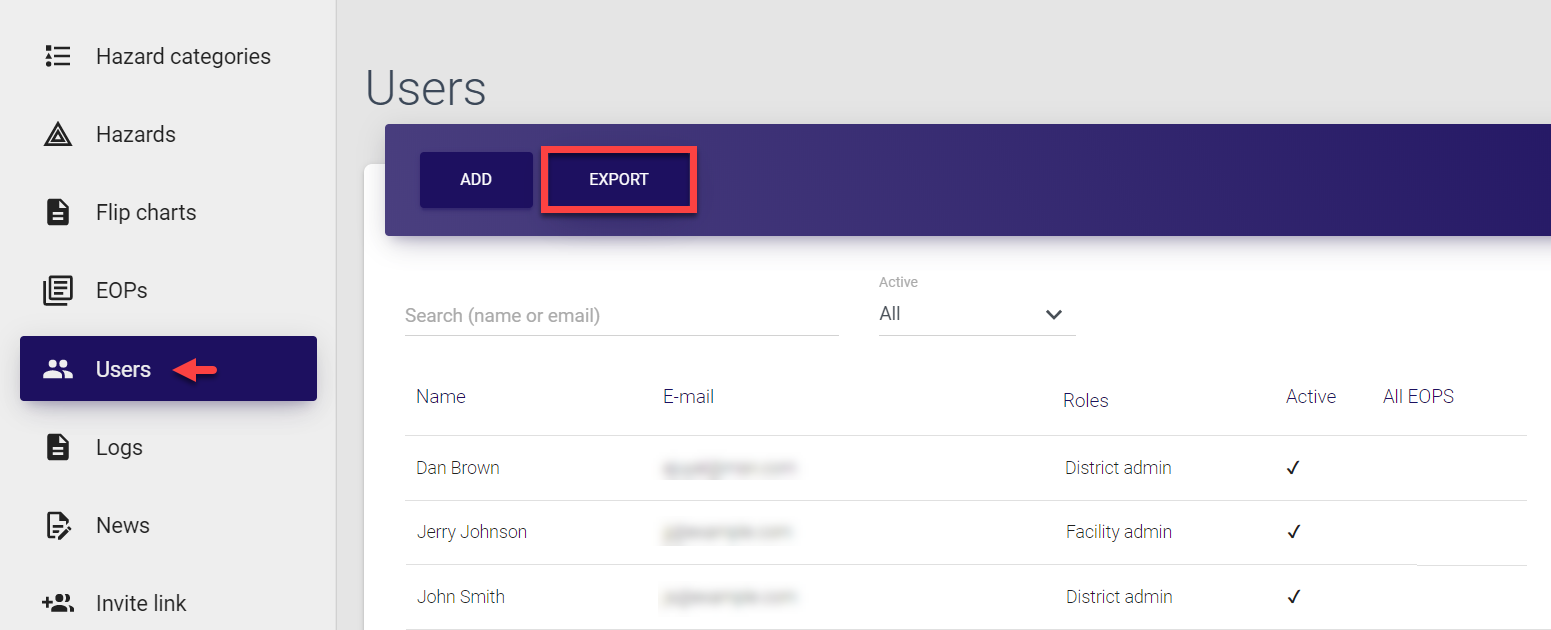
The downloaded file contains information about all users of the system, both active and inactive, in CSV format. The list does not include deleted users.

Logging 
All major operations in MO EOP system are logged. Access to logs is provided only to Super admin.
Logged operations
The following operations are registered in MO EOP logs:
-
user logins
-
importing data
-
adding users / districts / facilities / EOPs / flip charts / resources / news / hazard categories / hazards / files / links
-
updating users / districts / facilities / EOPs / flip charts / resources / news / hazard categories / hazards / files / links
-
deleting users / districts / facilities / EOPs / flip charts / resources / news / hazard categories / hazards / files / links
Viewing logs
To view the logs, simply select Logs from the left-side navigation menu.
Here, you can see the list of all logged actions. You can filter the list by the user name, date or time period.
-
To filter by user name, select the user id from the drop-down list or start typing the name in the editable field for a quick search.
-
To filter by “from-to” date, click in the corresponding field and select the date from the drop-down calendar.
-
To filter by time period, select the required from the drop-down list. Available options include: today, yesterday, this week, previous week.
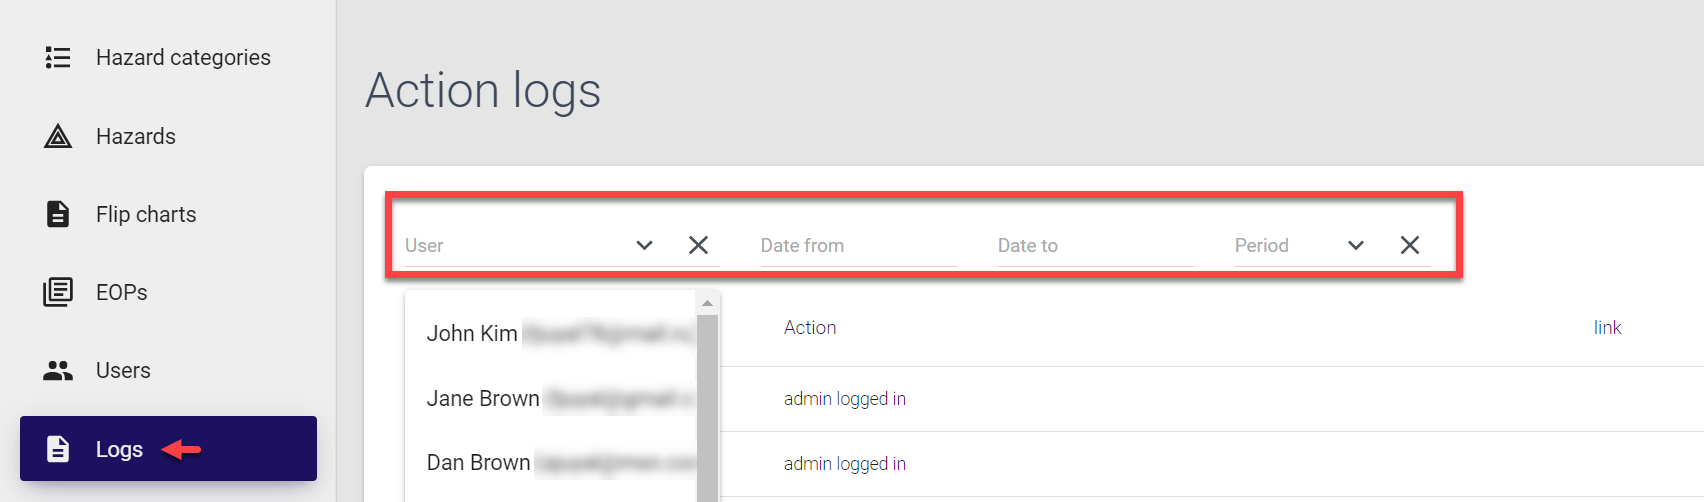
Each entry in the logs is clickable, you can open the entry to view more details. To exit the screen and return to the list of logged actions, click Close.
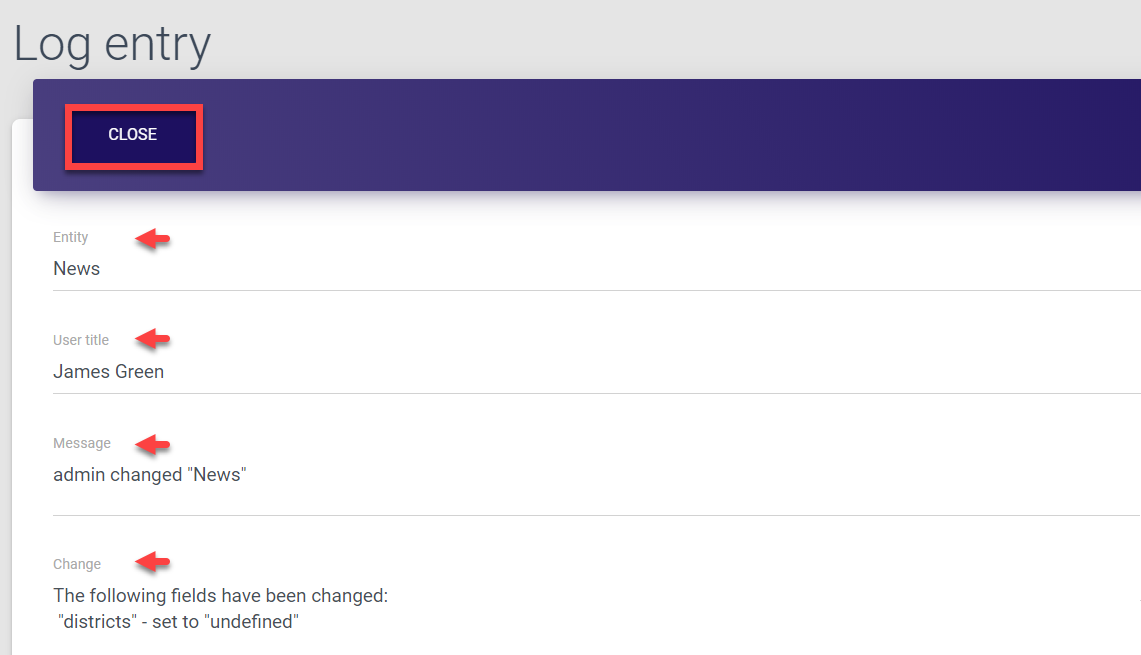
Addition/upload/update actions have the Show entity link, which takes you to the corresponding created/updated User, EOP, Flip chart, Resource, News, District, Facility, Hazard type or Hazard entry.
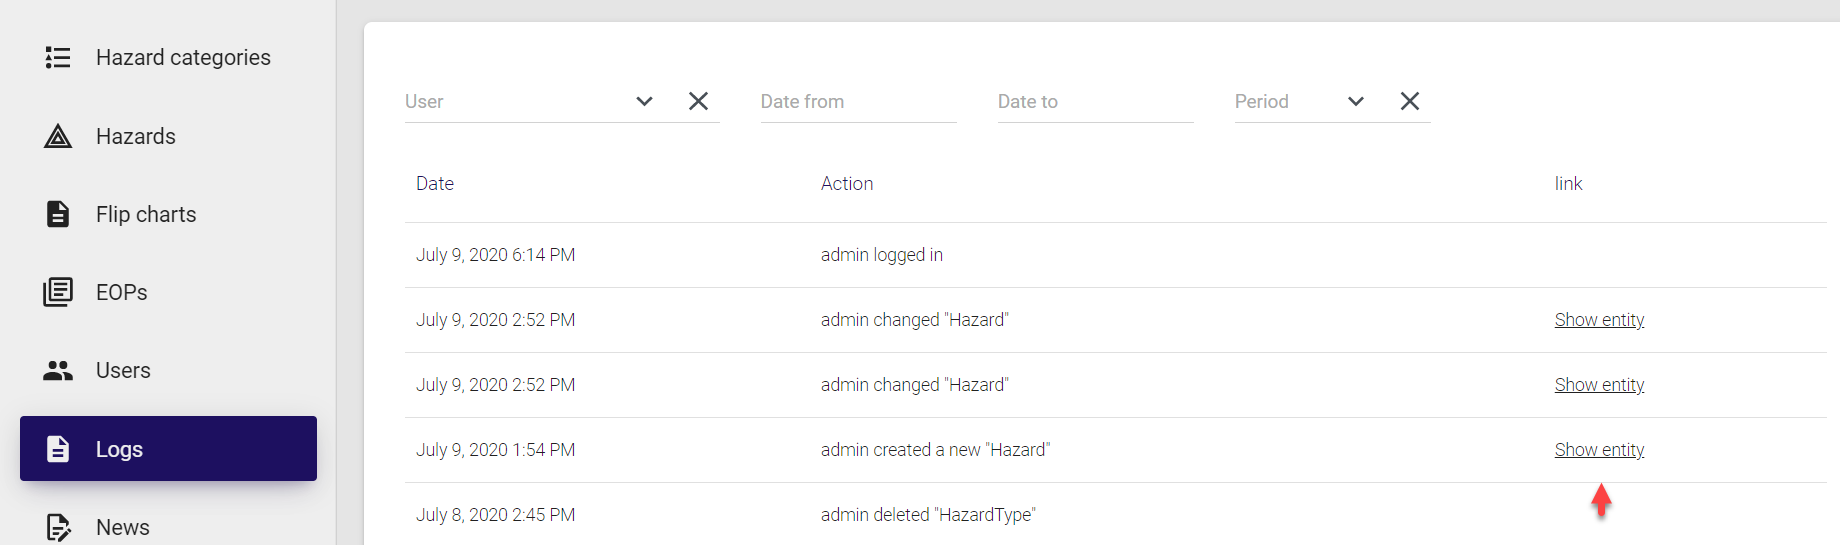
User roles 
User roles define the scope of rights and permissions as well as the level of access for a user within the system. The MO EOP service has five default user roles:
As shown above, all roles can be divided into admin roles and user roles - admins manage resources, while users (Users and First respondents) are provided with fast and easy access to all required data.
The First respondent is a special type of role, with the following specifics:
-
no access to the web panel
-
no attachment to district or facility
-
access to the mobile app only via the facility QR code
Below is the short description of rights and permissions for each role within the MO EOP web panel.
Super admin
Super admin has access to the whole range of MO EOP functionality and service tabs, and can manage all available system resources. They can expand the pool of users by inviting District admins, Facility admins, Users and First respondents.
Super admin accounts are created at the backend, please contact our support team to add Super admins.
The scope of permissions for a Super admin includes the following:
Users
-
Inviting users with lower ranking roles
-
Accepting new user registration requests
-
Updating user details
-
Deleting users
EOPs, flip charts and resources
-
Adding EOPs / flip charts / resources (system-wide)
-
Uploading EOPs / flip charts / resources
-
Updating EOPs / flip charts / resources
-
Deleting EOPs / flip charts / resources
Districts and facilities
-
Adding districts and facilities
-
Updating districts and facilities
-
Deleting districts and facilities
Hazards
-
Adding hazards and hazard categories
-
Updating hazards and hazard categories
-
Deleting hazards and hazard categories
News
-
Adding news in all categories (system-wide)
-
Updating news
-
Deleting news
Logs
- Viewing action logs
District admin
District admins join the system via the invite from the Super admin. Their access is limited to the resources of the corresponding district both in web and mobile app. Within their locale, they have complete scope of permissions to manage documentation, create EOPs, add news etc. Note that District admin can manage resources only for one district.
District admins can invite Facility admins and Users to join the system.
The scope of permissions for a District admin includes the following:
Users
-
Inviting Facility admins and Users
-
Accepting new user registration requests within their district
EOPs, flip charts and resources
-
Adding EOPs / flip charts / resources within their district
-
Updating EOPs / flip charts / resources within their district
-
Deleting EOPs / flip charts / resources within their district
Facilities
-
Adding facilities within their district
-
Updating facilities within their district
-
Deleting facilities within their district
News
-
Adding district news
-
Updating district news
-
Deleting district news
Facility admin
Facility admins join the system via the invite from the Super admin or District admin. They can access the web panel to view the news, EOPs and other resources for their facility. They can also invite Users.
The scope of permissions for a Facility admin includes the following:
Users
-
Inviting Users
-
Accepting new user registration requests within their facility
EOPs, flip charts and resources
-
Adding EOPs / flip charts within their facility
-
Viewing system-wide resources
Facilities
- Adding facilities
News
- Viewing system-wide news
User
Users join the system via the invite from the Super admin, District admin or Facility admin. They can view and download all required facility documentation and other resources using the web or mobile app.
The scope of permissions for a user includes the following:
EOPs, flip charts and resources
- Viewing corresponding EOPs, flip charts and resources
News
- Viewing corresponding news
First respondent
The First respondent is a policeman, fireman or any other representative of official authorities who comes on site to deal with the emergency. The users with this role can only access the MO EOP mobile app, using the QR code of corresponding facility to get all the information required for prompt and efficient response. This includes facility emergency operations plans, flip charts and any additional resources.
The QR code is created and shared by Super admins in the web panel. For more information, refer here.
Glossary 
EOP
Emergency operations plan. The plan outlines emergency management structure and defines actions and roles necessary to provide a coordinated response during an emergency event. EOP provides general guidance for all levels of emergency management and applies best practices to mitigate loss of life or damage to property and reinforce continuity of operations.
Flip chart
Information board briefly describing important actions to be taken in specific types of emergencies. Such info-boards are usually printed out and placed at strategic locations on the premises to ensure that all concerned people can quickly find appropriate emergency response procedures.
Resources
Any useful additional data (besides EOPs and flip charts) can be considered as a resource. It could be any relevant general/district/facility plans or layouts, templates, state-wide, district-wide or local safety recommendations etc.
Trisk
Third-party system used in direct conjunction with MO EOP. The system requires its own login credentials and is available to Super admins and District admins. Trisk is used to develop, review and approve EOPs for specific districts and/or facilities. These EOPs are then transferred to MO EOP control panel for further area- and user-role-based management and distribution.