MO EOP control panel - Facility admin guide
General information 
Solution overview
MO EOP service is an information system developed for the state of Missouri (MO) for accessing and managing emergency operations plans (EOPs). The purpose of the EOP is to outline emergency management structure and define actions and roles necessary to provide a coordinated response during an emergency event. The plan provides general guidance for all levels of emergency management and applies best practices to mitigate loss of life or damage to property and reinforce continuity of operations.
Thus, the MO EOP solution is used to facilitate the response in emergency situations, mainly in educational institutions. It provides fast and easy access to procedures and processes created specifically to ensure safety and protection of students and staff. All EOPs account for local specifics and the types of potential hazards. Comprehensive resources are used to proactively inform about correct behavior in emergencies as well as to provide the first respondents (firemen, policemen etc.) with required details allowing to choose the best course of action.
The service works as a combination of web and mobile applications with the web control panel being the main tool for managing EOPs.
This document describes MO EOP control panel functionality for a Facility admin.
Supported configurations
Web interface
Operating System:
Mac OS 10.14.4,
Windows 10 Pro Version 1803, OS Build 17134.753
Browser:
Google Chrome Version 74+
Opera 60.0.3255.27+
Mobile app
Android: Android OS v.4.1 and above
IPhone: iOS v.10 and above
Registration and authorization 
Registration
New users can join MP EOP only by invitation. According to the current implementation, Facility admins can be invited by Super admins and District admins. The invitation is shared by any preferred method of communication (email, chat, sms, etc.) as a link to the Registration page.
To create your MO EOP account:
-
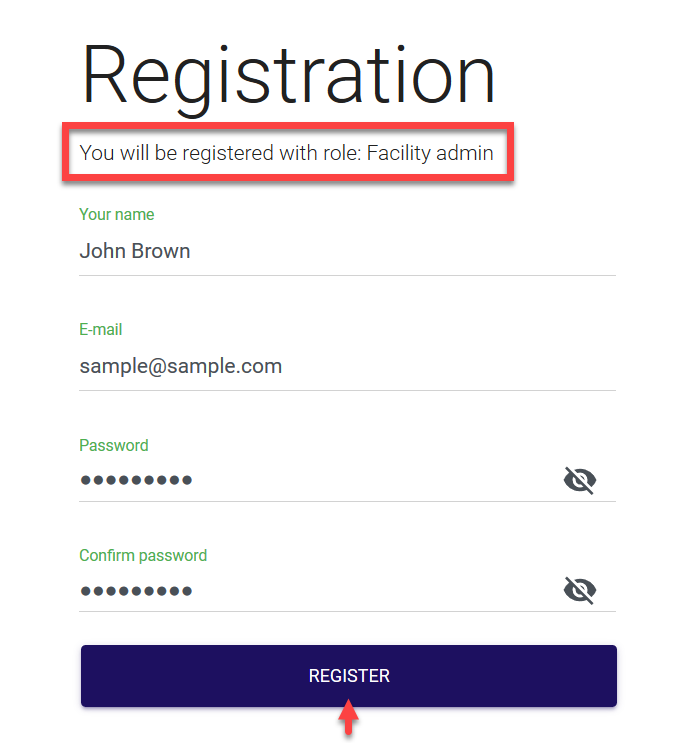
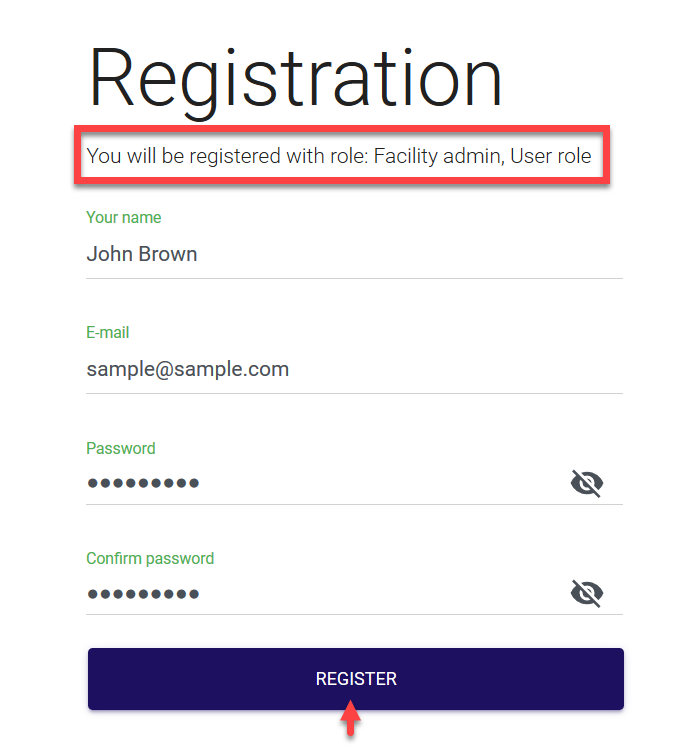
Open the invitation link shared by a Super/District admin. The screen includes information about the role you are being registered with. If you are invited only as a Facility admin, only one role is shown, if you are invited as a user with several roles, all of them will be listed on this page (e.g. you can be invited as a user with both Facility admin and User roles, or two Facility admin roles for two different facilities etc).
-
Fill in the registration form. Note that the fields are mandatory and the Register button remains disabled till all fields are successfully filled. On this screen, provide the details listed in the table below.
Field |
Description |
|---|---|
| Your name | Your name and surname. |
The email you will use to log in to your MO EOP account. The email should be unique, if the account with the same email already exists, the following message is displayed when you try to register:  |
|
| Password | The password you will use to log in to your MO EOP account. |
- Once all the fields are filled and successfully validated (highlighted in green), click Register.
| Registration screen for one role | Registration screen for multiple roles |
|---|---|
 |
 |
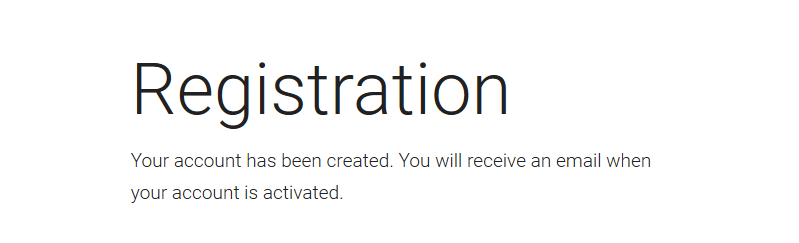
Your joining request is now sent to the Super/District admin to be approved, and the following confirmation screen is displayed:
Once your joining request is approved, you will receive the following confirmation on your registered email account:
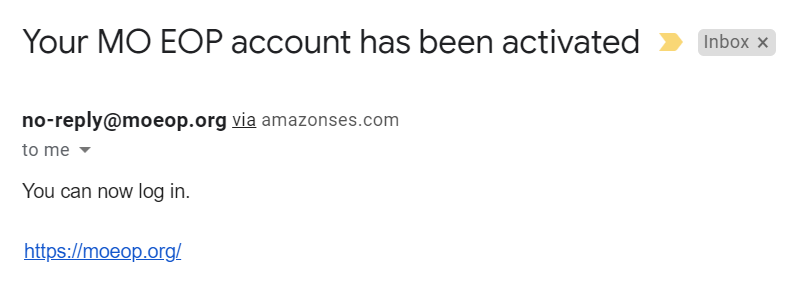
Your MO EOP account is now activated, and you can access the MO EOP panel.
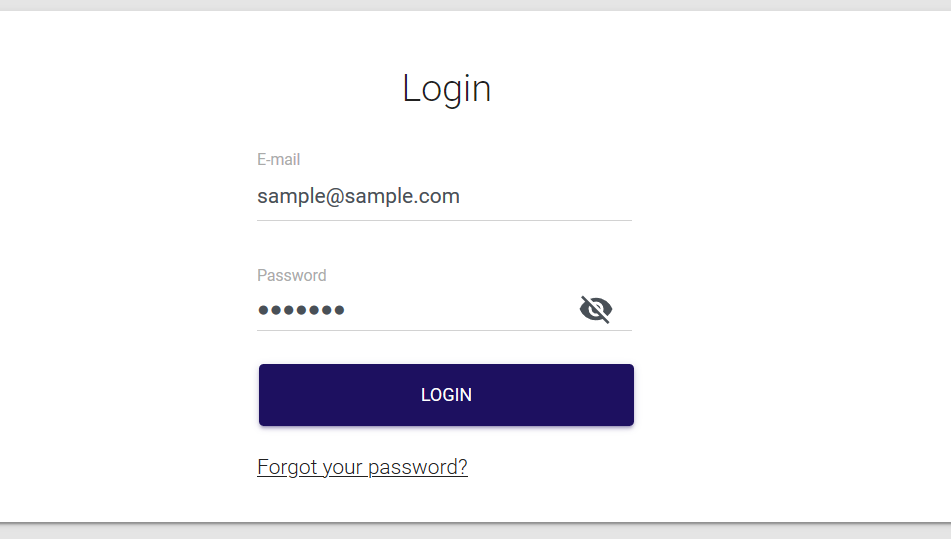
Login
MO EOP supports multi-login, that is you can register as a user with several roles and choose one of them at the time of login. Note that if you have registered as a user with one Facility admin role, the multi-login stage is skipped and you are taken directly to the Dashboard.
To log in to MO EOP:
-
Open https://moeop.org/.
-
Enter your email and password. You can use the eye icon to view the password in case you need to check if you’ve entered it correctly.
-
Click Login.
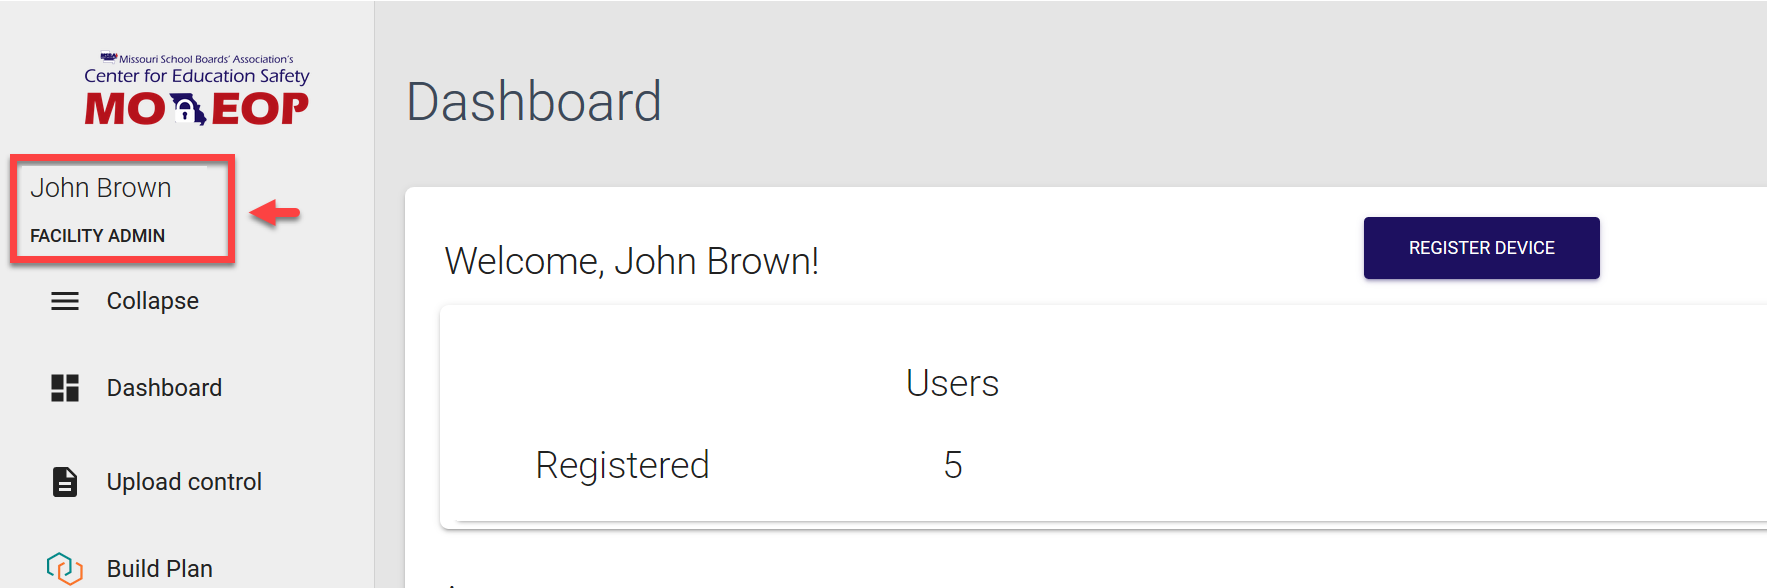
You are navigated directly to the MO EOP dashboard. Your name and role are displayed at the top of collapsible left-side navigation menu.
You session expires after 30 minutes of inactivity, and you’ll need to log in again to access MO EOP.
Logout
To log out of control panel, simply select the Logout option at the bottom of the left-side navigation menu.

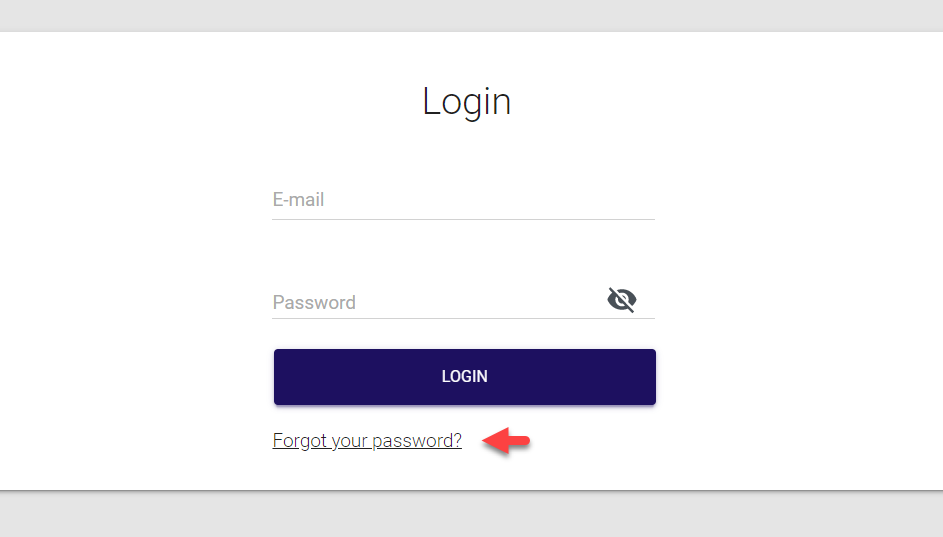
Password reset
If you forgot or lost your password, you can reset it by using the Forgot your password? option.
To reset your password:
- On the Login screen, click Forgot your password?
- Enter the email you used to register in the MO EOP system and click Recover password.
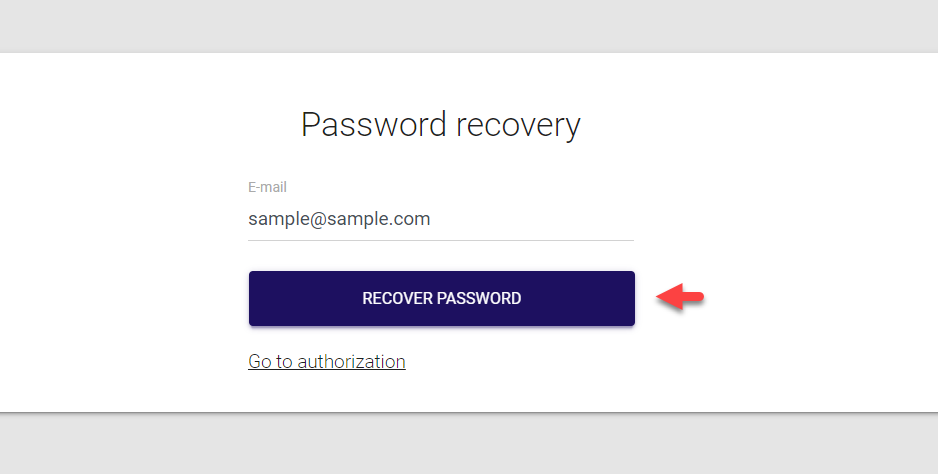
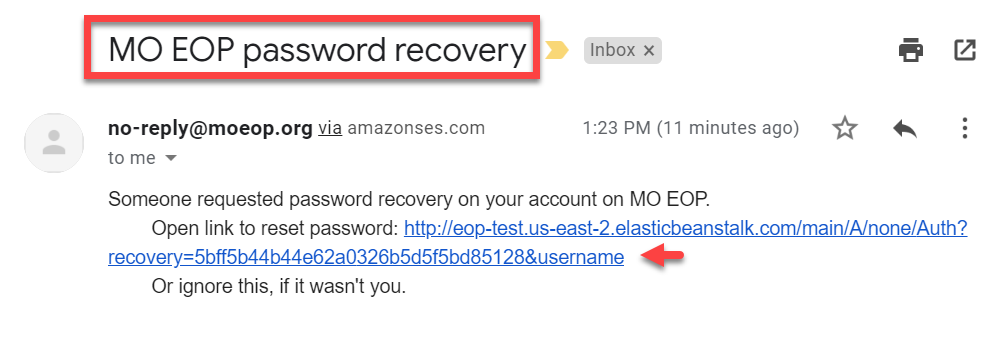
The confirmation screen is displayed. At the same time, an email is sent out to your registered account with password reset link and details.
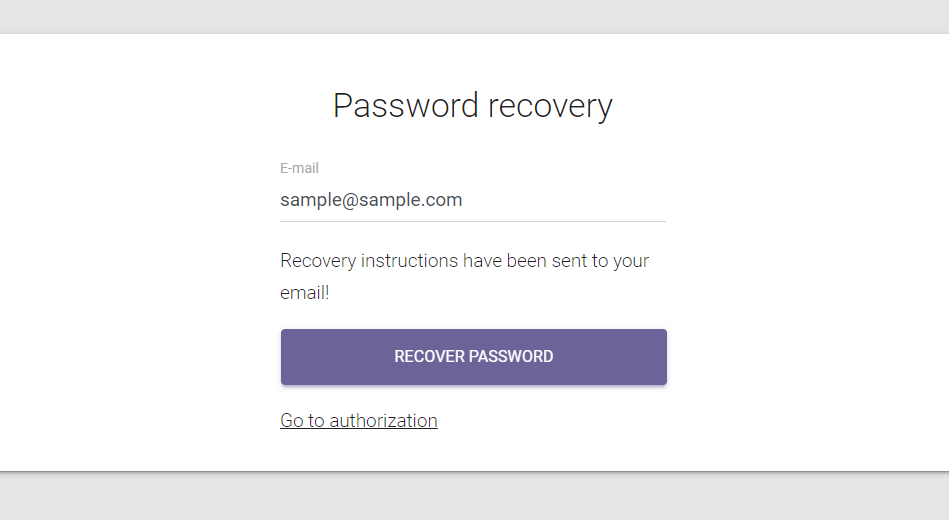
From both these screens, you have the option to return to the Login page by selecting Go to authorization, if needed.
- Go to your email account and open the MO EOP password recovery email. Use the link provided in the email to reset your password.
- On the Password reset screen, provide and confirm your updated details, and click Set new password.
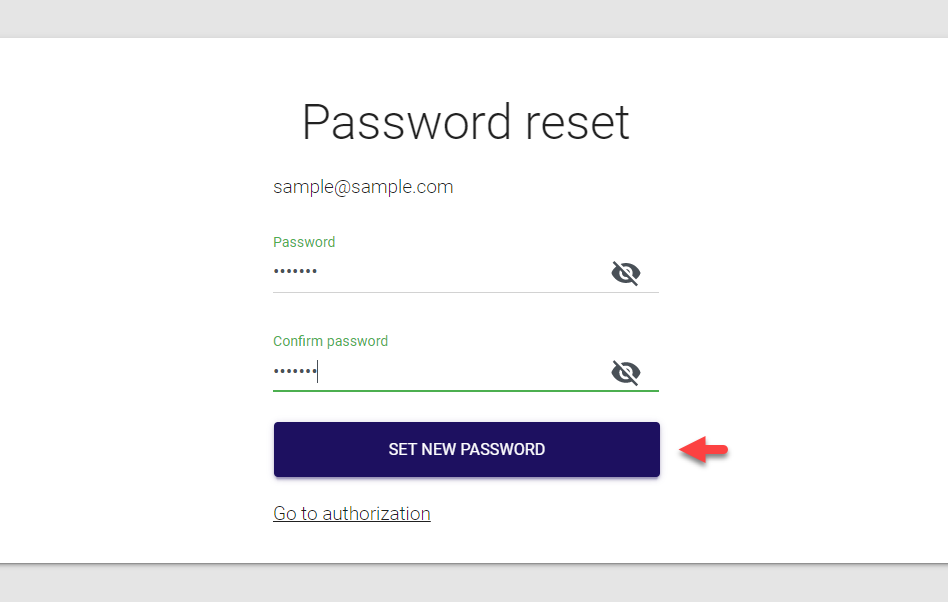
The confirmation message is displayed and your password is reset. Now you can return to the Login screen by selecting Go to authorization and sign in using your updated credentials.
MO EOP control panel overview 
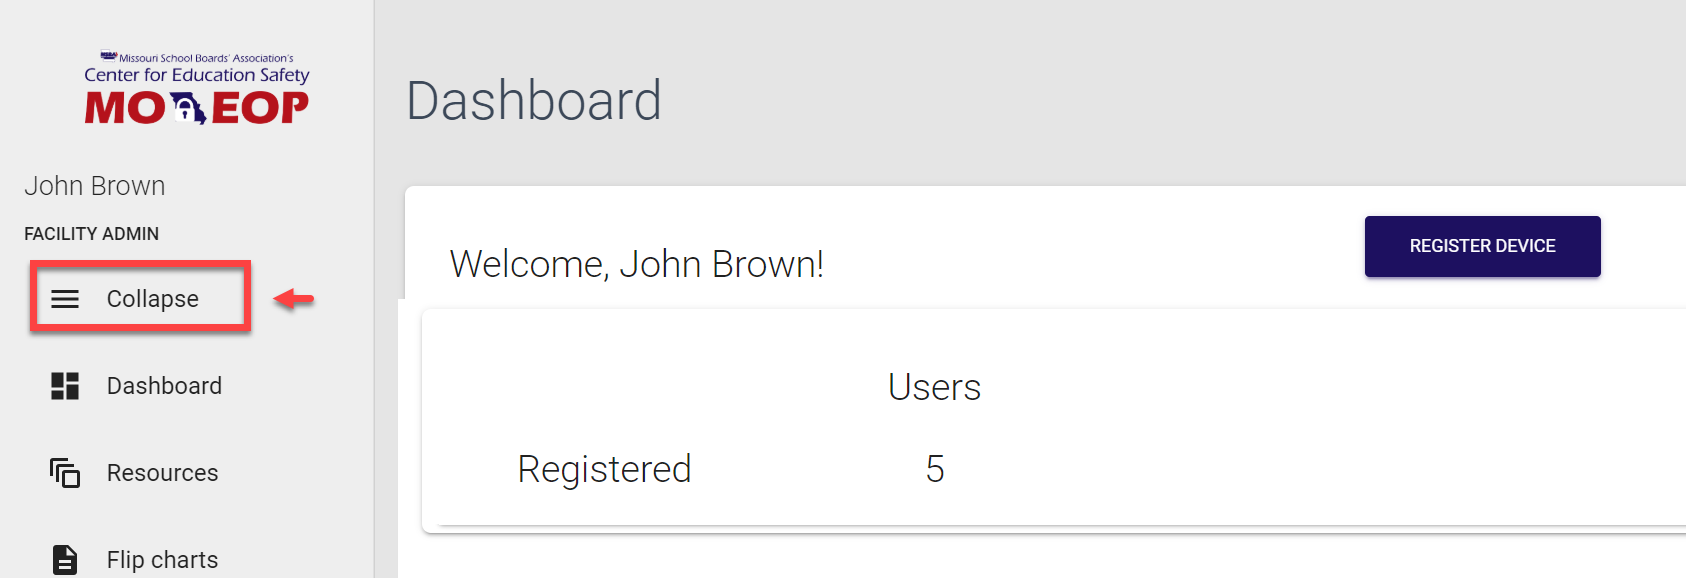
The MO EOP control panel is divided into several sections according to the main functionality areas. Below is the brief description of MO EOP panel sections or tabs of the left-side navigation menu. Note that the menu can be collapsed or expanded as needed.
To collapse the menu, simply click Collapse at the top of the side navigation bar. To expand the menu, click the Collapse icon again.
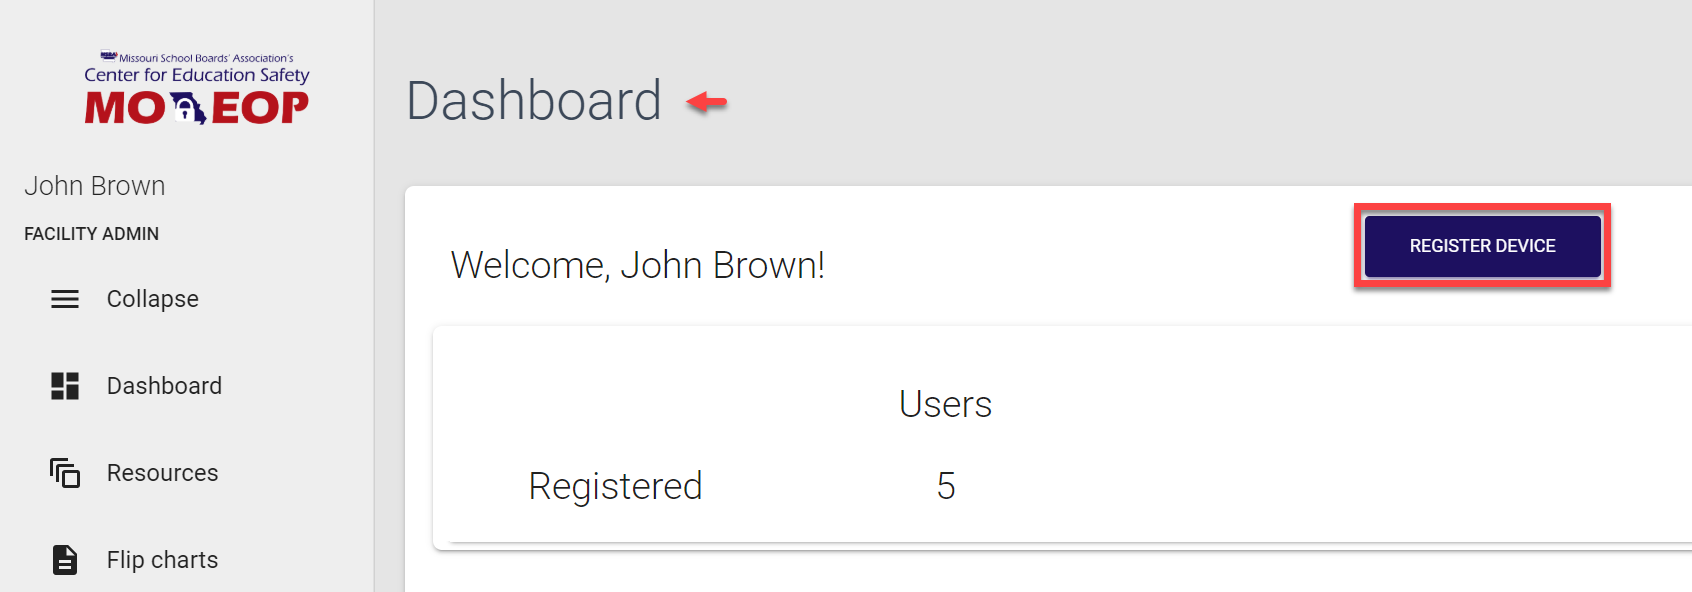
Dashboard
The MO EOP Dashboard provides a perfect at-a-glance overview of all key data points. Just on this one page, you can see everything that requires your attention or actions and helps to perform operations in a faster and easier way. The Dashboard for a Facility admin includes the following sections:
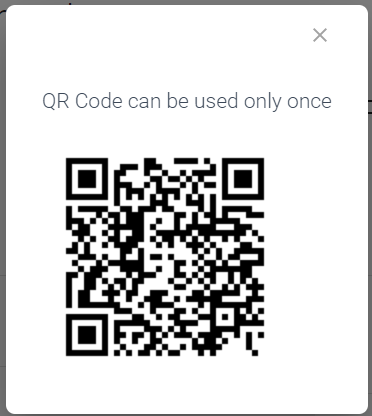
Register device
The Register device option is used for generating the QR code, which you can then scan with your mobile device to log in to MO EOP mobile app, rather than typing in your user name and password.
| Register device option on the Dashboard | Generated QR code for logging in to mobile app |
|---|---|
 |
 |
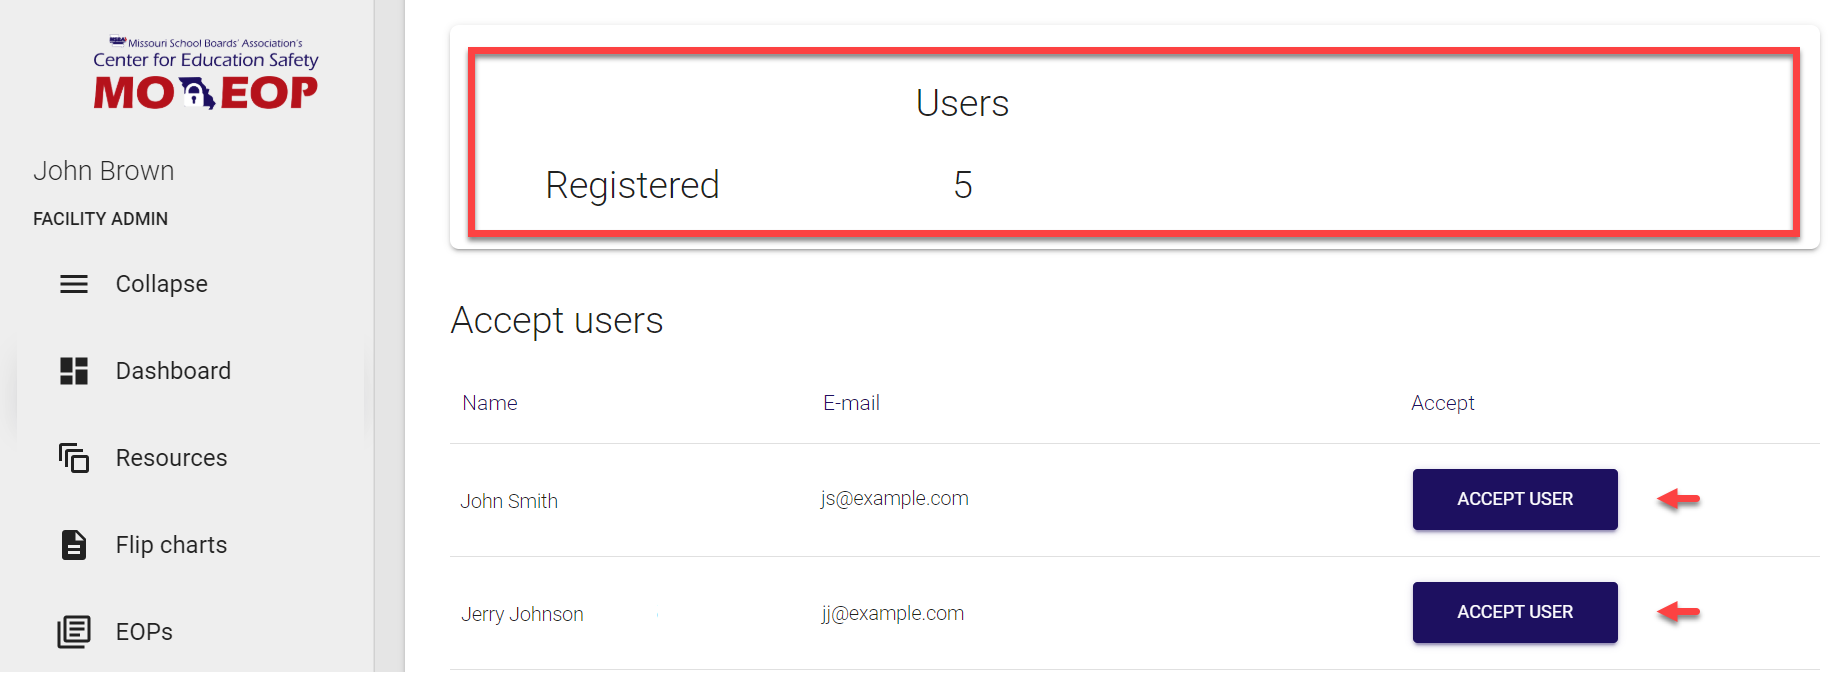
Users
Here you can find information about the number of registered users within your facility. Besides, this section includes all pending user joining requests for your facility, so you can accept them right from this page by clicking Accept user.
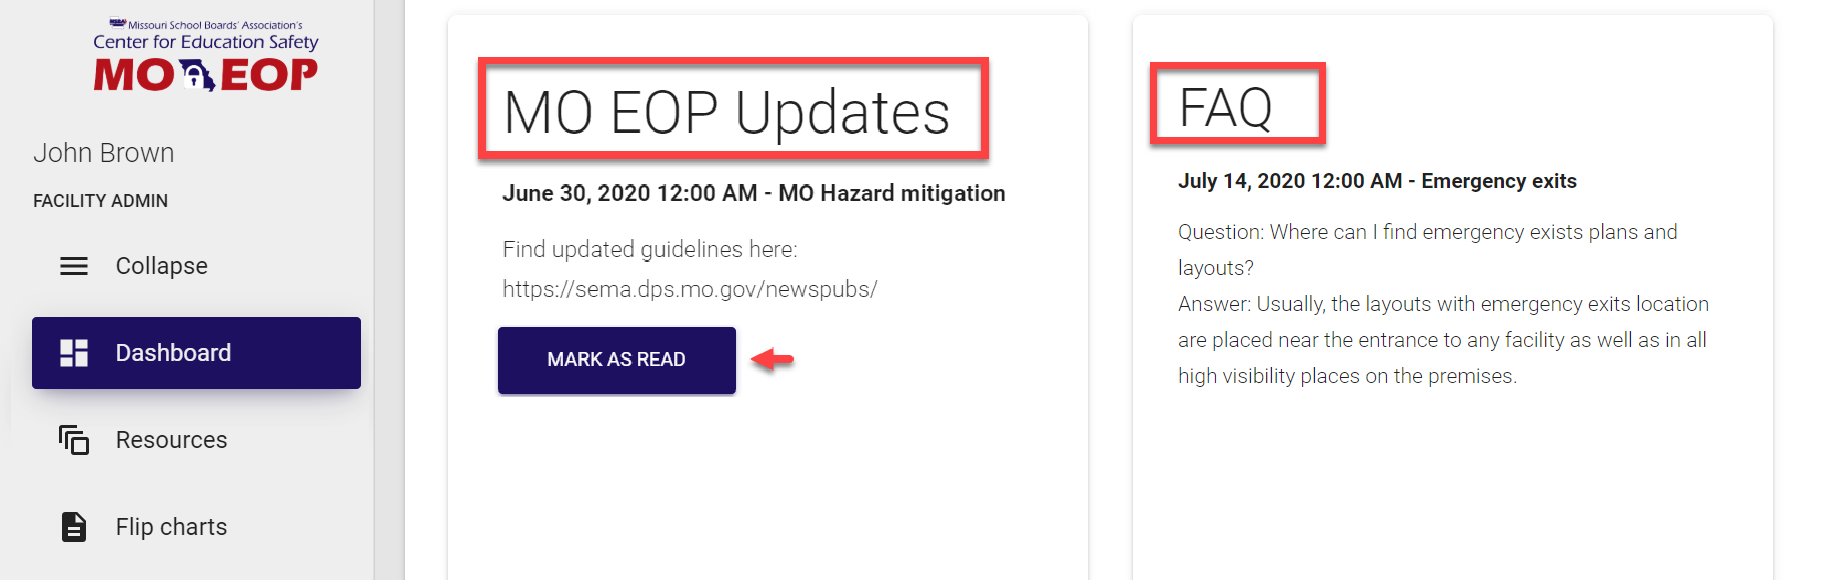
MO EOP Updates and FAQ
MO EOP Updates section includes system-wide news added by Super admins. All new items have the Mark as read button below them, once the news piece is read and the button is clicked, it changes to the check mark.
FAQs include important information in the “question-answer” format, which can be added by Super admins. FAQs are available to all registered MO EOP users.
Resources
The Resources section includes all resources added to MO EOP control panel automatically via Trisk upload or manually by Super admins and District admins. The section is divided into three parts:
-
MO EOP resources - files and links that are applicable to the entire state, and can only be added manually by Super admins.
-
District resources - files and links that are applicable to specific districts, they can be added during the document upload as well as manually by Super admins.
-
Facility resources - files and links that are applicable to specific facilities, they also can be added during the document upload as well as manually.
The access to this section is provided to:
-
Super admins
-
District admins
-
Facility admins, and
-
Users
| MO EOP resources | 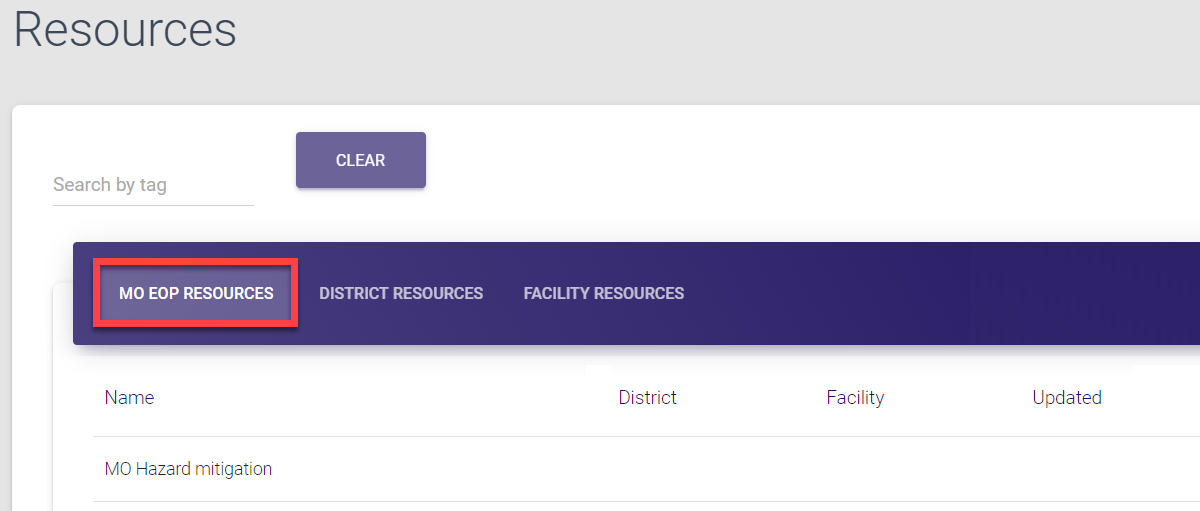 |
|---|---|
| District resources | 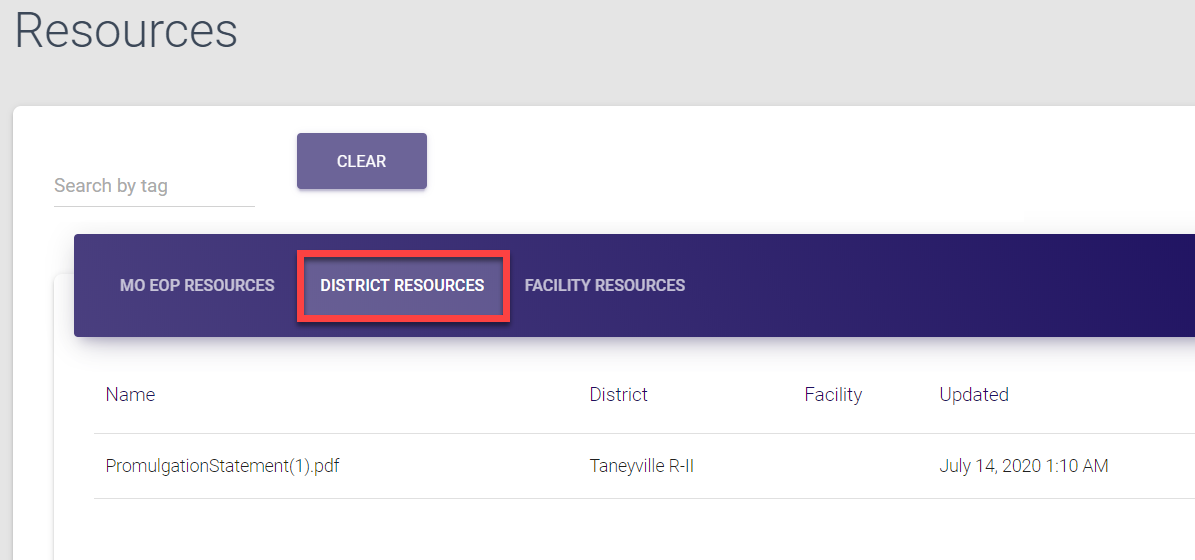 |
| Facility resources | 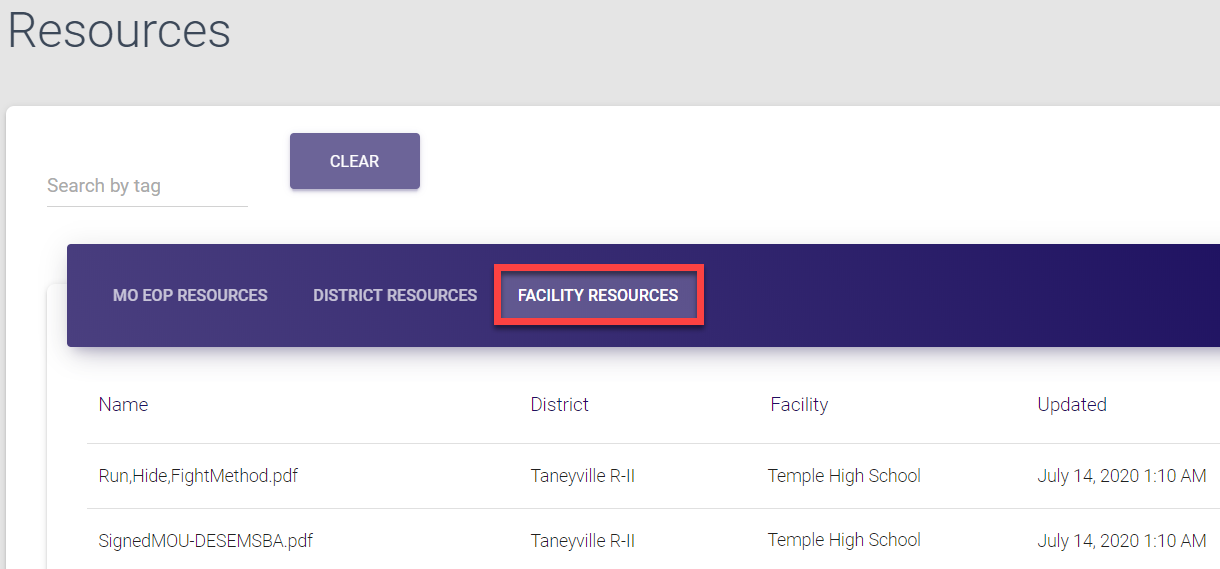 |
Here, you can search for entries and open any entry by clicking it. The complete list of available operations is described here.
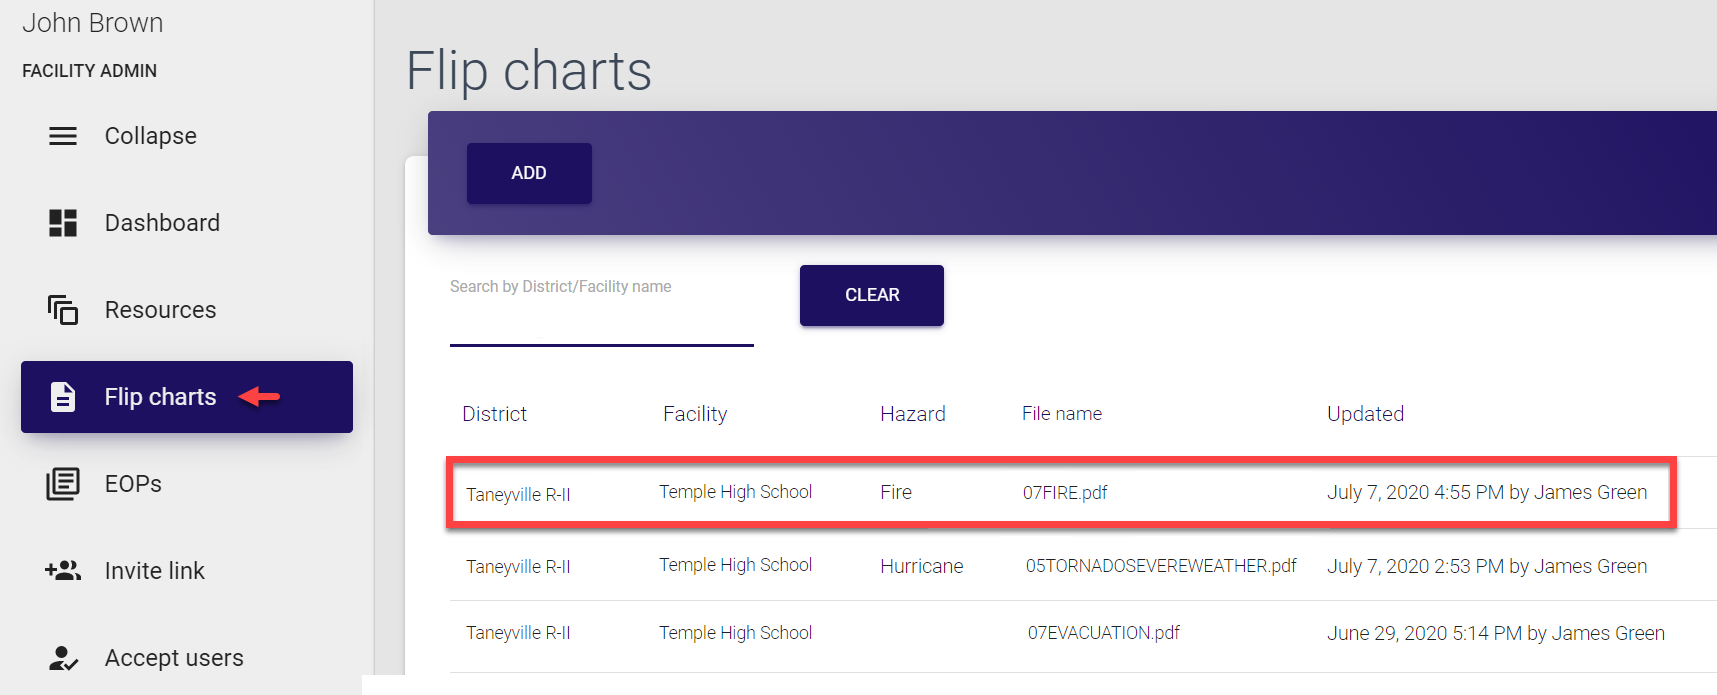
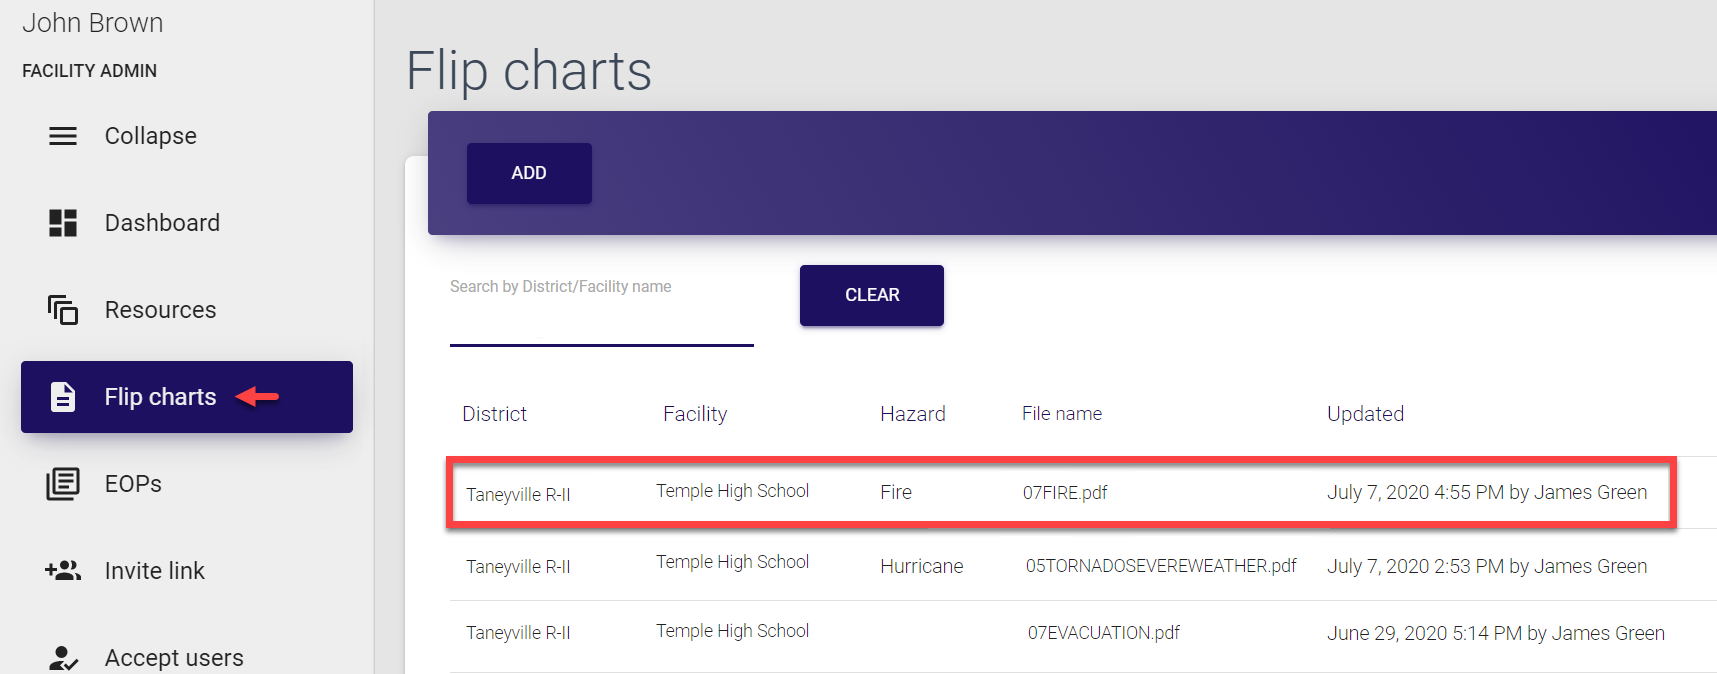
Flip charts
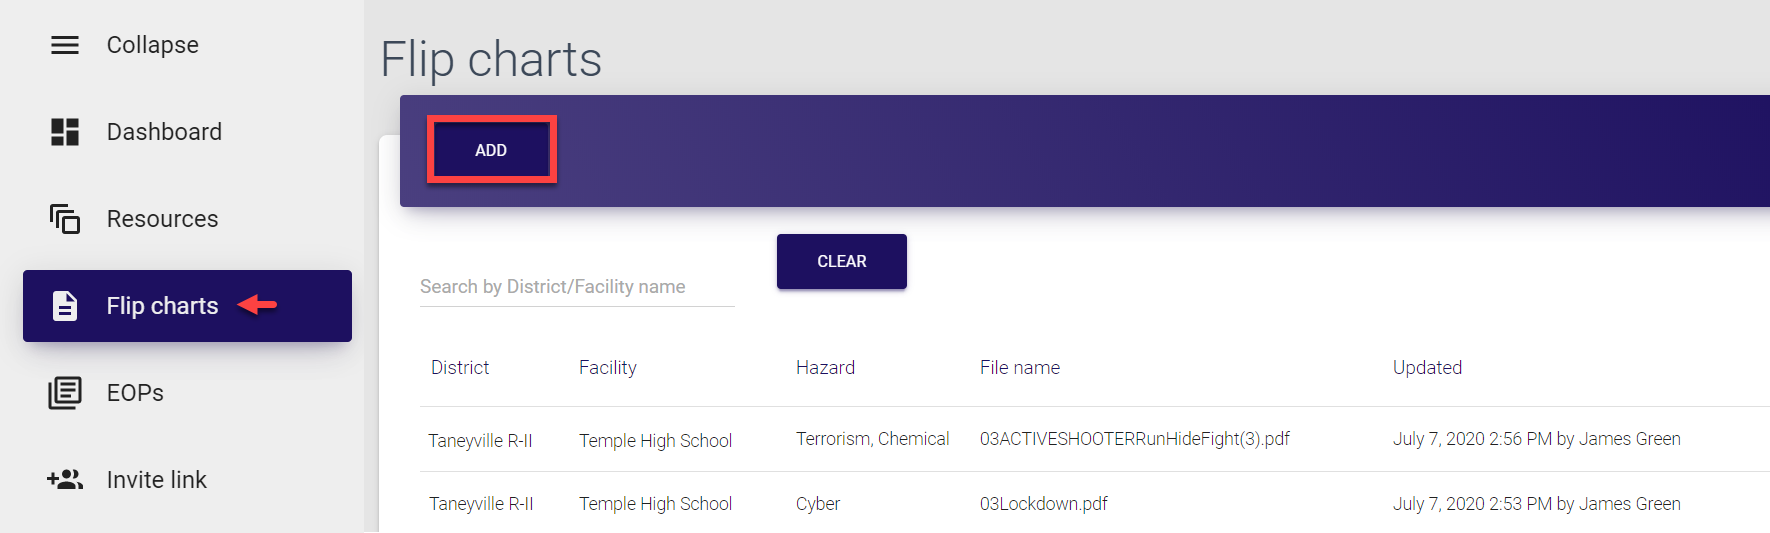
In this section, you can see the list of flip charts, which were either added during the Trisk upload or manually. If added via upload, each flip chart is assigned to a specific district and facility. On the screen, you can see the following details:
Field |
Description |
|---|---|
| District | District the flip chart refers to |
| Facility | Facility within the district the flip chart refers to |
| Hazard | Type of hazard the flip chart is created for (Hazards are configured by Super admins) |
| File name | Full name of the uploaded file, including extension |
| Updated | Time, date and author of the entry creation or update |
The access to this section is provided to:
-
Super admins
-
District admins
-
Facility admins
-
Users
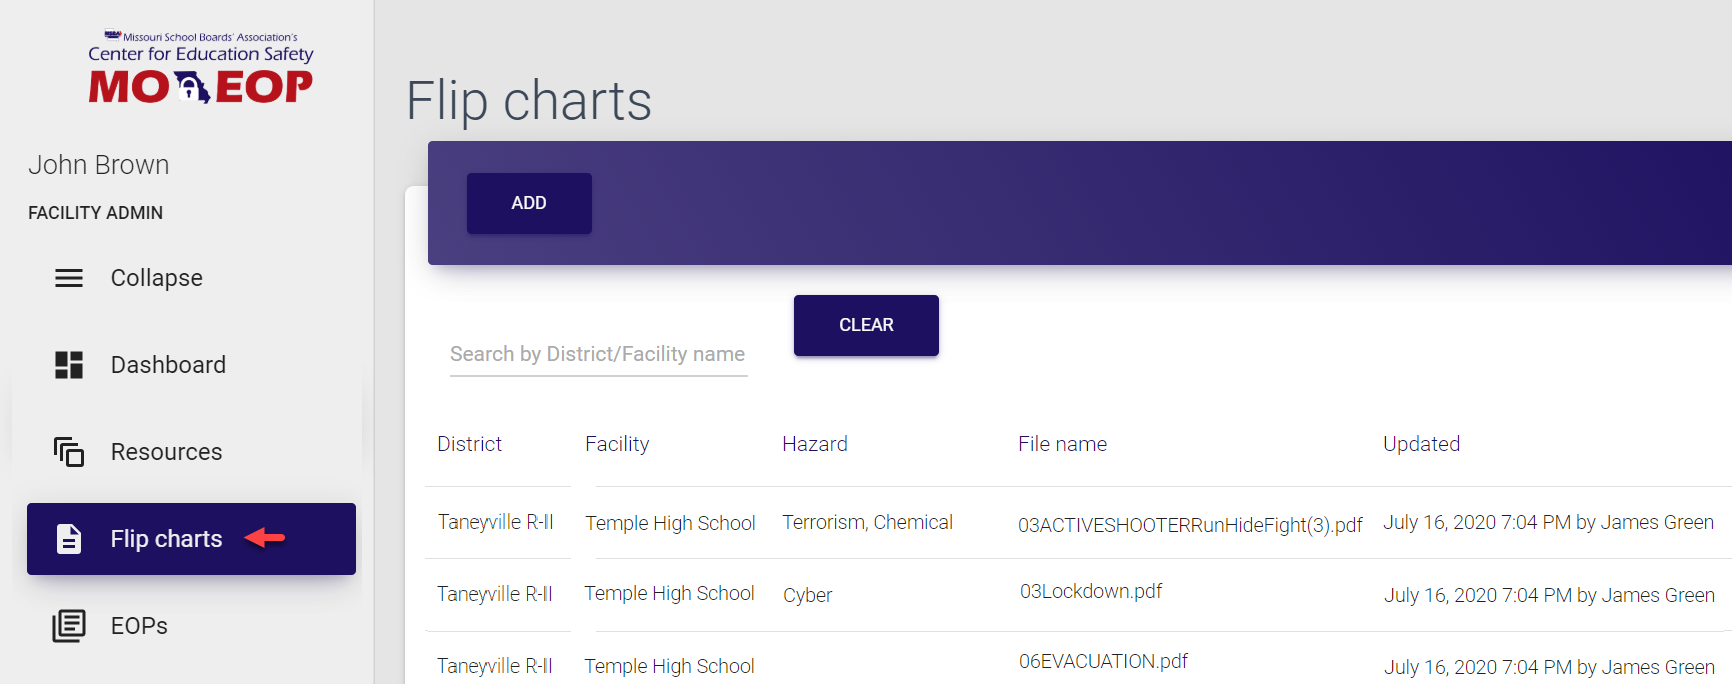
Here, you can search for entries by district or facility, and open any entry by clicking it. The complete list of available operations is described here.
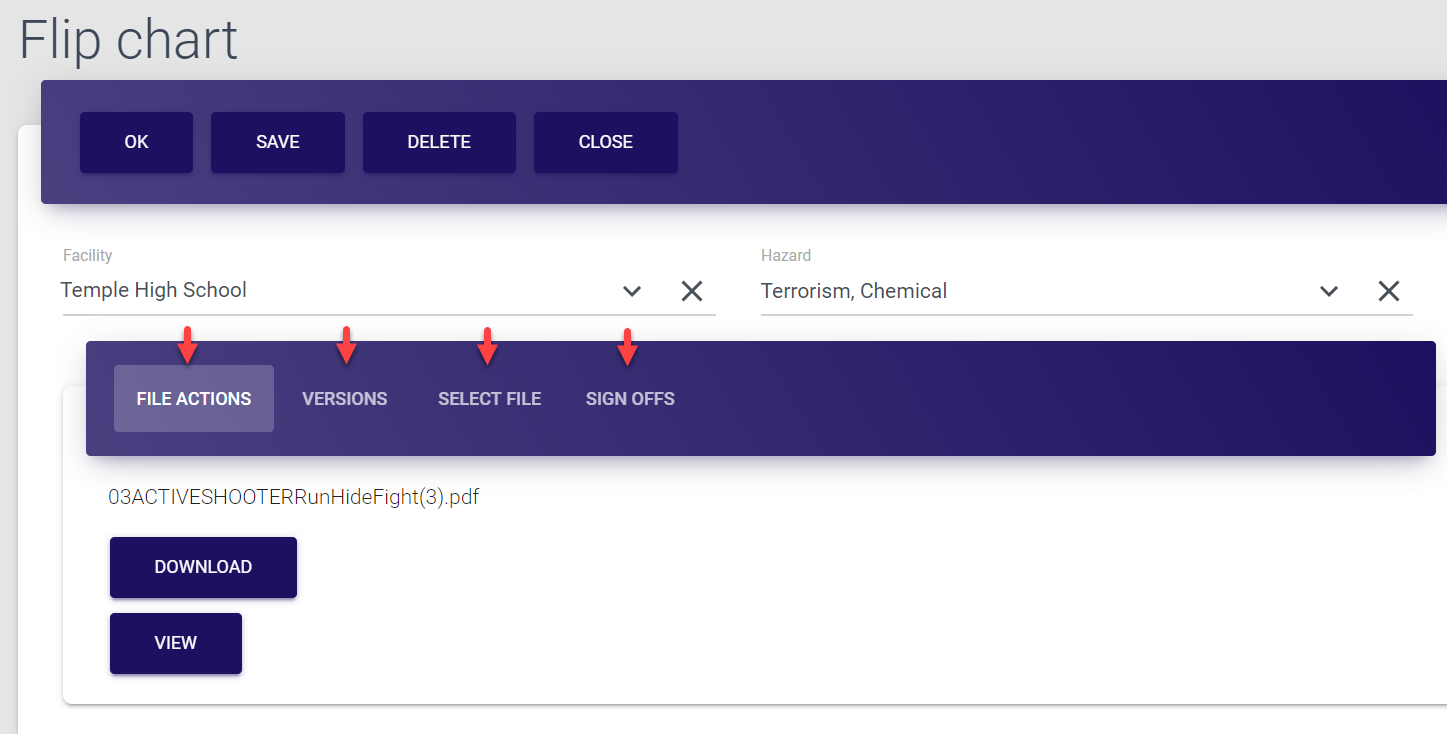
Each entry has the following tabs:
Entry tab |
Description |
|---|---|
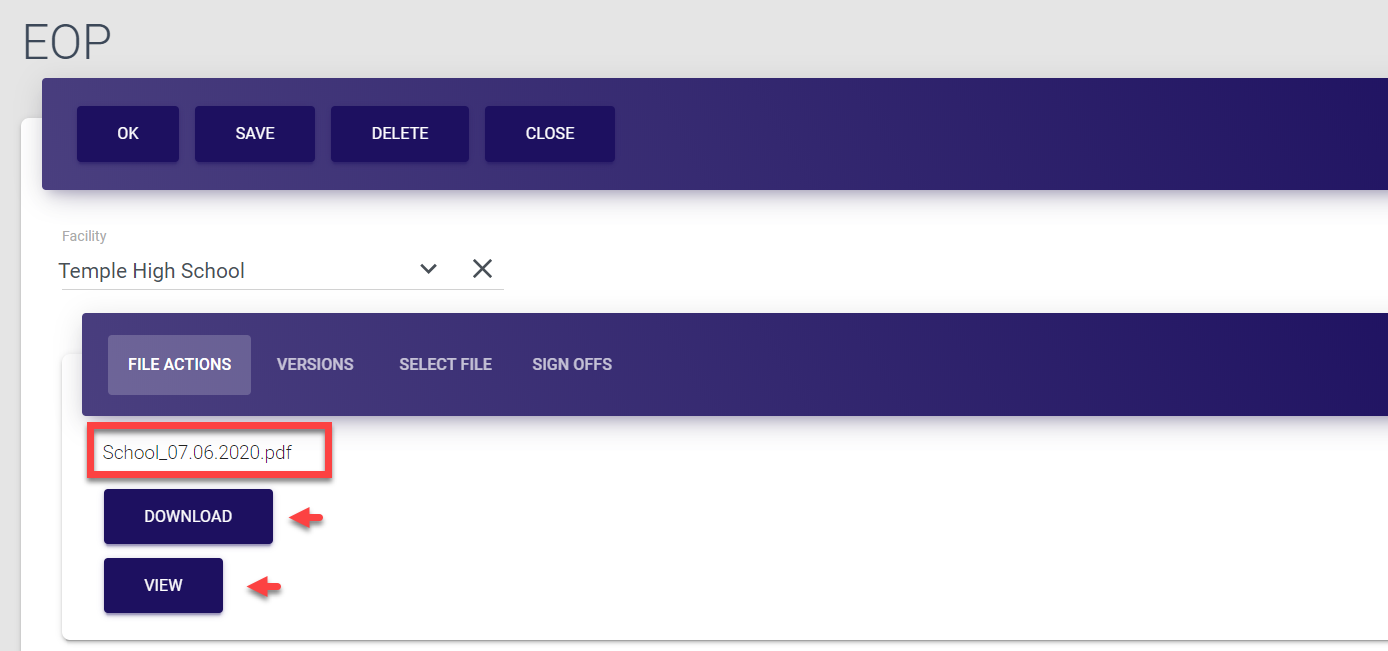
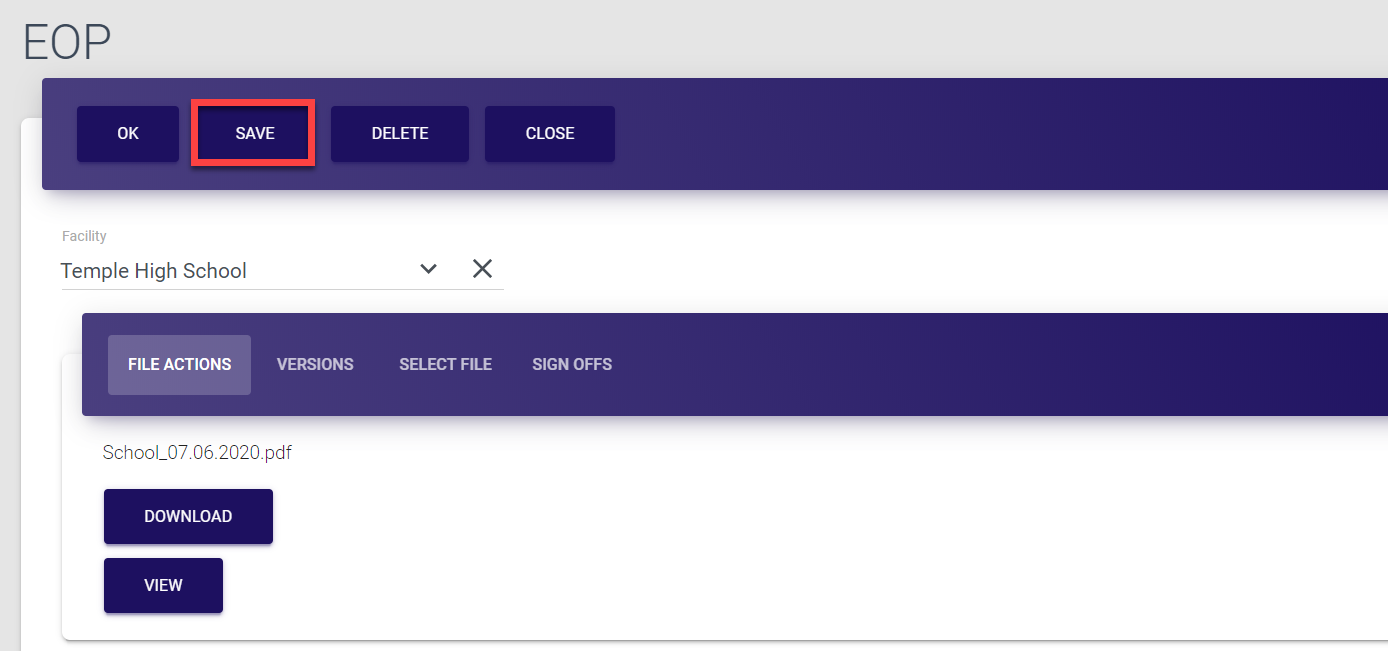
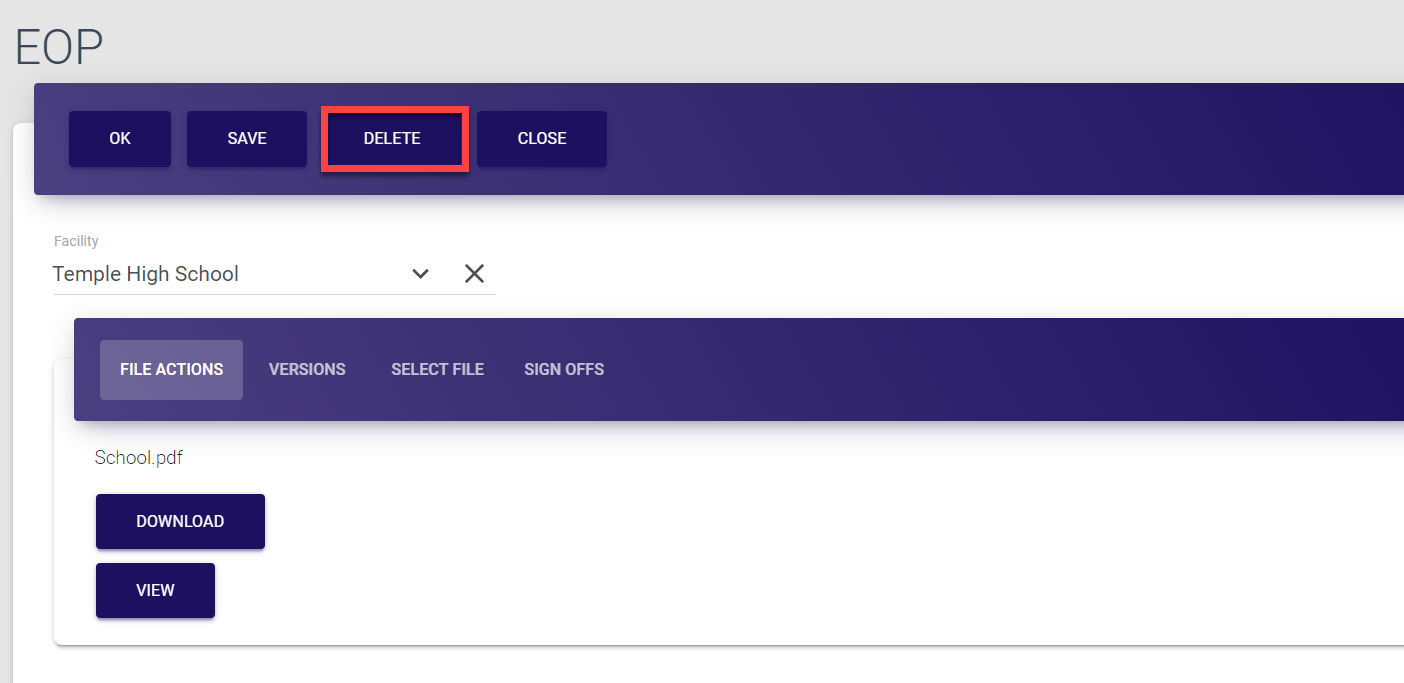
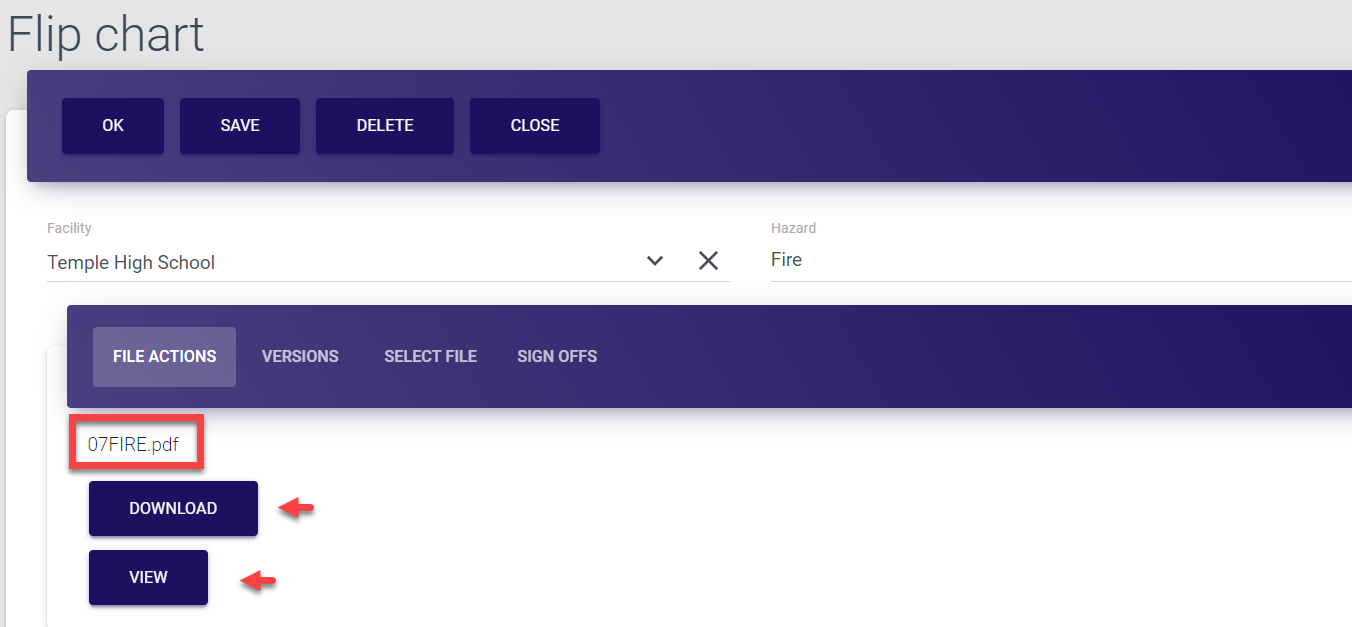
| File actions | This tab opens by default. Here you can download the file or view it in the pop-up window. |
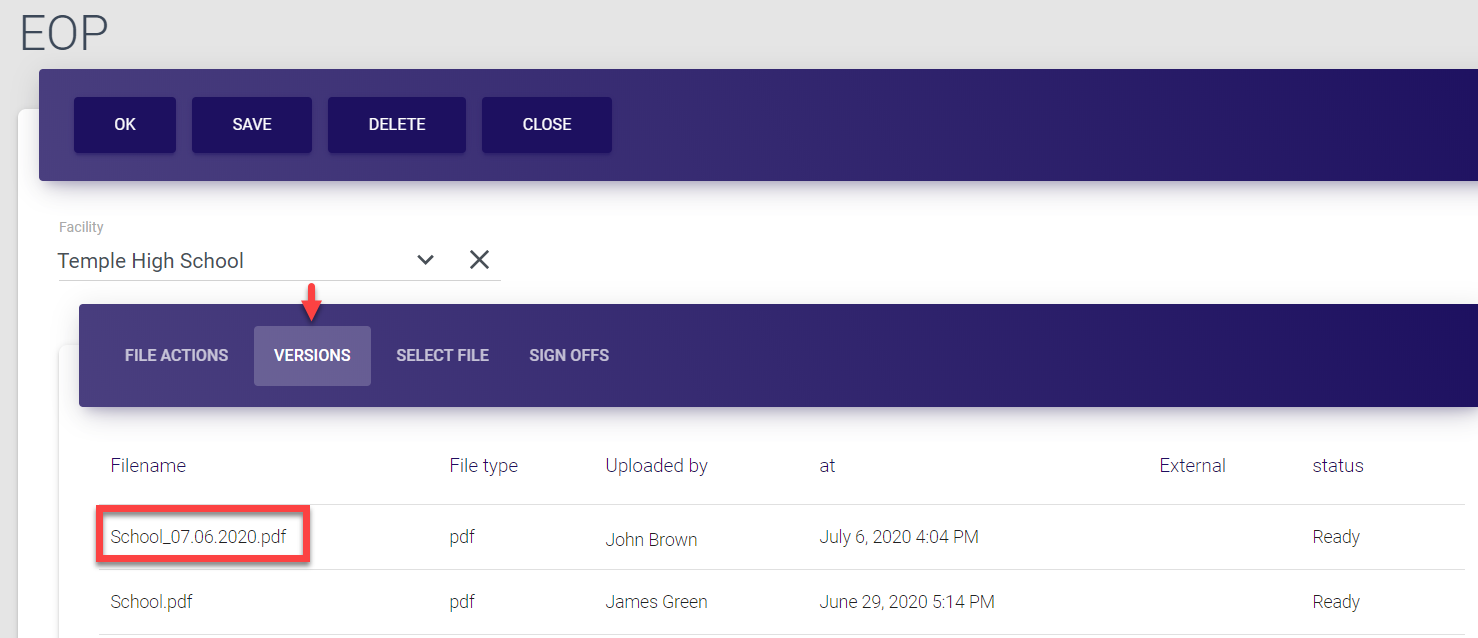
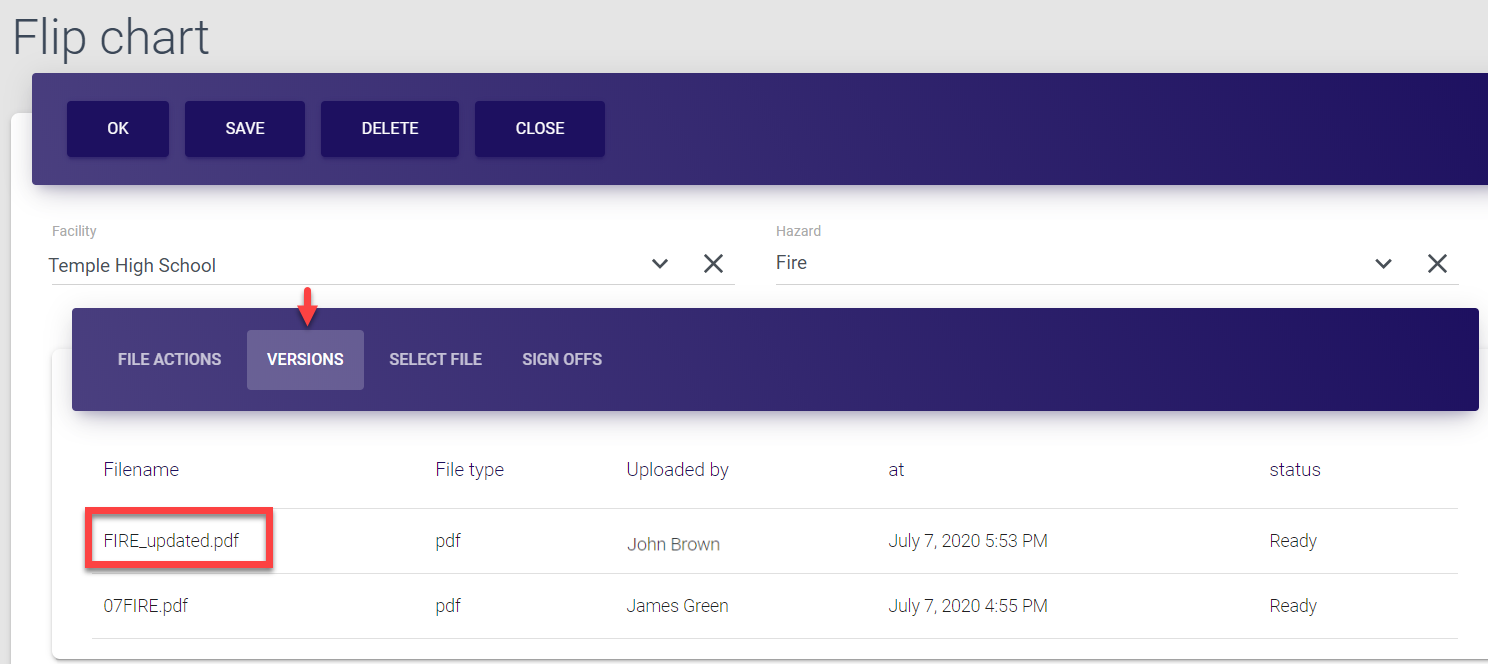
| Versions | This tab contains all versions of the document starting with the original upload. It includes such details as the name and format of the file, the time and initiator of the upload/update as well as the status (Ready - when the document is uploaded, Not ready - when the document is in the process of the upload). Here you can download and view any previous version of the flip chart by clicking required entry. |
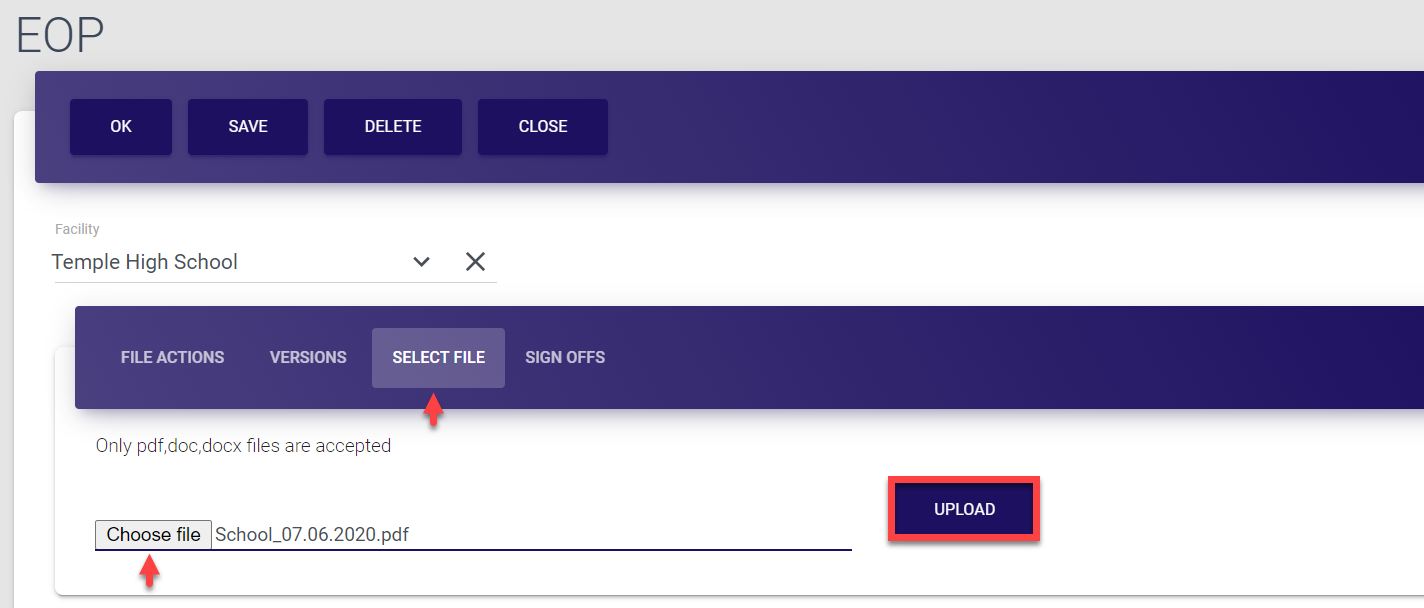
| Select file | This tab is used to upload or update the version of the document. The uploaded file becomes the current version, while the previous file is saved under the Versions tab. |
| Sign offs | This tab includes the list of users (with User role) who opened and viewed the flip chart. Whenever the user clicks Sign off for the document in his MO EOP Dashboard or Flip charts section, they confirm that they’ve read it, and their name is included in the list under this tab. |
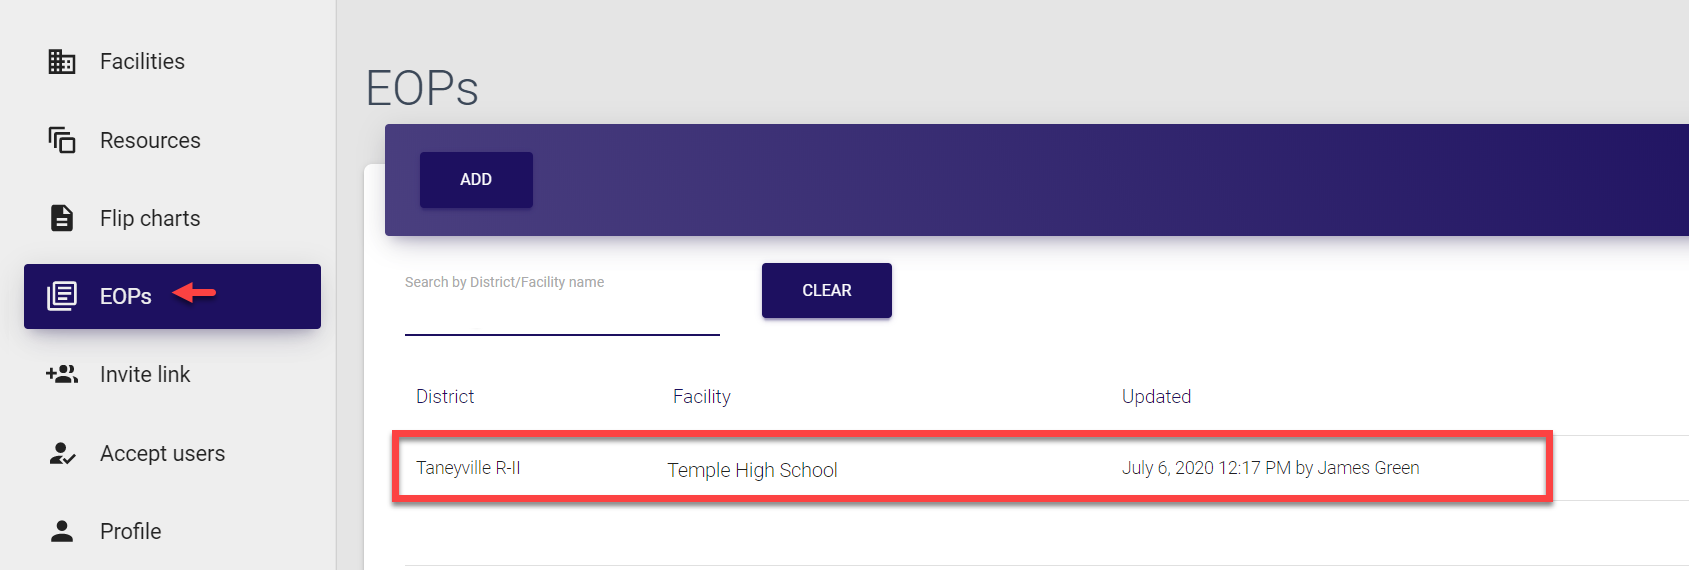
EOPs
In this section, you can see the list of EOPs, which were either added during the Trisk upload or manually. If added via upload, each EOP is assigned to a specific district and facility. On the screen, you can see the following details:
Field |
Description |
|---|---|
| District | District the EOP refers to |
| Facility | Facility within the district the EOP refers to |
| Updated | Time, date and author of the entry creation or update |
The access to this section is provided to:
-
Super admins
-
District admins
-
Facility admins
-
Users
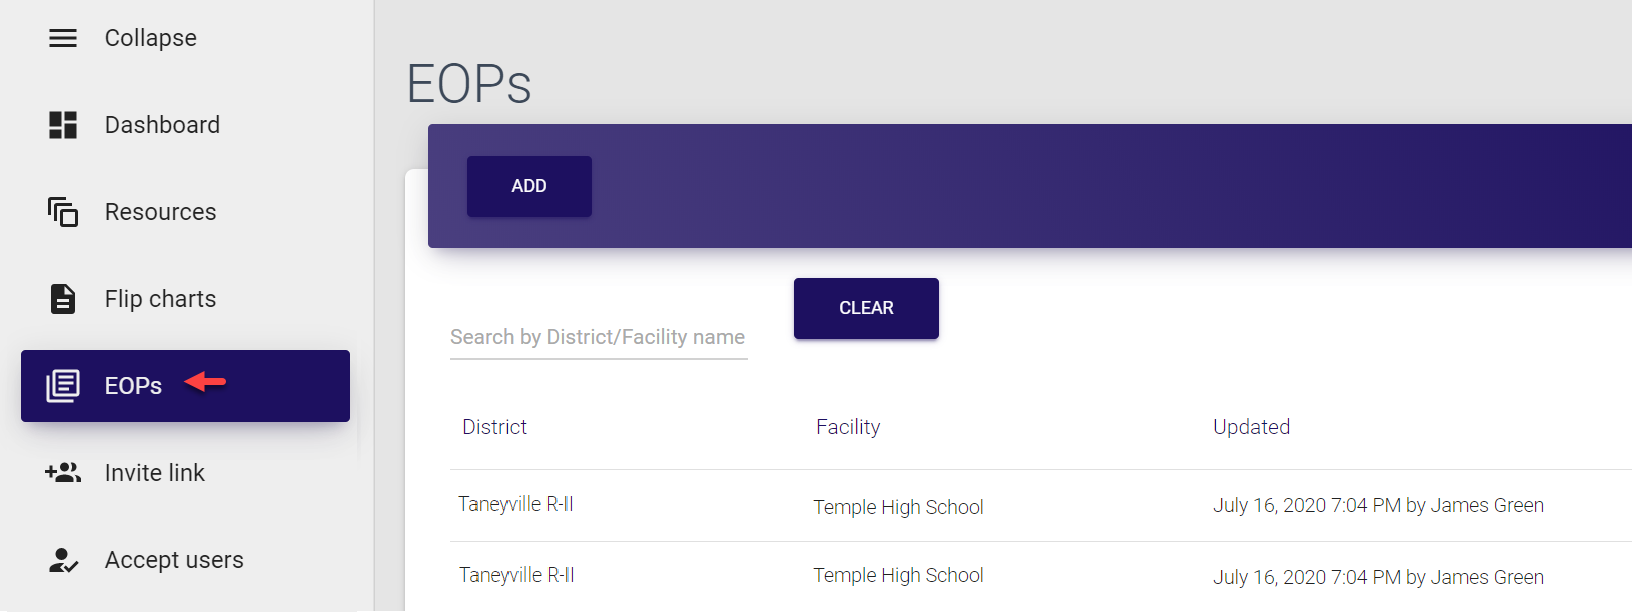
Here, you can search for entries by district or facility, and open any entry by clicking it. The complete list of available operations is described here.
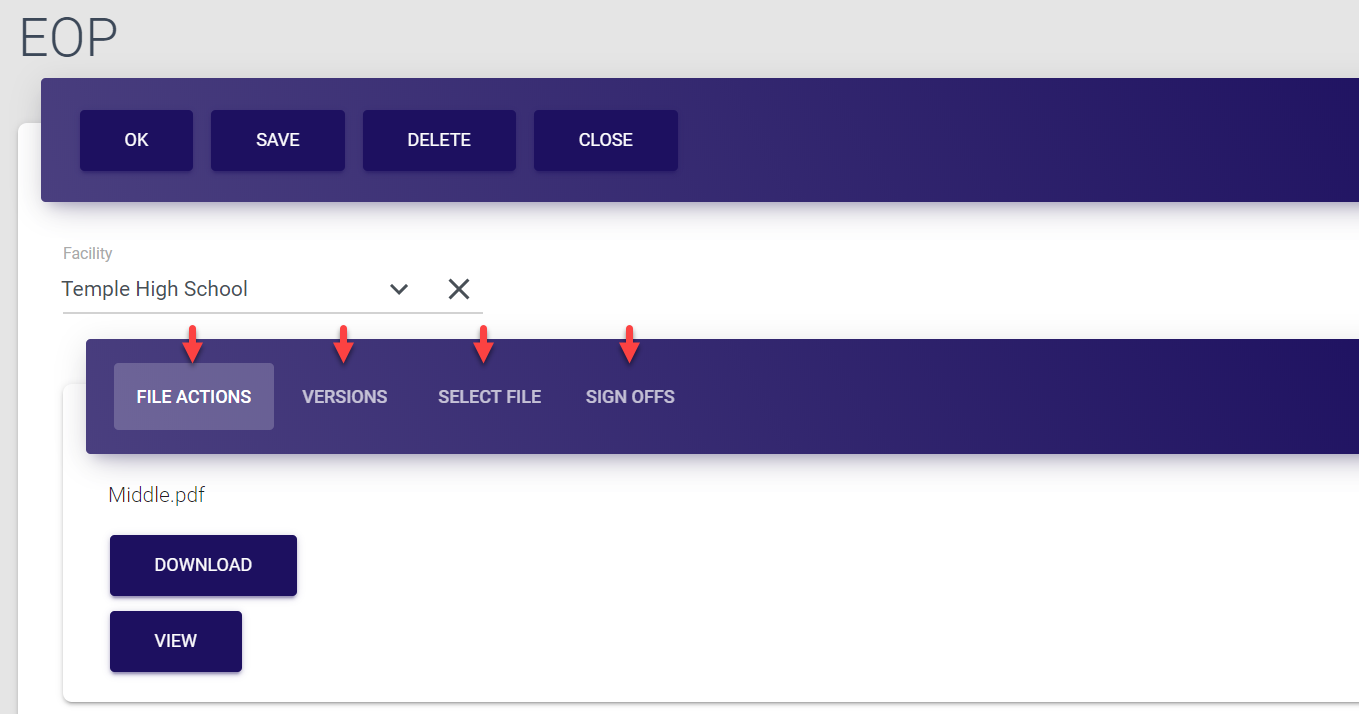
Each entry has the following tabs:
Entry tab |
Description |
|---|---|
| File actions | This tab opens by default. Here you can download the file or view it in the pop-up window. |
| Versions | This tab contains all versions of the document starting with the original upload. It includes such details as the name and format of the file, the time and initiator of the upload/update as well as the status (Ready - when the document is uploaded, Not ready - when the document is in the process of the upload). Here you can download and view any previous version of the EOP by clicking required entry. |
| Select file | This tab is used to upload or update the version of the document. The uploaded file becomes the current version, while the previous file is saved under the Versions tab. |
| Sign offs | This tab includes the list of users (with User role) who opened and viewed the EOP. Whenever the user clicks Sign off for the document in his MO EOP Dashboard or EOPs section, they confirm that they’ve read it, and their name is included in the list under this tab. |
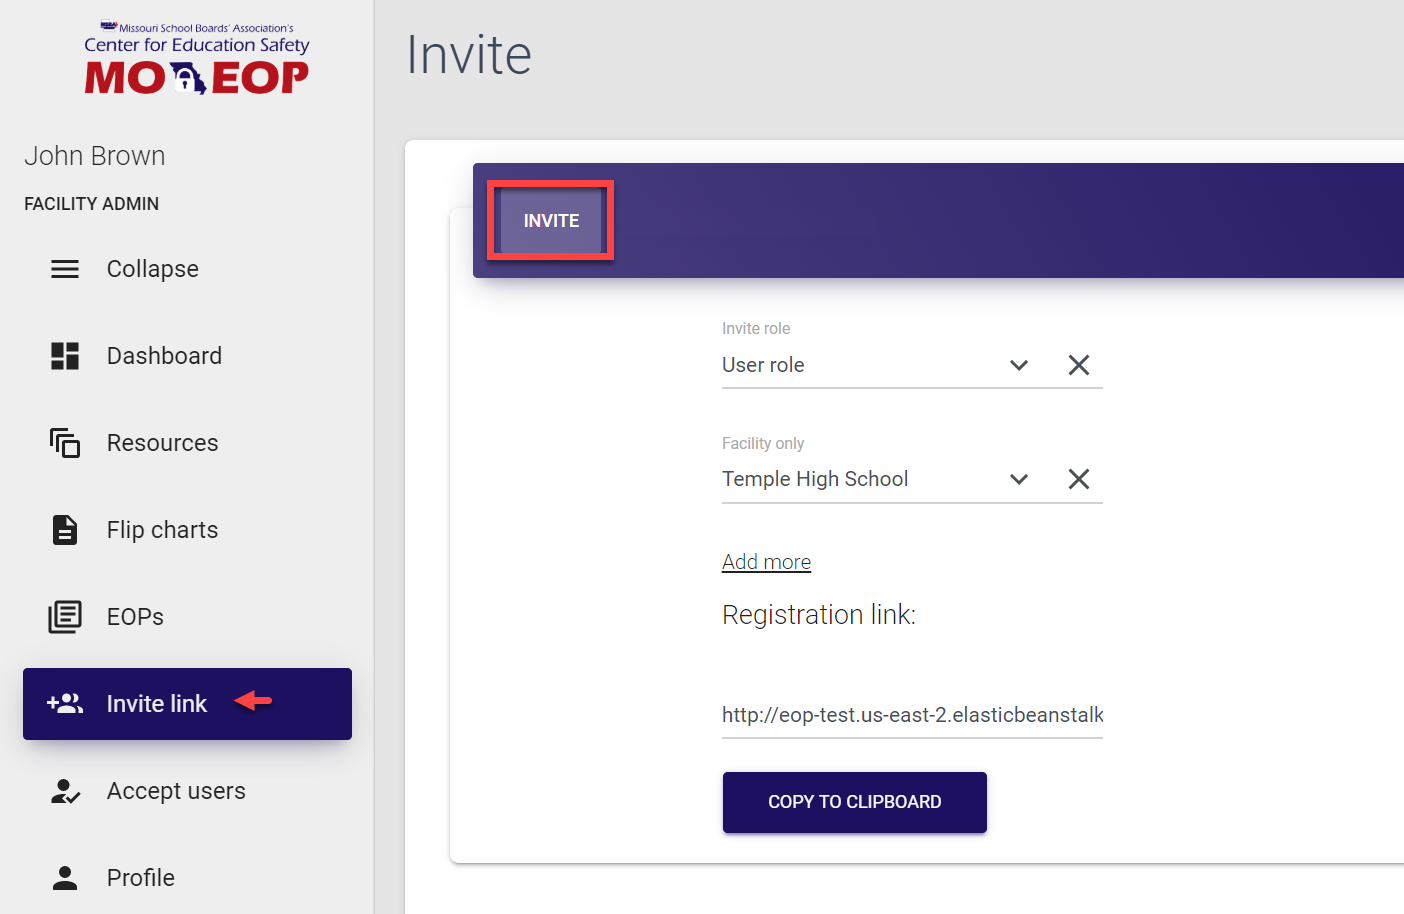
Invite link
This section allows you to invite new users within your facility.
The access to this section is provided to:
-
Super admins
-
District admins
-
Facility admins
For more information on inviting new users, refer here.
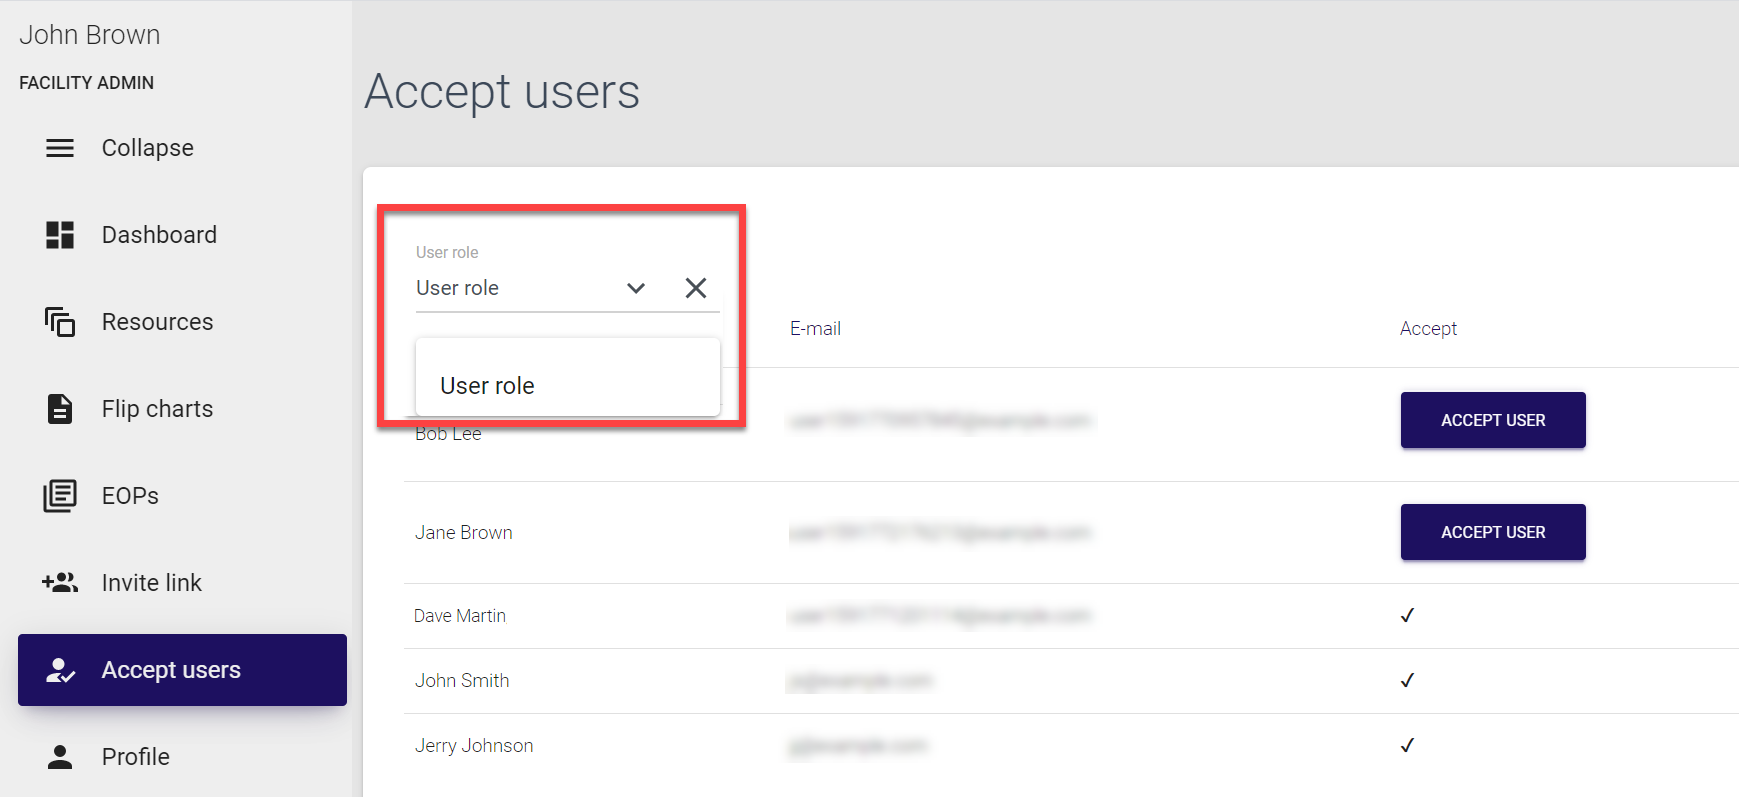
Accept users
Each invited user must be approved by MO EOP admin for their account to become activated. This section contains the list of all users who sent their joining requests after filling their registration form within your facility. On the screen, you can see the following details:
Field |
Description |
|---|---|
| Name | Name of the user to be approved. |
| Email (login) of the user to be approved. | |
| Accept | Status of the user to be approved. If user’s joining request is pending approval, the Accept user button is displayed against their name. If user’s request has already been approved, the check mark is displayed in this field. |
The access to this section is provided to:
-
Super admins (requests of all invited users within MO EOP system)
-
District admins (requests of all invited users within the corresponding district)
-
Facility admins (requests of all invited users within the corresponding facility)
Here, you can filter the entries by the user role. Note that entries in this section are not clickable.
For more information on accepting new user requests, refer here.
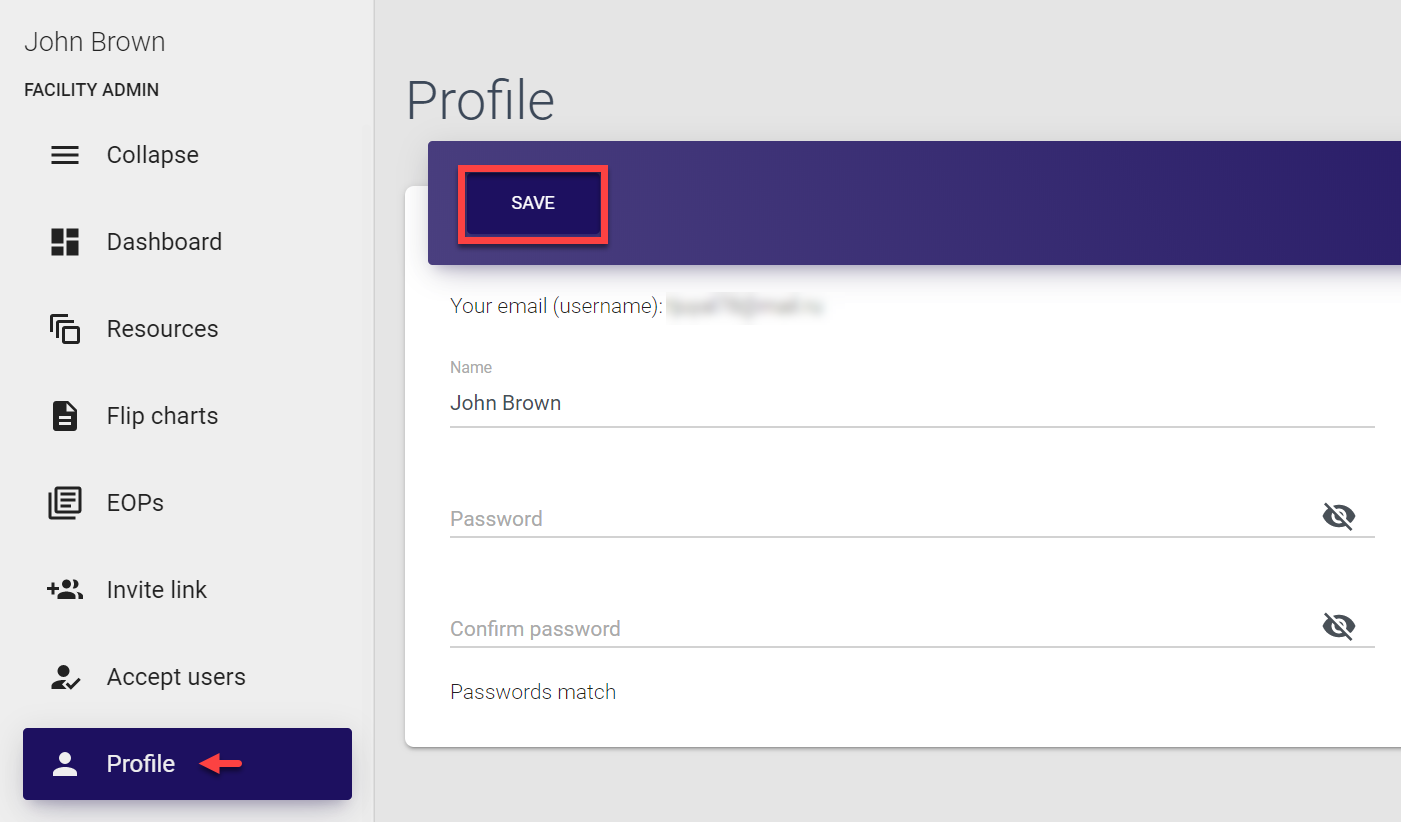
Profile
The Profile section contains all information about the logged-in user. Here you can:
-
Update your name,
-
Update your password.
To save the changes, simply click Save in the top bar.
Logout
You can find the Logout option at the end of the left-side navigation menu list. Once you click the button, you end your session, log out and are directed to the Login page.

Managing EOPs 
As a Facility admin, you have access to the full range of functionality related to EOP for your facility. By default, the EOPs and flip charts are auto-updated every time a Super admin or District admin uploads corresponding data from Trisk. However, it is also possible to add EOPs manually as well as to update the uploaded files or to delete those that are no longer in use.
EOPs are usually created and uploaded for facilities. Each facility can have only one active version of EOP.
Adding EOPs
If your facility does not have EOP uploaded from Trisk, you can always add it manually. The permission to add EOPs is granted to Super admins (within entire system), District admins (for corresponding districts) and Facility admins (for corresponding facilities).
To add an EOP:
-
Select EOPs from the left-side navigation menu.
-
Click Add in the top bar of the page to open the EOP form.

- In the EOP form, select your facility. Note that you can add EOP only for your facility.

- Now, upload the document. For that, open the Select file tab of the form, click Choose file, select the file from your PC and click Upload.

Successful upload is confirmed by the Saved! pop-up.

The file is now visible under the File actions tab, from where it can be downloaded and previewed. It is also distributed between corresponding users who can then go through the document and give their sign-off (confirmation that they’ve read it).
-
Finally, in the top bar menu of the EOP screen, select Save.
Selecting Ok also saves the data and directs you back to the EOPs screen.Selecting Close directs you back to the EOPs screen without saving the data.
Selecting Delete removes the entire EOP entry and after the deletion confirmation directs you back to the EOPs screen.
Updating EOPs
Any EOP details can be updated in MO EOP control panel whenever required. The permission to update EOPs is granted to Super admins (within entire system), District admins (for corresponding districts) and Facility admins (for corresponding facilities).
To update EOP details:
- Select EOPs from the left-side navigation menu.
- Click the entry to open EOP details. The EOP details screen opens and the current document is shown in the preview pop-up window. You can go through the document and then exit the preview mode by clicking the cross sign icon in the top right corner of the pop-up window.

- On the EOP screen, upload the updated version of EOP. For that, open the Select file tab of the form, click Choose file, select the file from your PC and click Upload.
Successful upload is confirmed by the Saved! pop-up.
Once the new document is uploaded, it is saved as the latest version of EOP under the Versions tab and becomes the current active EOP for the facility.
All versions of the EOP are saved in the system and you can download any document by clicking its name in the Versions tab.
-
Finally, in the top bar menu of the EOP screen, select Save.
Selecting Ok also saves the data and directs you back to the EOPs screen.Selecting Close directs you back to the EOPs screen without saving the data.
Selecting Delete removes the entire EOP entry and after the deletion confirmation directs you back to the EOPs screen.

Deleting EOPs
If needed, any emergency operations plan can be deleted from MO EOP database. The permission to delete EOPs is granted to Super admins (within entire system), District admins (for corresponding districts) and Facility admins (for corresponding facilities).
To delete an EOP:
- Select EOPs from the left-side navigation menu.

- Click the entry to open EOP details. The EOP details screen opens and the current document is shown in the preview pop-up window. You can go through the document and then exit the preview mode by clicking the cross sign icon in the top right corner of the pop-up window.

- On the EOP details screen, simply click Delete in the top bar menu and select OK in the pop-up confirmation window to confirm your choice.
The Deleted! message is briefly displayed on the screen to confirm successful completion of the operation. The entry is now deleted and removed from the EOPs section.

Managing flip charts 
As a Facility admin, you have access to the full range of functionality related to flip charts for your facility. By default, the EOPs and flip charts are auto-updated every time a Super admin or District admin uploads corresponding data from Trisk. However, it is also possible to add flip charts manually as well as to update the uploaded files or to delete those that are no longer in use.
Flip charts are usually created and uploaded for facilities. Each facility can have as many flip charts as required.
Adding flip charts
Even though the list is pre-populated, you can always add any new flip chart for your facility. The permission to add flip charts is granted to Super admins (within entire system), District admins (for corresponding districts) and Facility admins (for corresponding facilities).
To add a flip chart:
-
Select Flip charts from the left-side navigation menu.
-
Click Add in the top bar of the page to open the Flip chart form.
-
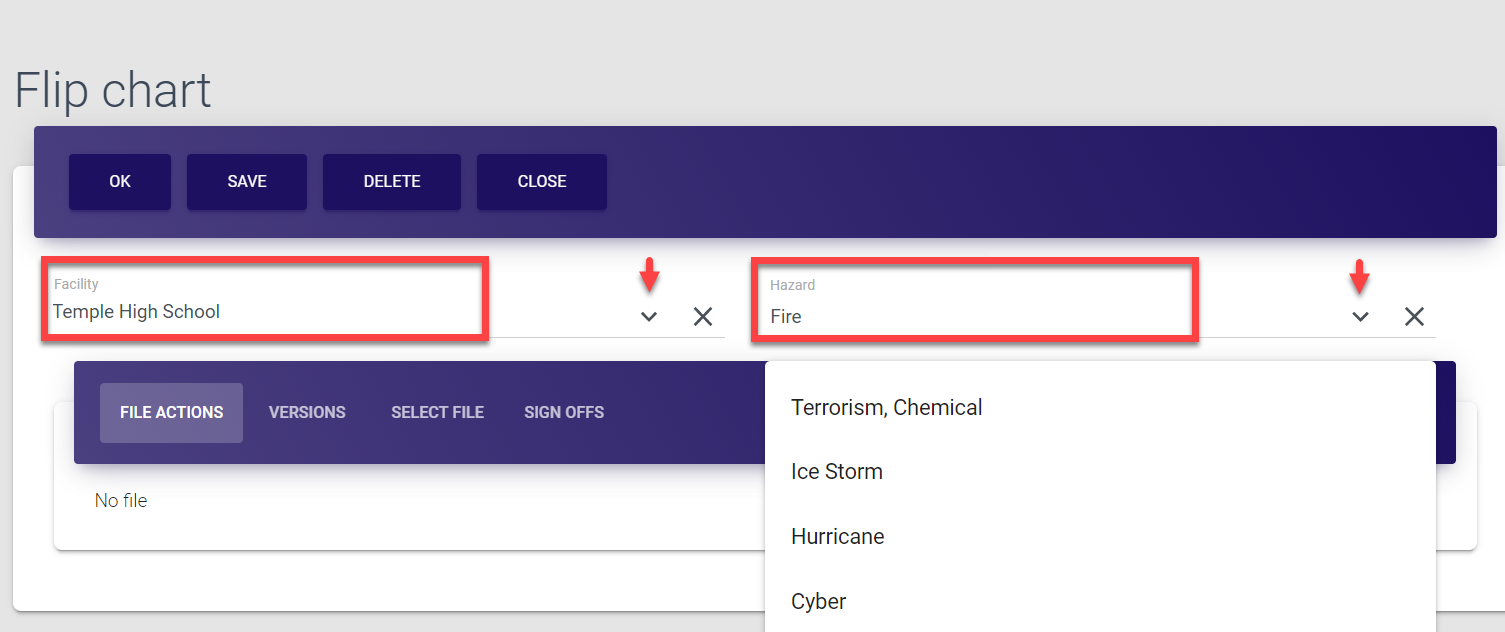
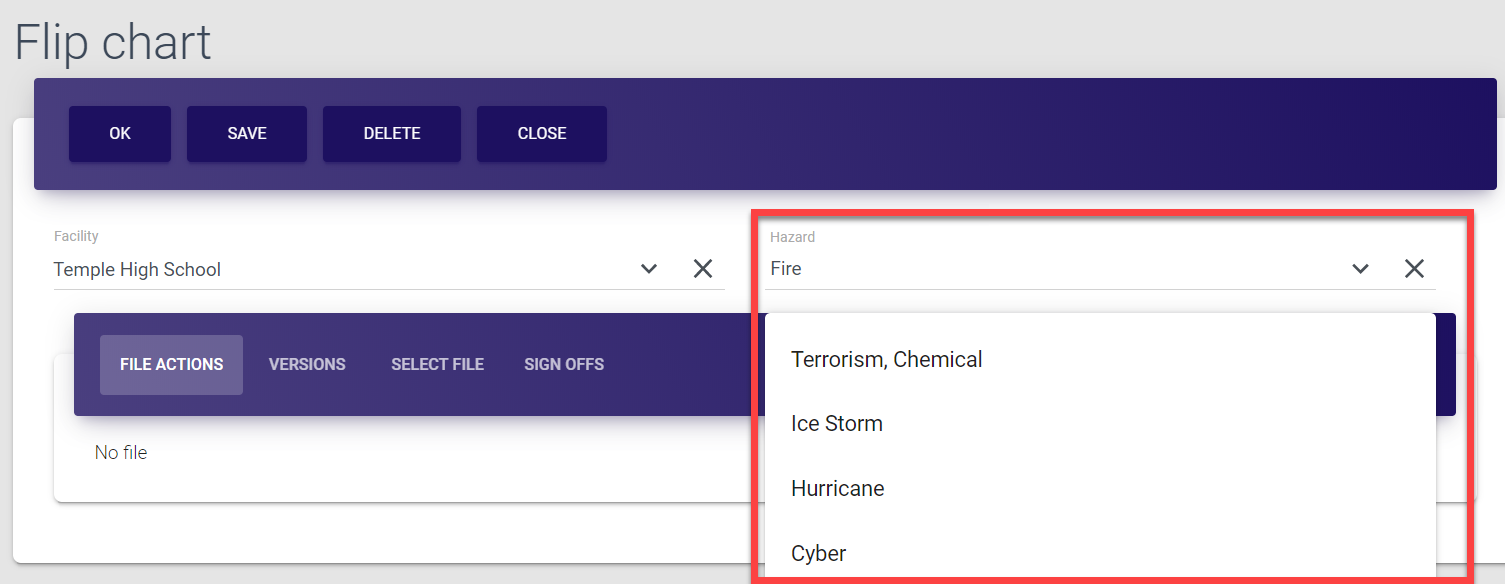
In the Flip chart form, select your facility. Note that you can add flip charts only for your facility.
-
Select the hazard type. You can either select it from the drop-down list or search by typing few first letters of the hazard name in the search field. The hazard options are configured by Super admins.
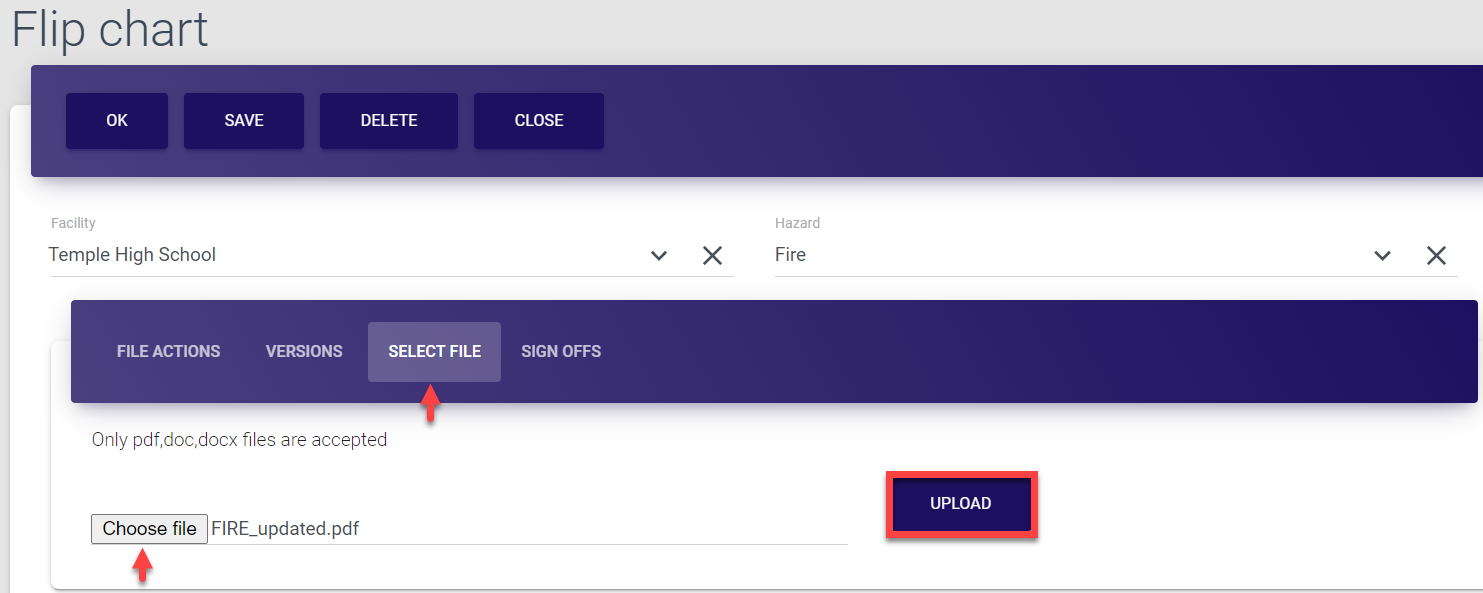
- Now, upload the document. For that, open the Select file tab of the form, click Choose file, select the file from your PC and click Upload.
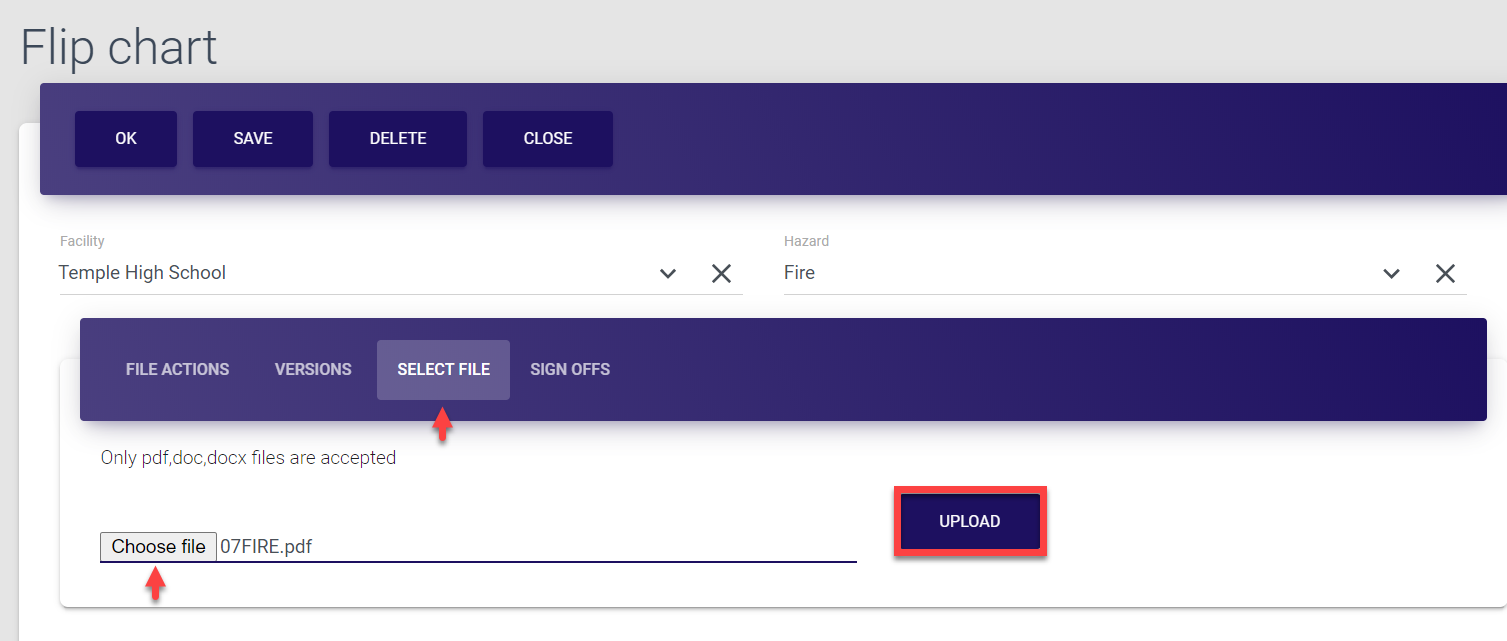
Successful upload is confirmed by the Saved! pop-up.
The file is now visible under the File actions tab, from where it can be downloaded and previewed. It is also distributed between corresponding users who can then go through the document and give their sign-off (confirmation that they’ve read it).
-
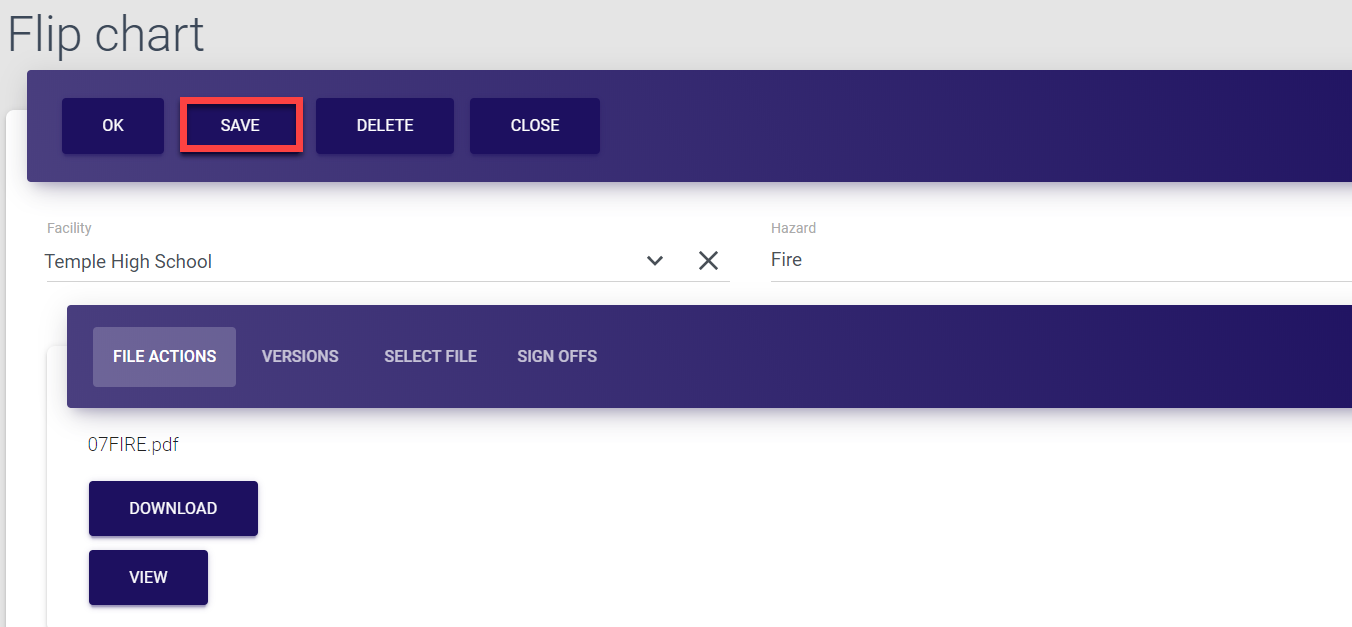
Finally, in the top bar menu of the Flip chart screen, select Save.
Selecting Ok also saves the data and directs you back to the Flip charts list.Selecting Close directs you back to the Flip charts list without saving the data.
Selecting Delete removes the entire flip chart entry and after the deletion confirmation directs you back to the Flip charts list.
Each added Flip chart entry is saved separately, even though the facility and hazard could be the same. If you want to update an existing entry rather than adding a new one for a facility, refer to the section below.
Updating flip charts
Any flip chart details can be updated in MO EOP control panel whenever required. The permission to update flip charts is granted to Super admins (within entire system), District admins (for corresponding districts) and Facility admins (for corresponding facilities).
To update a flip chart:
-
Select Flip charts from the left-side navigation menu.
-
Find the required entry in the list.
- Click the entry to open flip chart details. The Flip chart screen opens and the current document is shown in the preview pop-up window. You can go through the document and then exit the preview mode by clicking the cross sign icon in the top right corner of the pop-up window.

- On the Flip chart screen, update all required details. Here, you can:
To change the hazard type, either select it from the drop-down list or search by typing few first letters of the hazard name in the search field.
To update the flip chart version, open the Select file tab of the form, click Choose file, select the file from your PC and click Upload.
Successful upload is confirmed by the Saved! pop-up.
Once the new document is uploaded, it is saved as the latest version of the flip chart under the Versions tab and becomes the current active document for the facility.
All versions of the flip charts are saved in the system and you can download any document by clicking its name in the Versions tab.
-
Finally, in the top bar menu of the Flip chart screen, select Save.
Selecting Ok also saves the data and directs you back to the Flip charts list.Selecting Close directs you back to the Flip charts list without saving the data.
Selecting Delete removes the entire flip chart entry and after the deletion confirmation directs you back to the Flip charts list.

Deleting flip charts
If needed, any flip chart can be deleted from MO EOP database. The permission to delete flip charts is granted to Super admins (within entire system), District admins (for corresponding districts) and Facility admins (for corresponding facilities).
To delete a flip chart:
-
Select Flip charts from the left-side navigation menu.
-
Find the required entry in the list.
- Click the entry to open flip chart details. The Flip chart screen opens and the current document is shown in the preview pop-up window. You can go through the document and then exit the preview mode by clicking the cross sign icon in the top right corner of the pop-up window.

- On the Flip chart screen, simply click Delete in the top bar menu and select OK in the pop-up confirmation window to confirm your choice.
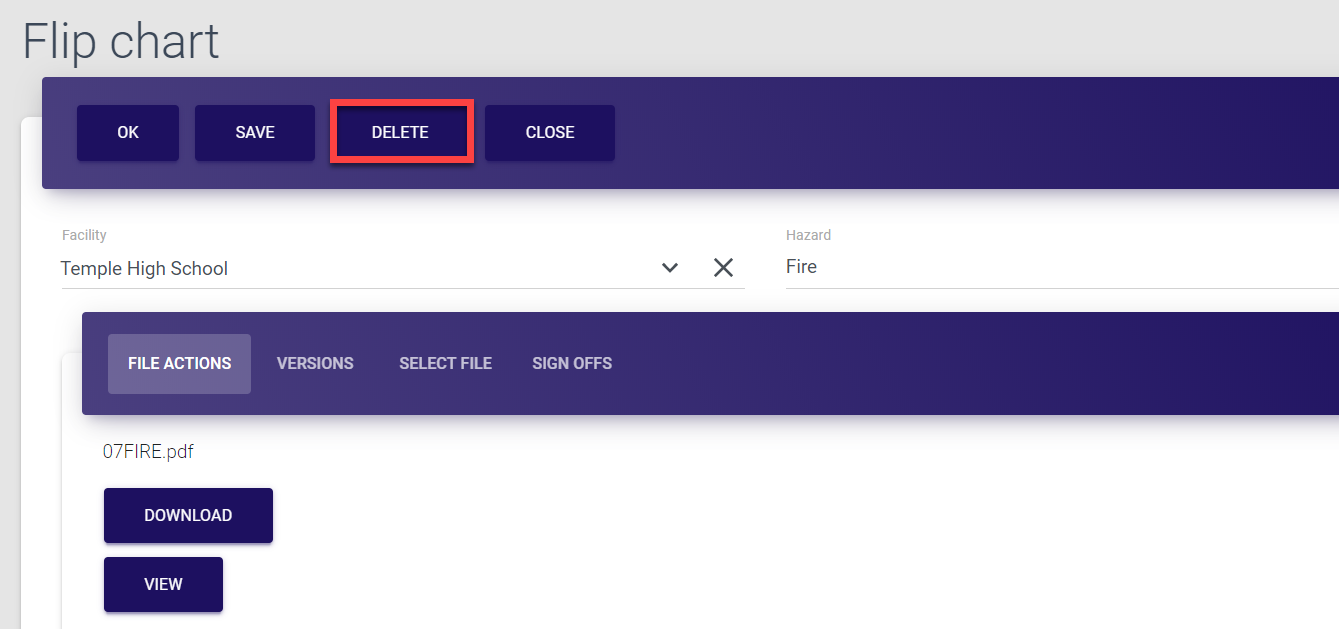
The Deleted! message is briefly displayed on the screen to confirm successful completion of the operation. The entry is now deleted and removed from the Flip charts list.
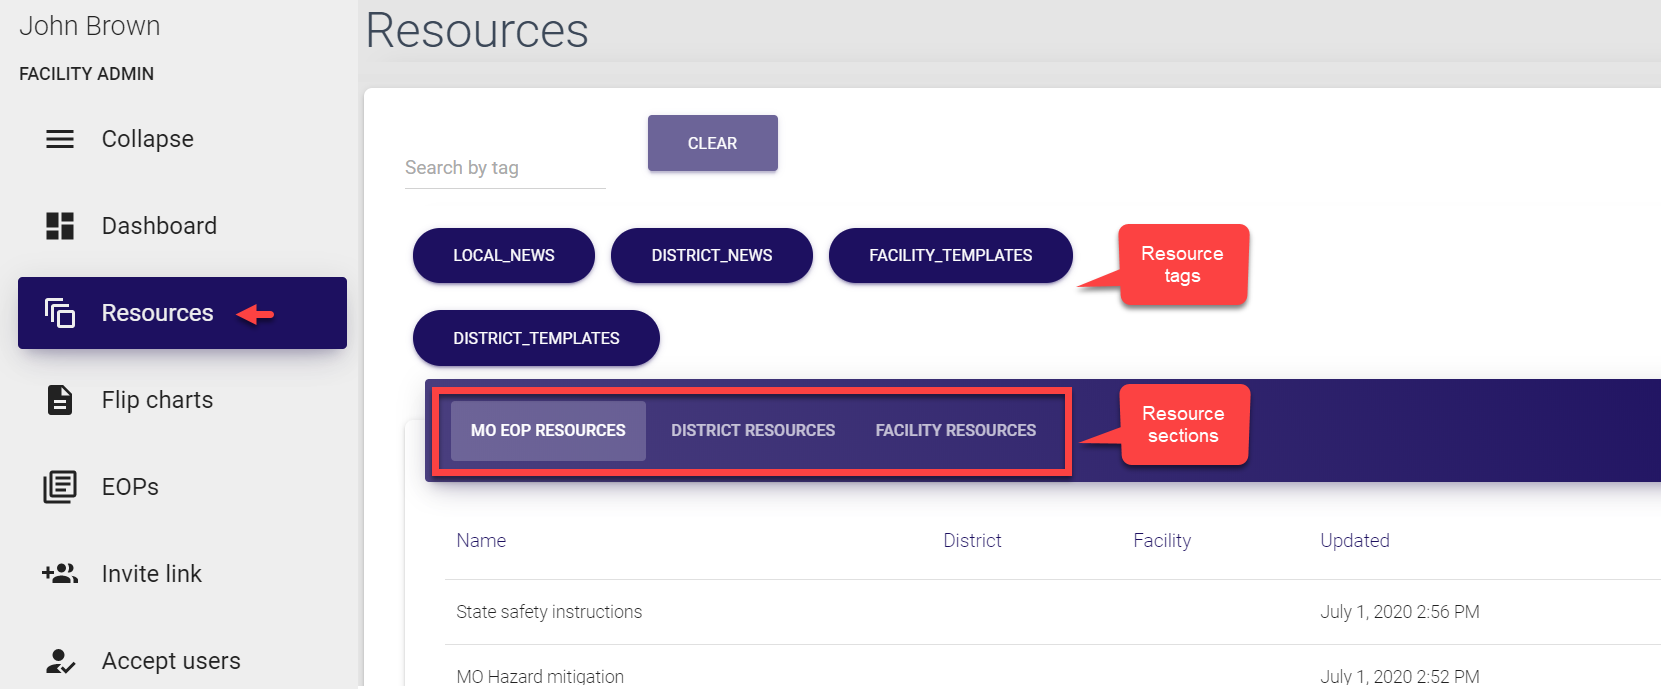
Managing resources 
As a Facility admin, you can access resources shared system-wide, within your district and within your facility. By default, resources are updated in MO EOP automatically every time a Super admin or District admin uploads data from Trisk.
All resources are subdivided into three sections:
-
MO EOP resources - resources that apply to the entire system, or any resources added without a dedicated district/facility.
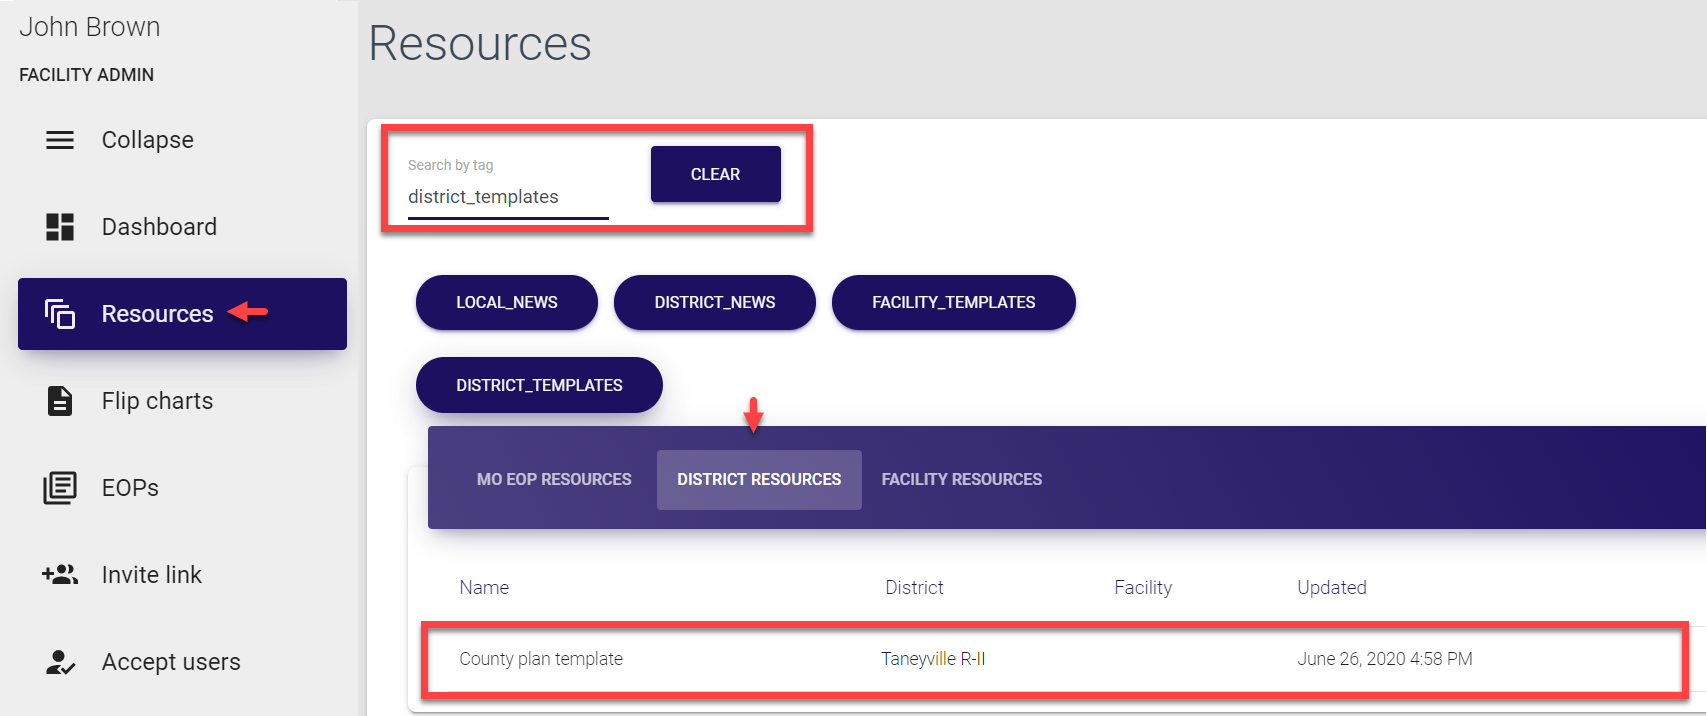
-
District resources - resources that apply to specific districts, either uploaded from Trisk or added manually via MO EOP panel.
-
Facility resources - resources that apply to specific facilities, either uploaded from Trisk or added manually via MO EOP panel.
The list of all resources is located under the Resources tab of the MO EOP navigation menu.
As a Facility admin, here you can:
Search resources
To search MO EOP, District and/or Facility resources:
-
Select Resources from the left-side navigation menu.
-
Look for a required entry using the search field at the top of the screen. Note that resources can be searched only by tags added at the time of resource creation or addition to MO EOP, district or facility.
Make sure to check all the resource sections (MO EOP resources, District resources and Facility resources) as currently, search does not fetch the results automatically on the current screen but rather keeps them on the corresponding section screen.
View/download resources
To view/download resources:
-
Select Resources from the left-side navigation menu.
-
Look for a required entry using the search field at the top of the screen. Note that resources can be searched only by tags added at the time of resource creation or addition to MO EOP, district or facility.
Make sure to check all the resource sections (MO EOP resources, District resources and Facility resources) as currently, search does not fetch the results automatically on the current screen but rather keeps them on the corresponding section screen.
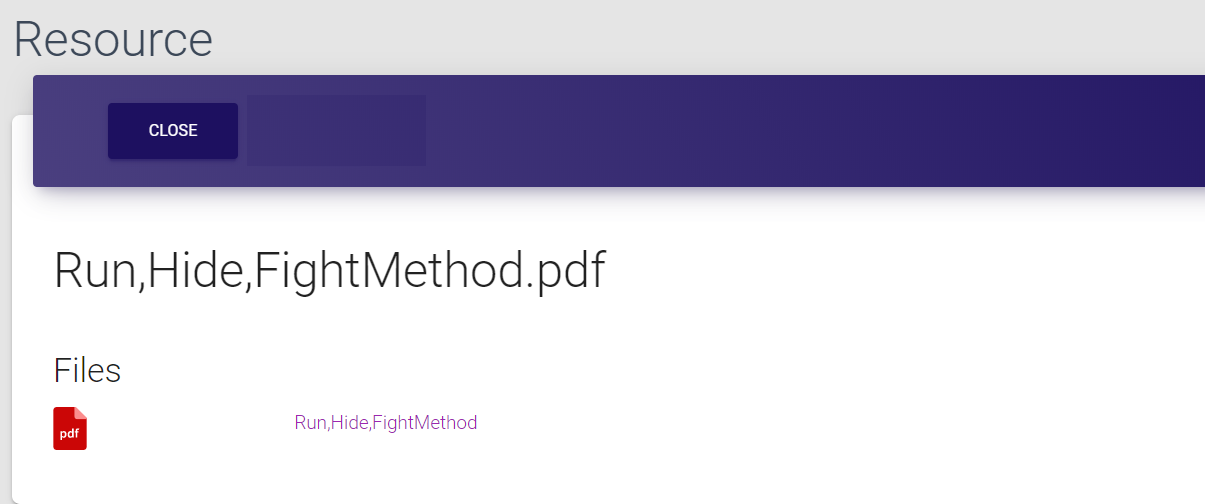
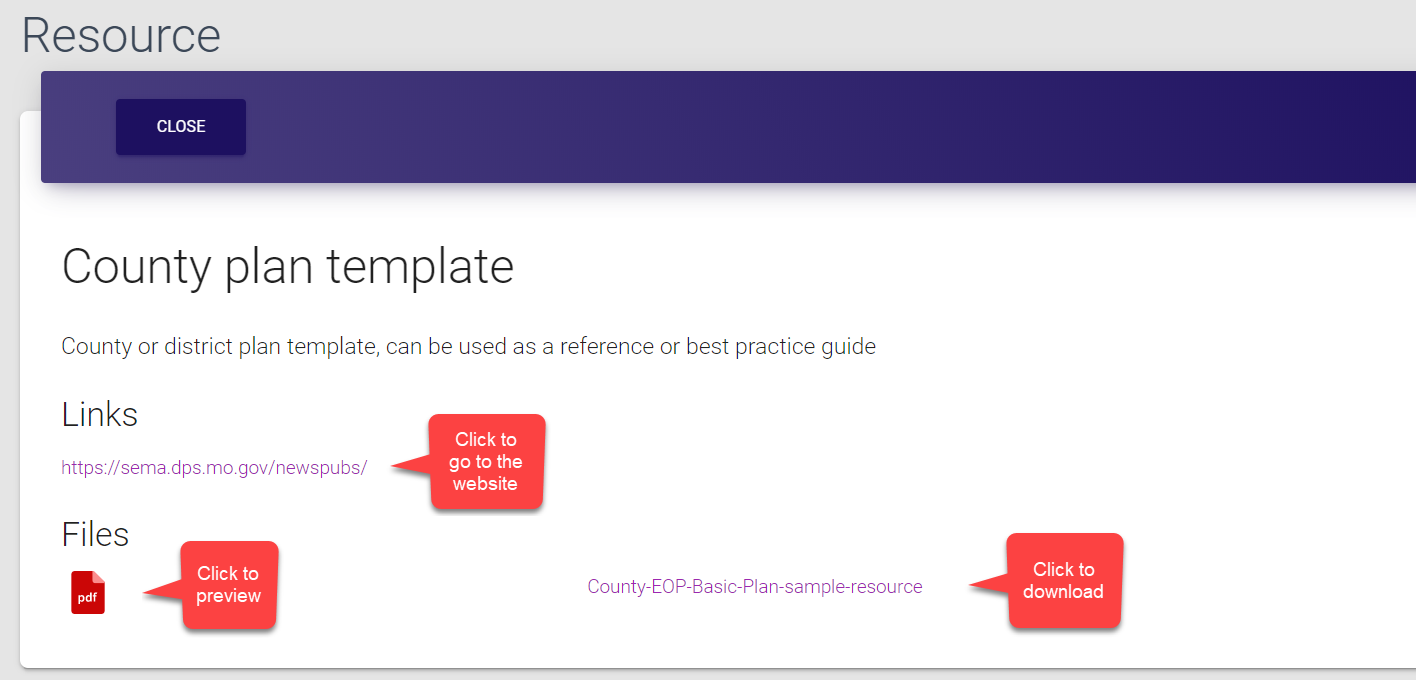
- Select the entry to open the Resource summary card. This card contains all available information about the resource, like its name, description and the list of added materials (links and files). Here, you can:
-
Open added links
-
Preview any file by clicking its icon
-
Download any file by clicking its name
-
Exit the screen and go back to the Resources list by clicking Close
Managing users 
As a Facility admin, you manage users within your facility, including:
Inviting users
New users can join MP EOP only by invitation. According to the current implementation, a user with any particular role can invite users with a lower ranking role, for example:
-
Super admins can invite District & Facility admins, Users and First respondents;
-
District admins can invite Facility admins and Users;
-
Facility admins can only invite Users.
The invites are created and shared in the Invite link section of the control panel. As a Facility admin, here you can invite Users.
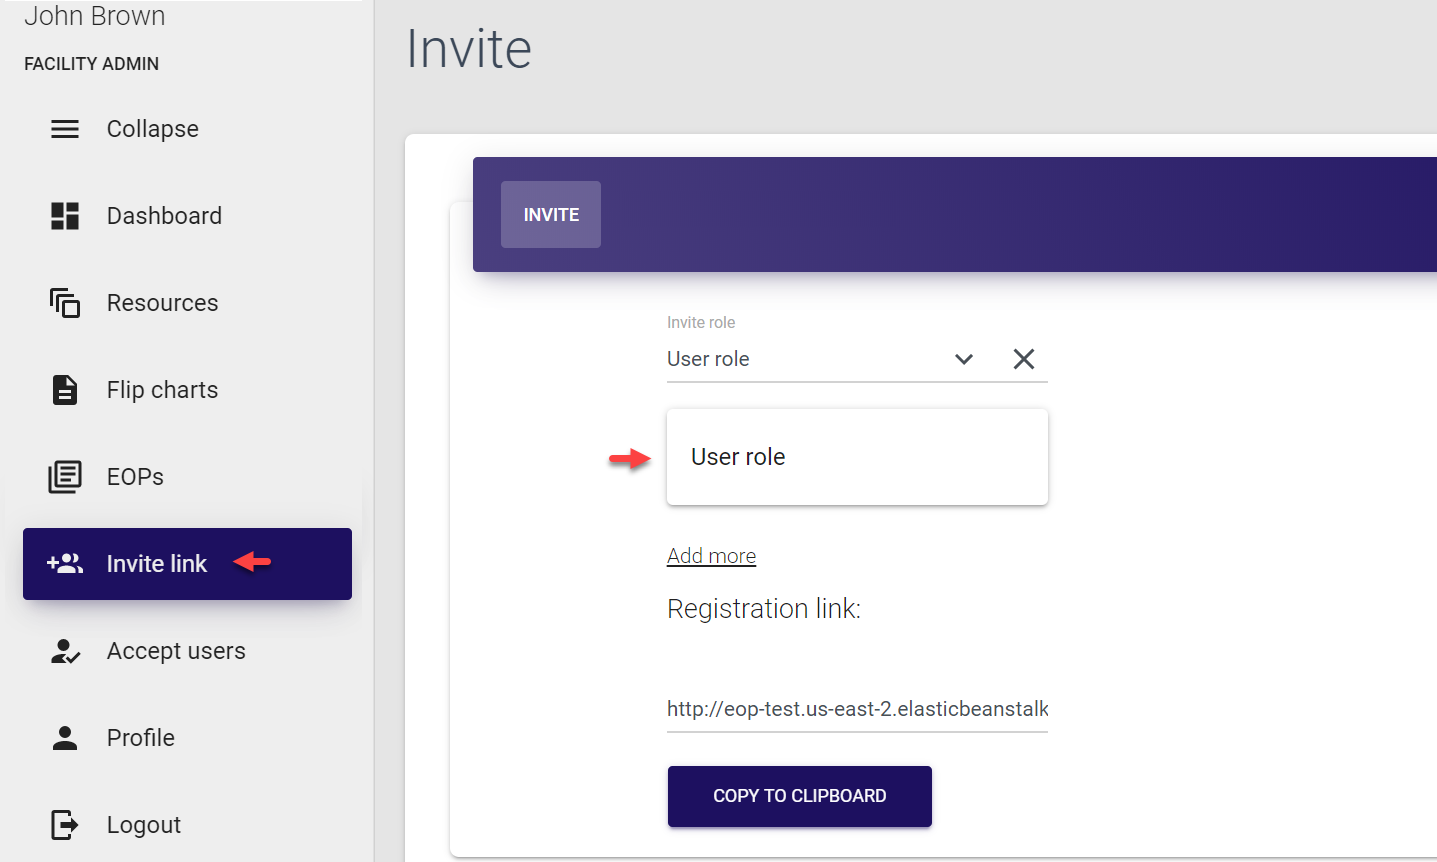
To invite an admin or a user:
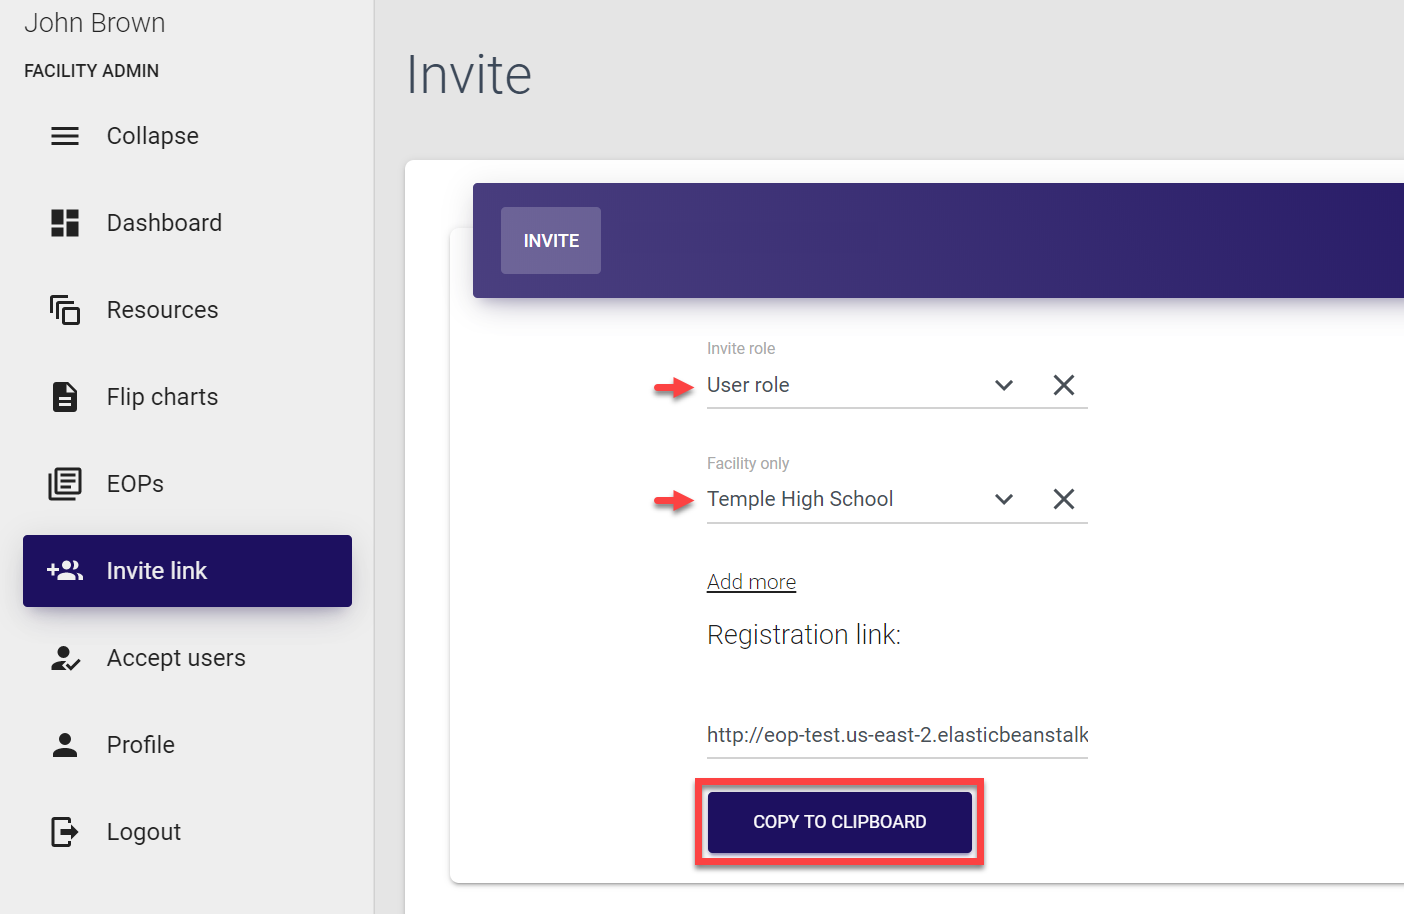
- Select Invite link in the left-side navigation menu. The required form is opened by default.
The user role and facility fields are filled automatically, as Facility admins can invite only Users and only for their own current facility.
We support multi-account registration and login, i.e. one user can be invited and registered with two or more different roles, for example, both Facility admin and User roles, or two Facility admin roles for two different facilities etc. This functionality is implemented as the Add more button and applies only to Super admins and District admins.
- The registration link is generated automatically. Simply click Copy to clipboard and share the link to invite a person using any preferred method of communication.
Accepting user requests
Each invited user joining request needs to be approved to avoid any unauthorized access. A Facility admin has permission to accept all incoming requests within their facility - from users either invited by them or by other Facility admins.
To accept user joining request:
- Select Accept users from the left-side navigation menu. Here you can see the list of all invited users within your facility, both pending and approved (with check marks against their names).
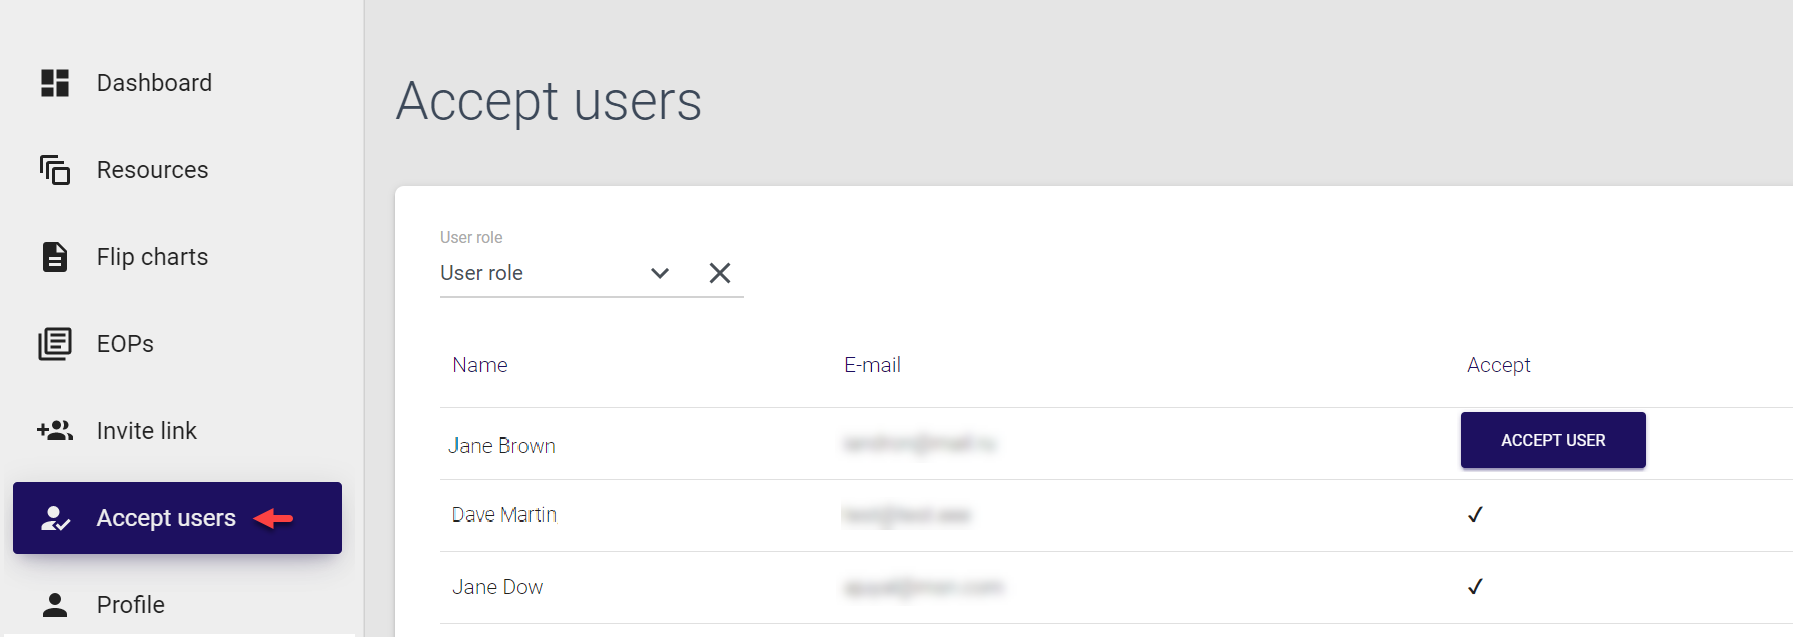
- Click Accept user against the names of the required user to approve their request and open their access to the system.
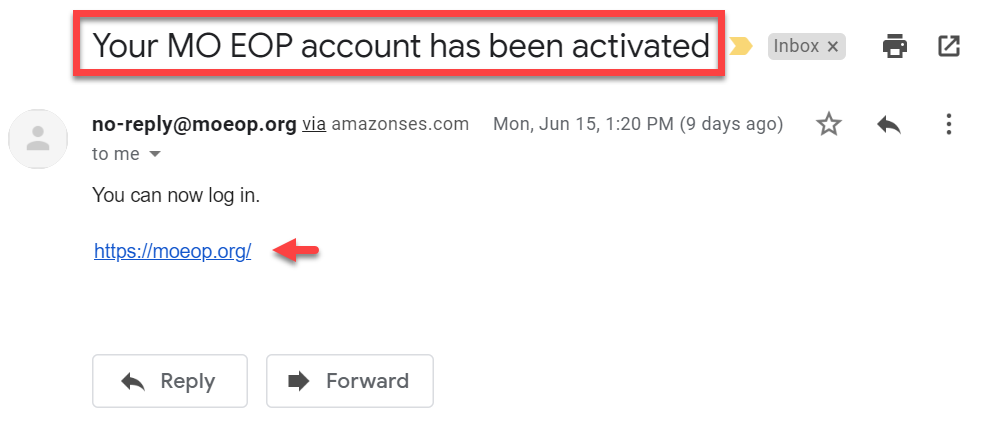
The Accept user button changes to a check mark, and the invited user receives an email about their account activation. The email contains the link that can be used to automatically log in to MO EOP.
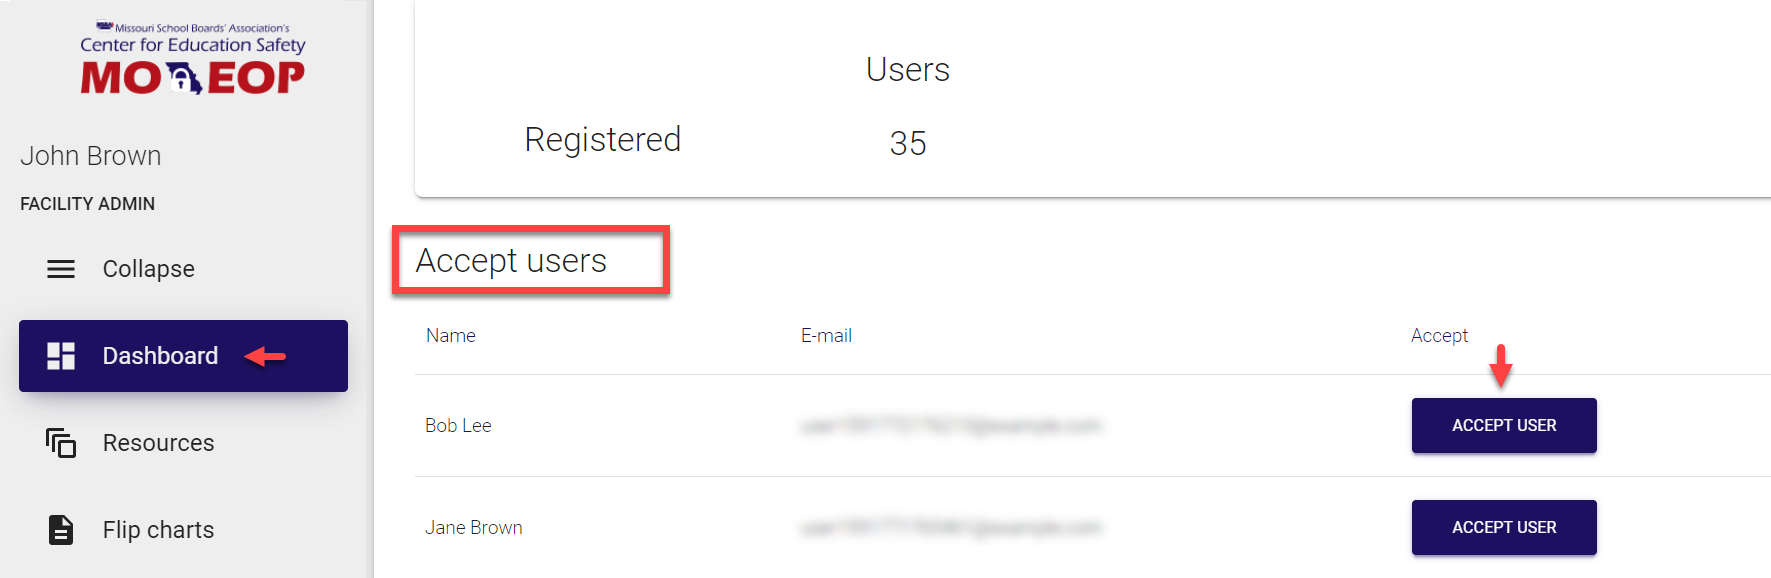
Alternatively, you can accept user joining requests directly from the MO EOP dashboard. Note that only pending requests are displayed here under the Accept users title. Simply click Accept user against the required user to activate their account, and to remove the request from the dashboard.
Glossary 
EOP
Emergency operations plan. The plan outlines emergency management structure and defines actions and roles necessary to provide a coordinated response during an emergency event. EOP provides general guidance for all levels of emergency management and applies best practices to mitigate loss of life or damage to property and reinforce continuity of operations.
Flip chart
Information board briefly describing important actions to be taken in specific types of emergencies. Such info-boards are usually printed out and placed at strategic locations on the premises to ensure that all concerned people can quickly find appropriate emergency response procedures.
Resources
Any useful additional data (besides EOPs and flip charts) can be considered as a resource. It could be any relevant general/district/facility plans or layouts, templates, state-wide, district-wide or local safety recommendations etc.
Trisk
Third-party system used in direct conjunction with MO EOP. The system requires its own login credentials and is available to Super admins and District admins. Trisk is used to develop, review and approve EOPs for specific districts and/or facilities. These EOPs are then transferred to MO EOP control panel for further area- and user-role-based management and distribution.